Are you ready to watch the show? CLICK HERE for It's Sew Easy episode 805. Enjoy!
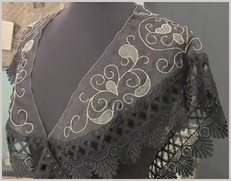
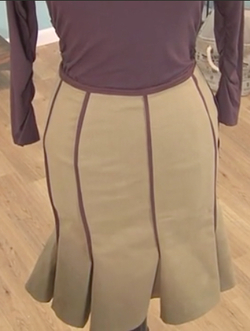
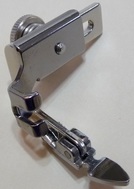
 It's Sew Easy Episode 805 explores an era full of opulence. See a stunning sheer capelet in part one and a very wearable piping trimmed skirt in part two. Lisa Shaw starts with a "doodle design" and ends with a capelet fit for a queen! Chances are you'll find this entire project highly inspiring even if you don't think you will ever create an exact duplicate. However, if you do wish to make your own version you'll find all the instructions, (and even the full size capelet pattern) available as a FREE download from itsseweasytv.com.  A close up view of the details on this eye catching accessory item reveals free motion stitching consisting of swirls, twirls, and little leaf shaped cut outs. On the show they call the black and taupe fabric layers Crepon which translates into what I call sheer polyester organza. This fabric is commonly available in the special occasion (think bridal and prom) section of big box fabric stores. See how the Brother ScanNCut is used to draw the stitching lines and also to cut the cutwork, making quick work of what would otherwise be a tedious and time-consuming task. The finished project is most certainly a showpiece garment worthy of any very special occasion.  Ready for another pattern drafting lesson from Angela Wolf? Watch this segment and learn how to slash and spread your way from a pencil slim skirt to a multi-seam gored skirt option. She'll give you more than one method for turning a straight skirt hemline into a trumpet shaped alternative. Next, she'll show step-by-step how to make piping from faux suede. Piping is one of the best ways to dress up a seam and add a coordinating or contrasting fabric color at the same time. My best tip for perfect piping is to invest in a rotary cutter, ruler, and last but not least a nifty tool called the Darr Piping Magic tool. This tool is best for making dressmaker weight piping, similar to the pre-packaged Maxi Piping by Wrights®. If you're making custom piping you want to look for size 50 cable cord to imitate this size. This cord measures approximately 1/8-inch in diameter. See the example below. I have to tell you that on the subject of piping I could easily write a page or two and I plan to do just that in the near future. For now, let me give you just a few more quick piping tips. First, if you are looking for a shortcut for cutting all that bias, consider purchasing double fold bias tape to use for your piping "fabric." Simply unfold, press, and then use to cover piping cord. This idea works well if you just need a basic solid color. The next tip is to invest in an adjustable zipper foot.  There are machine specific piping feet available and they work great but this ski-toed style is often available for most any machine both old and new. The screw at the back adjusts the foot from left to right allowing you to sew piping cord of any thickness, ready made and custom made. It's a must if you plan to use jumbo cording or experiment with a wide variety of cording in different diameters and weights. This foot also tends to be inexpensive since it's available in a generic form. Ask your favorite sewing machine dealer if they have one to fit your machine model. Are you ready to watch the show? CLICK HERE for It's Sew Easy episode 805. Enjoy!
0 Comments
Episode 804 of It's Sew Easy is all about jazzy styles from the roaring twenties. Drop waists, fringy fashions, garment details with pretty points, and long strings of pearls typified the era. A little digging into historical photos will turn up everything from the wild and crazy to the sophisticated and chic. Aside from the 20's style dropped waist, I think you'll agree that some of these fashionable features are quite trendy today. Take a glance at the beautiful blue dress pictured above and think about how it fits right in to our contemporary fashion scheme. Look at the following details:
It's amazing how fashion comes full circle but always has a different twist. In this show Angela Wolf added simple fringe to a t-shirt and Amber Eden, editor of Stitch Magazine provided a full tutorial on sewing sequined fabrics. You can watch Amber Eden's sequin segment by visiting the official It's Sew Easy TV blog. CLICK HERE to locate this video.
Episode 803 features three main techniques, little lace accents, fluffy full ruffles, and quick to cut little doll clothes. Each one is designed to show a bit of the late teens fashion era. These items would have been seen as street clothing or “unmentionables” such as petticoats and bloomers. As always, it’s interesting to think about how clothing and accessories would have been created many decades ago. Certainly the time and labor involved would have been long and tedious compared to modern methods. In this show you are sure to see modern methods made possible by machine capabilities in the 21st century. Watch how everything from yesterday gets done today . . . faster and easier!  Coleen Swettman appears first and shows lace embroidery on a layer of wash away stabilizer and polyester organza fabric. She takes the resulting little leaf designs and glues them to a headband. With an embroidery machine this project is short and simple. I have a standard recipe for making these sheer lace appliqués, which includes the following:
 In the next segment Tina Givens shows how to ruffle both with and without an attachment. It’s obvious Tina is a master at ruffling without the aid of a special attachment. Ruffles are a major accent on many of the pattern she produces. However, if you are looking for a machine accessory that makes ruffling fool proof, fast, and utterly perfect, look no further than adding a ruffle attachment to your sewing room tool kit. This awkward looking foot takes just a bit of know how to use but it's not at all intimidating once you give it a try. Every ruffler I have seen, both ancient and newfangled looks pretty much the same. Check with your favorite sewing supply store and you'll find one to fit machines both old and new, whether you have a mechanical or computerized machine. Want to explore just a bit more? CLICK HERE for my Free Ruffler Attachment tip sheet. The final piece in this show is presented by Lynn Lunoe. She’ll show you step by step how to use the Brother ScanNCut to make short work of cutting little bitty patterns for doll clothing. Yes, you are seeing more and more projects made with the aid of this electronic cutter but that’s because it is such a versatile accessory. Wondering if you would really get your money's worth from this machine? There are truly a thousand a one uses, probably more! Think about the possibilities every time you cut small and intricate pieces and wish you had a machine to do it for you. Only you can decide but remember that this cutter can scan. That means you can create original patterns from lots of sources like hand drawn or commercially available appliqué patterns, in addition to copying small items like doll patterns. With this cutter you can cut multiples really quickly. Adorable doll clothes are a fun way to use up fabric remnants and try out embellishment techniques. Plus, I’ve never heard a doll complain about her outfit! Every doll I have ever seen has a perpetual smile on her face! CLICK HERE to watch
It's Sew Easy Episode 803. Enjoy! The World at War 1910-1919 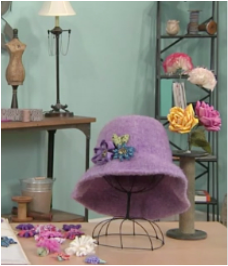 We continue this trip through fashion history with an eye towards the teen years of the 20th century. With the world at war, women drew on their innate ability to “make do”, adding decorative embellishments that could be made from small amounts of fabric. In this episode you’ll see Rebecca Kemp Brent’s modern version of frugal embellishments with bits of fabric turned into eye catching fabric flowers. Her step-by-step instructions are easy to follow and you’ll see her work at a pace that is relaxing and unhurried. She even shows a handy Clover Notions tool for flower making. Click Here to see all the flower forms made by Clover. Chances are your local sewing shop has these in stock or available to special order. You may want to watch this segment once, prepare your materials to make a flower, and then rewind and watch a second time, stitching along with Rebecca from start to finish. 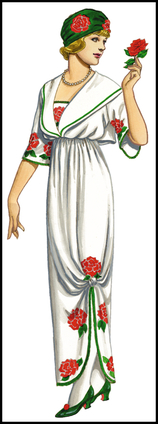 Take a look at the flowers on this 1912 ensemble by a designer named Lanvin. The dress itself was called an "at home dress." Flowers seem to be a perennial favorite for adding a splash of color or a three dimensional accent to an otherwise flat piece of fabric. Today we have the opportunity to re-create the look with appliqué, machine embroidery, or even a 3-D fabric flower like the ones Rebecca demonstrates this week. As is typical, wartime brought about the need for change. With men at war, women did work they had not previously been accustomed to doing. Practicality eventually made its way into a woman’s wardrobe. I say eventually, because at first we saw less full skirts in favor of pencil slim straight styles. However, some of these first straight skirts were slim to the point of being ridiculous and actually were called hobble skirts. It’s not hard to figure out where that name came from! This style literally forced a woman to shorten her walking stride so much, that walking was more like hobbling. Hobbling became dangerous and there were highly publicized accidents where women were injured by slim skirts that made them trip and fall. This extreme form of a slim styled skirt was then modified and became more practical with walking slits and hidden pleats for walking ease. This skirt style did signal the fact that the fussiness of previous years was on it’s way out and simpler, more practical garments were on their way in. It is interesting to note that the so called pencil skirt has remained in fashion for many decades now. Angela Wolf spins this slim style into much shorter skirts with added draping details. Watch as she demonstrates the process of draping. It's really a form of improvisational designing. With draping techniques you can feel free to scrunch, pleat, and manipulate fabric until you achieve a good looking silhouette. If you’re not happy you simply start over. As Angela recommends, using muslin for this process means you don’t cut real fabric until you have your pattern all worked out on the dress form. This type of design work is often used by big name designers and for some intricate styles it’s the only way to achieve a finished fashion pattern. Personally I prefer designing on paper but it’s always fun to watch a master draper at work, sculpting yards of fabric into a final, fashionable form. Click Here to watch this week's line episode of It's Sew Easy. Enjoy all the historical photos and try to pick out at least one small detail you can incorporate into your own contemporary sewing projects.
|
Welcome!
Each week at noon a new show airs online at itsseweasytv.com. This blog features a preview of each weekly show. Author:Joanne Banko Archives
March 2021
As a believer in full disclosure, I'd like you to know that Blog posts may contain affiliate links for products and services I know and trust. Purchasing items through a link marked * results in a small commission for me, with no extra charges for you.
Shop popular online retailers via EBATES and you will receive cash back rebates on all your purchases. I have personally used Ebates for for several years and receive a small referral fee if you click the button below.
|
|
© Copyright 2023 by Joanne Banko. All rights Reserved
|