letsgosew.com
  • Home
  • Contact
  • Privacy Policy
  • Sign Up for Sewing News, Freebies, & Updates
  • Order Just Jackets Embroidery Collection
  • Just Jackets FAQ
  • Order Wrapped in Embroidery Book by Joanne Banko
  • Joanne Banko's Blog
  • It's Sew Easy TV Online Blog
  • Machine Embroidery Survey
  • IT'S SEW EASY TV Videos & Bonus Files
    • NEW! It's Sew Easy TV Series 2100
    • It's Sew Easy TV_Series 2000
    • It's Sew Easy TV_Series 1500
    • It's Sew Easy TV - Series 1600
    • It's Sew Easy TV_Series 1700
    • It's Sew Easy TV Series 1800
    • It's Sew Easy TV Series 1900
    • NEW! Superstar Sewing Stitches
    • NEW! Classy Textured Cape
    • NEW! Baby Bath Wrap
    • NEW! Detachable Collar
    • Sew a Swimsuit
    • Machine Embroidered Garments
    • Kimono Blouses
    • Custom Covered Hangers
    • Sewing Beautiful Belts
    • Felted Flower Hat Trim
    • Sew a Waffle Weave Robe
    • Learn about Couching accessories!
    • Turn a Pashmina into a Trendy Topper
    • Machine Embroidered Reverse Applique
    • Machine Embroidered Knit Dress
    • Use Non-Stick Foot to sew a Custom Luggage Tag
    • Serge & Sew Broomstick Skirt
    • Machine Embroidered Western Jacket
    • Machine Embroidered Bobbin Work Pashmina
    • Embroidered Pajamas
    • Sewing Pearls and Sequins
    • Learn how to use the Fringe Foot
    • Quilted Pinwheel Patchwork Tote
    • Machine Embroidered Lace for Lingerie
    • Sewing Circles with a Circular Attachment
    • Sew with the Edge Joining Foot
    • Re-style Tops for Little Girls
    • Short Style Tip- Blouse Embellishment
    • Learn how to make pretty piping using the Piping Foot
    • Embellish with the Three Slot Cording Foot
    • Facebook Live Interview 12-4-2018
    • Machine Embroidery - Starter Tips
  • FREE Tutorials and Tip Sheets
    • NEW! Embroidery Placement Positioning Tips
    • Free Embroidered Snowflake Coasters
    • Tip sheet - 5 Reasons Quilters Need A Serger
    • Free In-the-Hoop Patch Pocket Design
    • Serging versus Sewing
    • FREE Project-Embroidered Gift Tag with Gift Bag
    • Tip Sheet - Pillow Pointers
    • Tip sheet_Sew Straight Laser for Seams
    • Embelishment Tips from dime V.111
    • Tip sheet - Shannon Embrace Double Gauze
    • Tip sheet - Fun with Fonts
    • Fabric Tip Sheet- Sewing Faux Suede
    • Tip sheet for Sewing & Embroidering with Metallic Thread
    • Fleece Ruana Pattern: As seen on PBS It's Sew Easy TV
    • Fabric Tip Sheet - Crepe Back Satin
    • Fabric Tip Sheet-Sewing Slinky Type Knit
    • Fabric Tip Sheet - Fleece
    • Fancy Footwork Tipsheet - About the Walking Foot
    • Fancy Footwork Tip Sheet_Basic Appliqué
    • Fancy Footwork Tip sheet - Ruffler Attachment
    • Fancy Footwork Tip Sheet - Narrow Hems with a Standard Foot
    • Fancy Footwork Tip Sheet - Non Stick Foot
    • Tip sheet - Machine Embroidery Pattern Connection Resources
    • Tip Sheet - Machine Set up for Shirring
    • Tip sheet - Snowman and Target Markers
    • Tip Sheet for Printing on Fabric
    • Tip sheet-Five Ways to Finish Fleece Blankets
    • T-Shirt Transformation Tutorial
    • Project- Serge a Little Girl's Sweet Summer Dress
    • Tip Sheet for Fleece Frame Shape Appliqué
    • Tip Sheet - Bobbin Work Sewing & Embroidery
    • Tip Sheet - Custom Covered Buttons
    • Tip Sheet - Liquid Stabilizers
    • Tip sheet - Appliqué with Brother XV8500D & ScanNCut
    • Project - Sheer Chiffon Wrap
    • Project - Pearl Trimmed Candle Ring
    • Tip Sheet -Mitered Satin Blanket Binding
    • Fabric Tip Sheet_Knit Know How
    • Tool School Tip Sheets
    • ITH Project Planner
  • As seen in DiME Magazine - Photo Gallery
  • Sewing and Embroidery Events
  • About Joanne Banko
  • What's New? Let's Get Creative Club Meetings
  • November Pinecone Project

EPISODE 810 - MORE FIFTIES STYLE IDEAS THAT YOU WILL WANT TO WEAR TODAY

8/28/2015

0 Comments

 
Picture
If you would like to read my previous post for this episode you can CLICK HERE. You can watch o this show from noon on August 28th until noon on September 4th. 


I invite you to read my quick buttonhole tips below and then CLICK HERE to watch It's Sew Easy Episode 810.

The garments on this show have one thing in common . . . a closure with buttonholes. Does the very thought of making a buttonhole strike fear into your normally fearless sewing self??? I understand and I can relate to that shaky feeling. After all, buttonholes are usually the very last thing you add to a garment that you’ve worked so hard to complete. Let me help ease your apprehension by offering a few helpful tips.
  • Always, always, always, make a test sample using the exact same conditions you will have for your final fashion buttonholes.  Do yourself a favor and work up a sample piece with identical elements to practice on. If this means you’ll encounter the bulk of a seam then you’ll want to make a sample that mimics that same situation. Remember to properly grade seam allowances and then thoroughly press to eliminate as much bulk as possible. 
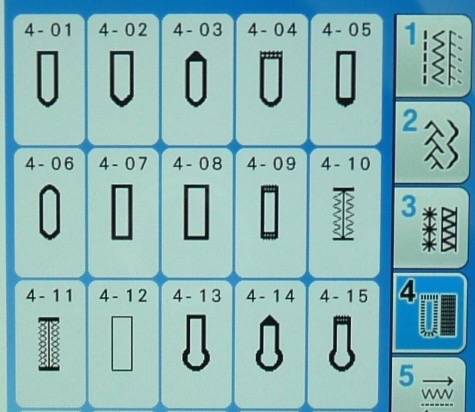
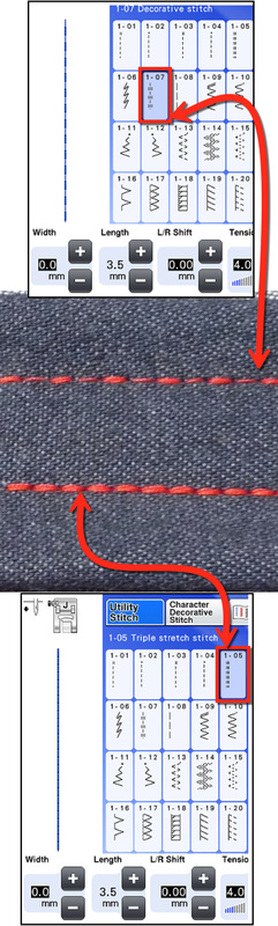
  • Try out different buttonhole styles and settings. Depending on your machine you may have many to choose from. I suggest making a sample of each buttonhole available on your machine to use for future reference. Generally, I like round-ended buttonholes for blouses, and keyhole style buttonholes for shank style buttons. But those are just traditional choices, feel free to break the rules. If the final button hole looks good with your button on your garment that’s all that counts!
Picture
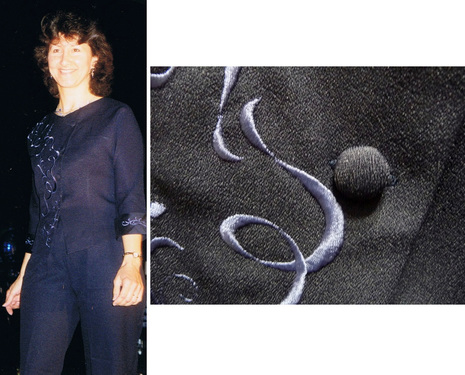
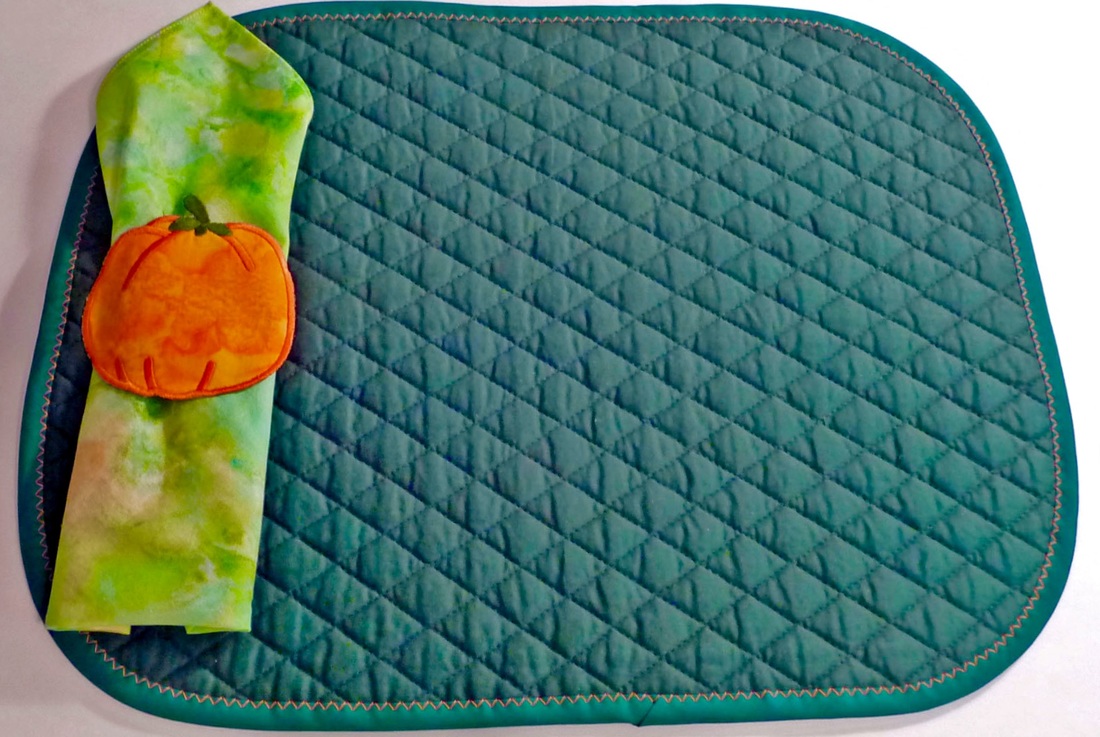
  • Plan to stitch your buttonholes when you are at your best, mentally and physically. Strive for uninterrupted quiet time so you can thoroughly concentrate. Once I made a garment that took many hours of embroidery to complete. When it came time to sew the buttonholes I got up very early (early for me anyway) and stitched them in the quiet of the day. I think even the cat was still asleep that morning! I know it’s a little tough to see the results in the pictures below but trust me this outfit has been photographed professionally and used in advertising materials. These carefully crafted buttonholes are worthy of the attention. This was and continues to be one of my favorite embroidered outfits.
Picture
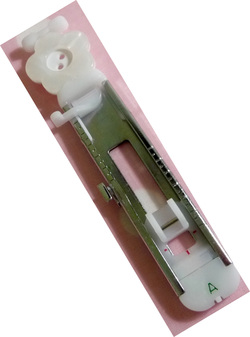
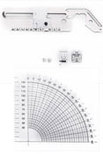
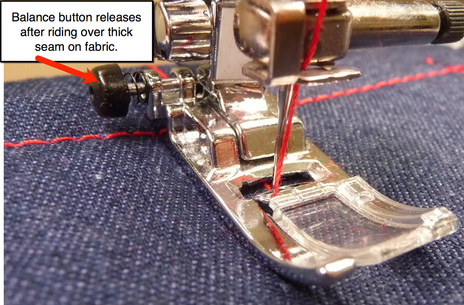
  • I can’t say enough about the virtues of a One-Step buttonhole attachment like the one you see below. It will even accommodate many shank style and novelty buttons. This is a common accessory for many machines. It's   worth upgrading for if you intend to sew many buttonholes and your current machine is without this modern day feature. Visit your local sewing machine dealer for a demonstration of this little beauty. It can be found on many machines. You're sure to find one that fits your budget.
Picture
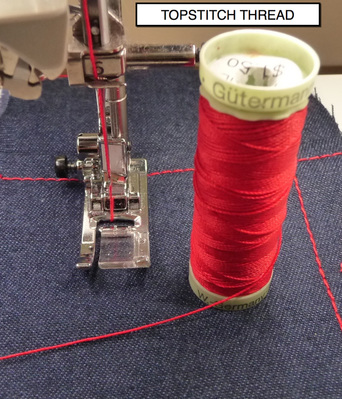
  • Try using machine embroidery thread in place of ordinary sewing thread for you next buttonhole. This type of thread comes in so many colors and it's thin, smooth and has a beautiful sheen. I think this type of thread imitates silk and that is what a tailor would use to make a hand worked buttonhole. I use this type of thread exclusively for every buttonhole I make on a garment. 
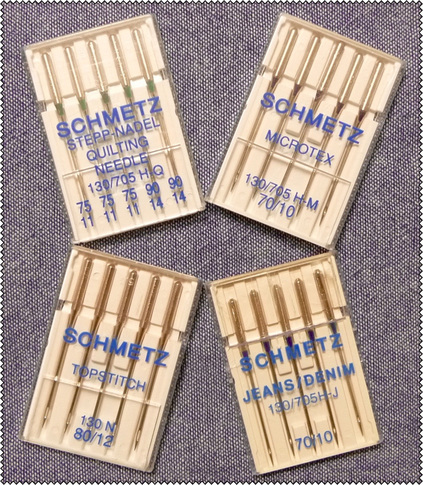
  • Select a needle that compliments your fabric. In fact, this may be the best time to change the needle and start fresh. If you have used the same needle throughout the construction of the agreement it is probably due for replacement. Make a note when you remove the needle telling yourself that it is new and you'll be set for the next garment you make. One more note on needles, my philosophy is "when in doubt - throw it out!"
Picture
  • Most items with buttonholes will have interfacing sandwiched in the layers. Consider adding a removable stabilizer to beef up the fabric temporarily while you stitch the buttonhole.
  • If your fabric is compatible with a seam sealant such as Fray Check, use it to seal the buttonholes before you cut them open. Let dry. Then, seal again if necessary after cutting the buttonhole. Be very careful when cutting; use a sharp seam ripper or a special buttonhole cutting tool.
Watch for a tip sheet with more photos and step-by-step buttonhole basics coming soon!
0 Comments

FASHIONS FROM THE FIFTIES INSPIRE DRESSES AND SWEATERS TO WEAR TODAY - IT'S SEW EASY EPISODE 809

8/21/2015

0 Comments

 
Picture
You'll see some fun photos from the 1950's at the beginning of this episode. Full skirts, bobby socks, and ponytail up-do's ruled the day for the younger generation. 

Many women and men too, were seen sporting cardigan sweaters. In show #809 full skirts and cardigans are the main focus. I think you'll agree that the guest instructors on this show feature versions that could easily be worn today.
If you would like to read my previous post for this episode you can CLICK HERE. Among other things, you'll find tips for using a Narrow Hem Foot. This good old-fashioned foot has been around forever. Master the use of this foot and you will find yourself using it often for a neat finish when hemming lightweight fabrics. Here is a link for a project that features basic use of this foot:
Napkin Project with Narrow Hem
Picture
In my humble opinion the narrowest of the narrow hem feet is best for straight or just slightly curved edges. A standard narrow hem foot rolls a hem that finishes at a width of approximately 1/8-inch, or 3mm.  
Below you'll find a video that shows this foot in action. I just found this recently and amazingly it shows the same method I've used for years to get the roll of the hem started.
If you can find a foot for your machine that has a wider slot I highly encourage you to experiment with this "more forgiving" style foot. A narrow hem foot that rolls a width of approximately 1/4-inch will work on a wider variety of fabrics and it's just plain easier to master. Check with your local sewing machine dealer for alternative options. It is likely that you have choices beyond the feet that are branded by your particular machine manufacturer. In other words some feet made for other brands may also fit your particular model. There may even be generic style feet to choose from. I suggest taking your machine to the shop if possible. Then you can try on various feet just like you would try on shoes in a department store. If the presser foot fits, take it home and sew with it. It's that simple!
CLICK HERE to watch episode 809.
0 Comments

SWIRLING RUFFLES AND TRENDY CROP PANTS - It's Sew Easy Episode 808

8/15/2015

1 Comment

 
Picture
This episode is timed just right for late summer and early fall garment sewing projects. You'll see good looking knit tops and trendy crop pants. Make one of each and you'll be set to span the seasons!

Picture

Learn all about circular ruffles in the first segment. 
Soon you'll be creating your own twirling swirls of fabric for blouses, skirts, and more! 


Ruffles made from circles don't have the bulk of those created with traditional gathering or ruffler attachment methods. 

Picture
Did you know you can use a circular sewing attachment to make this type of ruffle? There are some limitations in size as far as the depth of the ruffle but you can sew the circles together to construct a ruffle with additional length. I highly recommend visiting your local Brother Sewing machine shop for a demonstration of this wonderful gadget. 

You can CLICK HERE to see a current home decor project made with the Brother Circular Sewing Attachment. The ruffles on this towel set are hemmed using bias binding. I like using this method because circular raw edges can be tricky to turn and fold under for an even hem. 
Picture
On lightweight fabrics I often rely on the rolled hem stitch on the serger. By placing wooly nylon in the upper looper you can shorten the stitch length and get good coverage on the raw edge. The idea you see on this towel set could be translated to other home decor projects such as pillows and curtains. The circular attachment is a great way to make ruffles for dolls and children clothing.
My previous post includes lots more tips and ideas. Just CLICK HERE to read the post for show #808. Then, CLICK HERE to watch the show online from August 14th to August 21.
1 Comment

MILITARY FASHION AND A CLASSIC CLUTCH PURSE- IT'S SEW EASY EPISODE 807

8/8/2015

0 Comments

 
Picture
The theme is 1940's fashions and popular accessories from the early 1940's era. In this episode Angela shares some great ideas for details on a jacket with military influence. Lisa embroiders a clutch purse and shows you how to match two embroidered rectangles for a big beautiful purse design. To read my previous post for this episode CLICK HERE.
Picture


Military makes me think of epaulettes, pocket flaps, and shiny brass buttons. Take a close look at military uniforms and you'll see that topstitching tames the stiff fabric, accents the solid color of a uniform and adds an element of  style to an otherwise plain and utilitarian looking garment. 

Let me share a few tips for top notch topstitching:


Picture
  • ALWAYS use a sharp needle on woven fabrics. What's a sharp needle? Quilting, Microtex, Jeans, and Topstitching needles all have a super sharp or modified sharp point and come in a variety of sizes. The size of the needle blade, tip, eye and groove varies with each of these needles. To simplify the difference, just remember that Microtex and Quilting needles are finer and a bit more delicate, while Jeans needles and Topstitch needles are thicker and stronger. Choose the needle type and size that's compatible with your fabric. CLICK HERE to download the Schmetz Pocket Guide for sewing machine needles.
Picture
Picture
  • Special topstitching thread is thicker than standard thread and designed for use in the sewing machine. This thread should only be used with topstitching needles as these needles have an eye and a groove to accommodate the extra thickness. A size 14 Topstitch needle is a good all purpose size. 
  • NEVER use topstitch thread in your standard bobbin case. Instead, use regular thread that closely matches the color of your top thread. You may need to tighten your upper tension slightly when sewing with this thicker thread. 
Be aware that some machines are "fussy" and won't tolerate thicker thread. In this case you can use regular sewing thread and opt for a stitch that sews on top of itself and thus creates a bolder looking stitch. See two examples below:
Picture
  • Lengthen your stitch slightly when topstitching. I like a setting anywhere between 3-4 mm.
  • Use a flat presser foot for maximum contact between the fabric and the feed dogs. If you have a balancing button on your foot you can lock it in place whenever you are beginning at a bulky spot or crossing over a previously sewn thick seam.
Picture
Picture
Now that you have read some tips for topstitching are you ready to watch the show? CLICK HERE to watch episode 807 online.
0 Comments
    Welcome!
    ​
    E
    ach week at noon a new show airs online at itsseweasytv.com.
    This blog features a preview of each weekly show.
    Picture

    Author:​

    Joanne Banko
    Brother Ambassador

    Inspiring Sewing Enthusiasts to make the most of their machines!

    ​
    Click Here to Sign up for Sewing News, & updates about FREE Tip Sheets and FREE Project downloads.

    Archives

    March 2021
    December 2020
    November 2020
    October 2020
    September 2020
    August 2020
    July 2020
    June 2020
    December 2019
    November 2019
    October 2019
    September 2019
    June 2019
    May 2019
    April 2019
    March 2019
    December 2018
    November 2018
    October 2018
    September 2018
    June 2018
    May 2018
    April 2018
    March 2018
    December 2017
    November 2017
    October 2017
    September 2017
    June 2017
    May 2017
    April 2017
    March 2017
    December 2016
    November 2016
    October 2016
    September 2016
    June 2016
    May 2016
    April 2016
    March 2016
    November 2015
    October 2015
    September 2015
    August 2015
    July 2015
    June 2015
    May 2015
    April 2015
    March 2015
    February 2015
    March 2014
    February 2014

    As a believer in full disclosure, I'd like you to know that Blog posts may contain affiliate links for products and services I know and trust. Purchasing items through a link marked * results in a small commission for me, with no extra charges for you.
    Shop popular online retailers via EBATES and you will receive cash back rebates on all your purchases. I have personally used Ebates for  for several years and receive a small referral fee if you click the button below.
    Ebates Coupons and Cash Back

    RSS Feed

© Copyright 2022 by Joanne Banko. All rights Reserved