letsgosew.com
  • Home
  • Contact
  • Privacy Policy
  • Sign Up for Sewing News, Freebies, & Updates
  • Order Just Jackets Embroidery Collection
  • Just Jackets FAQ
  • Order Wrapped in Embroidery Book by Joanne Banko
  • Joanne Banko's Blog
  • It's Sew Easy TV Online Blog
  • Machine Embroidery Survey
  • IT'S SEW EASY TV Videos & Bonus Files
    • NEW! It's Sew Easy TV Series 2100
    • It's Sew Easy TV_Series 2000
    • It's Sew Easy TV_Series 1500
    • It's Sew Easy TV - Series 1600
    • It's Sew Easy TV_Series 1700
    • It's Sew Easy TV Series 1800
    • It's Sew Easy TV Series 1900
    • NEW! Superstar Sewing Stitches
    • NEW! Classy Textured Cape
    • NEW! Baby Bath Wrap
    • NEW! Detachable Collar
    • Sew a Swimsuit
    • Machine Embroidered Garments
    • Kimono Blouses
    • Custom Covered Hangers
    • Sewing Beautiful Belts
    • Felted Flower Hat Trim
    • Sew a Waffle Weave Robe
    • Learn about Couching accessories!
    • Turn a Pashmina into a Trendy Topper
    • Machine Embroidered Reverse Applique
    • Machine Embroidered Knit Dress
    • Use Non-Stick Foot to sew a Custom Luggage Tag
    • Serge & Sew Broomstick Skirt
    • Machine Embroidered Western Jacket
    • Machine Embroidered Bobbin Work Pashmina
    • Embroidered Pajamas
    • Sewing Pearls and Sequins
    • Learn how to use the Fringe Foot
    • Quilted Pinwheel Patchwork Tote
    • Machine Embroidered Lace for Lingerie
    • Sewing Circles with a Circular Attachment
    • Sew with the Edge Joining Foot
    • Re-style Tops for Little Girls
    • Short Style Tip- Blouse Embellishment
    • Learn how to make pretty piping using the Piping Foot
    • Embellish with the Three Slot Cording Foot
    • Facebook Live Interview 12-4-2018
    • Machine Embroidery - Starter Tips
  • FREE Tutorials and Tip Sheets
    • NEW! Embroidery Placement Positioning Tips
    • Free Embroidered Snowflake Coasters
    • Tip sheet - 5 Reasons Quilters Need A Serger
    • Free In-the-Hoop Patch Pocket Design
    • Serging versus Sewing
    • FREE Project-Embroidered Gift Tag with Gift Bag
    • Tip Sheet - Pillow Pointers
    • Tip sheet_Sew Straight Laser for Seams
    • Embelishment Tips from dime V.111
    • Tip sheet - Shannon Embrace Double Gauze
    • Tip sheet - Fun with Fonts
    • Fabric Tip Sheet- Sewing Faux Suede
    • Tip sheet for Sewing & Embroidering with Metallic Thread
    • Fleece Ruana Pattern: As seen on PBS It's Sew Easy TV
    • Fabric Tip Sheet - Crepe Back Satin
    • Fabric Tip Sheet-Sewing Slinky Type Knit
    • Fabric Tip Sheet - Fleece
    • Fancy Footwork Tipsheet - About the Walking Foot
    • Fancy Footwork Tip Sheet_Basic Appliqué
    • Fancy Footwork Tip sheet - Ruffler Attachment
    • Fancy Footwork Tip Sheet - Narrow Hems with a Standard Foot
    • Fancy Footwork Tip Sheet - Non Stick Foot
    • Tip sheet - Machine Embroidery Pattern Connection Resources
    • Tip Sheet - Machine Set up for Shirring
    • Tip sheet - Snowman and Target Markers
    • Tip Sheet for Printing on Fabric
    • Tip sheet-Five Ways to Finish Fleece Blankets
    • T-Shirt Transformation Tutorial
    • Project- Serge a Little Girl's Sweet Summer Dress
    • Tip Sheet for Fleece Frame Shape Appliqué
    • Tip Sheet - Bobbin Work Sewing & Embroidery
    • Tip Sheet - Custom Covered Buttons
    • Tip Sheet - Liquid Stabilizers
    • Tip sheet - Appliqué with Brother XV8500D & ScanNCut
    • Project - Sheer Chiffon Wrap
    • Project - Pearl Trimmed Candle Ring
    • Tip Sheet -Mitered Satin Blanket Binding
    • Fabric Tip Sheet_Knit Know How
    • Tool School Tip Sheets
    • ITH Project Planner
  • As seen in DiME Magazine - Photo Gallery
  • Sewing and Embroidery Events
  • About Joanne Banko

Tips for Creative Quilting with Decorative Stitches

2/28/2018

6 Comments

 
One hundred days and one hundred ways - Day 4
Picture
This post deals specifically with the topic of quilting with decorative stitches and the walking foot. Let's start with a brief description of the Walking Foot, also known as the Even Feed foot.

The walking foot is a foot with a special feeding system built right into the mechanics of the foot. With an upper set of teeth coming from the walking foot itself, and a lower set of teeth on the machine, the layers under the foot feed evenly as the teeth link together and walk the layers through the machine. Therefore, it makes perfect sense that this foot is also known as an EVEN FEED FOOT.

​You can see close-up photos of the teeth on the machine and on the foot itself below:
Picture
Picture
Many machines have the option of a walking foot in two different forms, Closed Toe and Open Toe.
Picture
Closed Toe Walking Foot on the left. Open Toe Walking Foot on the right.
CLICK HERE to read my complete tip sheet on the Wonders of the Walking Foot.
Traditional quilting with the waking foot is done with a straight stitch and the walking action is ideal for keeping the fabric layers of a quilt sandwich smooth. The walking foot is engineered for FORWARD MOTION stitches such as straight and zig zag. If the feed dogs move backwards they may cause the fabric to shift, as feed dogs do not move backward as efficiently as they do forward. Think of it this way, your car will drive in reverse, but it is designed to move forward. Ever try to drive backward very far? It is much easier to drive forward and it is easiest to drive straight. It is similar with the walking foot. But what about using decorative stitches with the walking foot?

There are many options for using decorative stitches on a quilt. Proper set-up and a bit of experimentation is the key to exploring options for decorative stitching on a quilt. Read the following tips, and test stitches that are relatively open in their form and design. 

Examples Of Stitch Possibilities For Quilting With A Walking Foot
(Test stitches that resemble those pictured below.)
Picture
Tips for preparing and stitching a quilt with decorative stitches:
  • Begin with quality needles and thread. The smoother the thread, the prettier the stitch will be. A sharp needle such as a quilting needle (11-14) or a jeans needle (12-14), work well with cotton threads. A sharp needle pierces the fabric cleanly and evenly.
  • Set machine for a slow, even speed. It will take longer to stitch from end to end but that’s okay, relax and enjoy the process.
  • Use batting that is thin and firm. Warm and Natural is a good choice. Flannel is also a good substitute when you want to use decorative stitches. Be sure to wash and dry the flannel and make sure it is throughly pre-shrunk.
  • Unless the quilt is very small you'll need to baste before stitching. Here are a few methods.
1.) Hand baste or machine baste with traditional thread, or water soluble thread if the quilt will be washed when completed.
2.) Use fusible basting spray. 
3.) Pin baste with long, flat pins such as flower head pins, OR quilter's safety pins.

  • Make sure your entire quilt is supported by quilting in a table or cabinet with an insert, or by using a machine specific extension table. If the quilt falls away from the surface while you are quilting, the weight will drag the quilt down and possibly cause distortion of the stitches. Do WHATEVER you need to do to fully support the entire quilt. This is true even if your quilt is the size of a wall hanging.
  • It is easier if you select stitches that do not exceed the 7mm width of the throat plate. Some of the wider (multi directional) decorative stitches will work but they require more practice to sew. It can be difficult to stay straight for lengthy sections with these super wide stitches. 
  • You may get the better results by setting presser foot pressure slightly less than standard.
  • Consider using a water soluble "fibrous" stabilizer to further “beef up” the fabric for decorative stitches to form properly. Another good water-soluble stabilizer is sold in a liquid form. The brand name is Perfect Sew®. 
  • Experiment with increasing stitch length and width to allow the stitch to flow more freely across the fabric.
  • Be careful when crossing seams. You may need to stop when you reach the seam, lift the presser foot to smooth the fabric, and then start again, making sure the foot lays flat on the fabric layers.
Each and every project is a different combination of fabric, thread, batting, speed of the machine, mood of the operator, etc., etc., etc., you get the picture! To test is best! Always test using the same combination of ingredients you will use in your quilt. Also, test with relatively long pieces. A four inch piece does not behave in the same manner as your finished quilt is likely to. When your chosen combination works . . . great! When it doesn’t, just find another way to go. There are many paths leading to a finished quilt. Each and every time there is a learning process and that is true even for a pro! Remember, when you are green you’re growing . . . when you’re ripe you rot! Keep growing and stay green!
Did you learn anything new from this post? If so, please let me know in the comments below.
6 Comments

Twin needle tips

2/27/2018

1 Comment

 
One hundred days and one hundred ways - Day 3
Picture
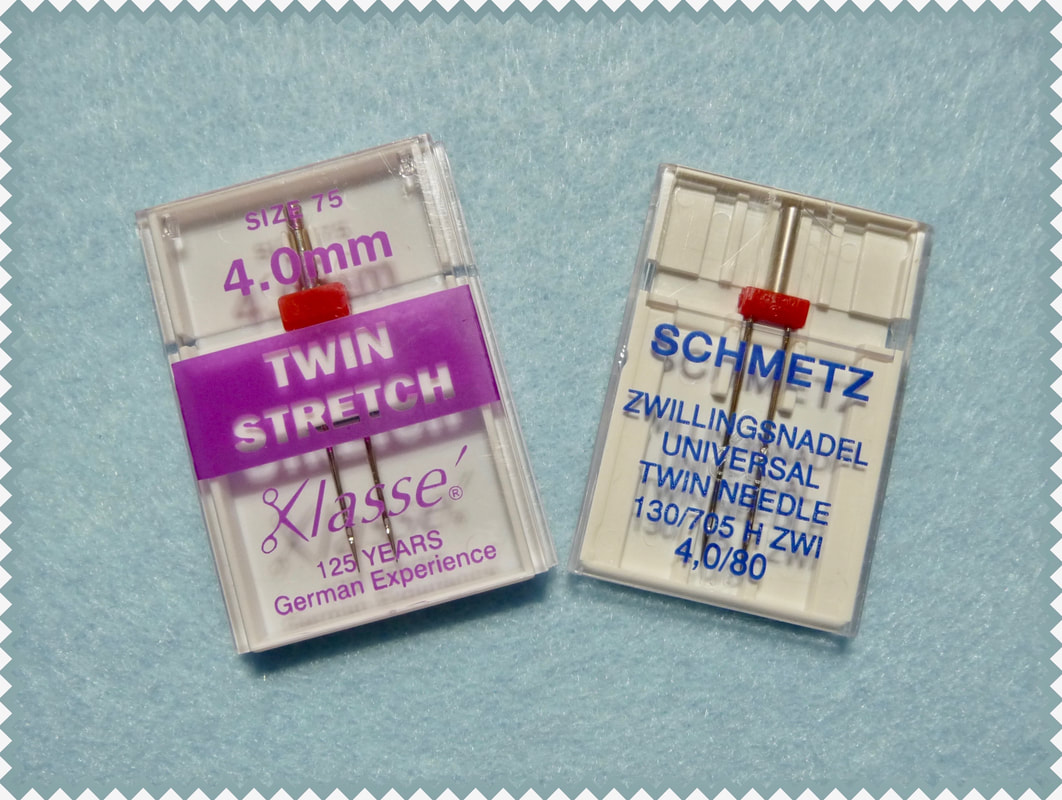
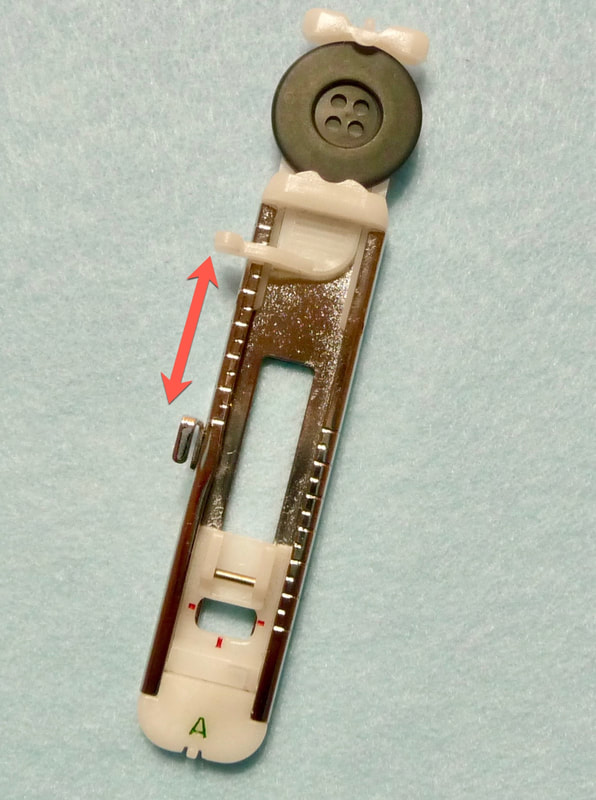
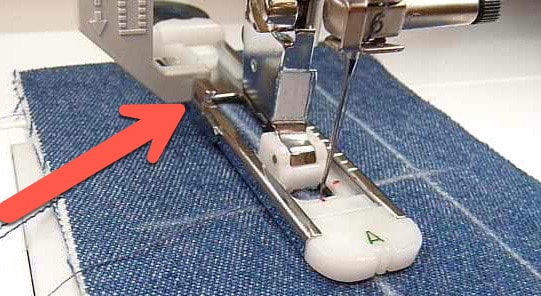
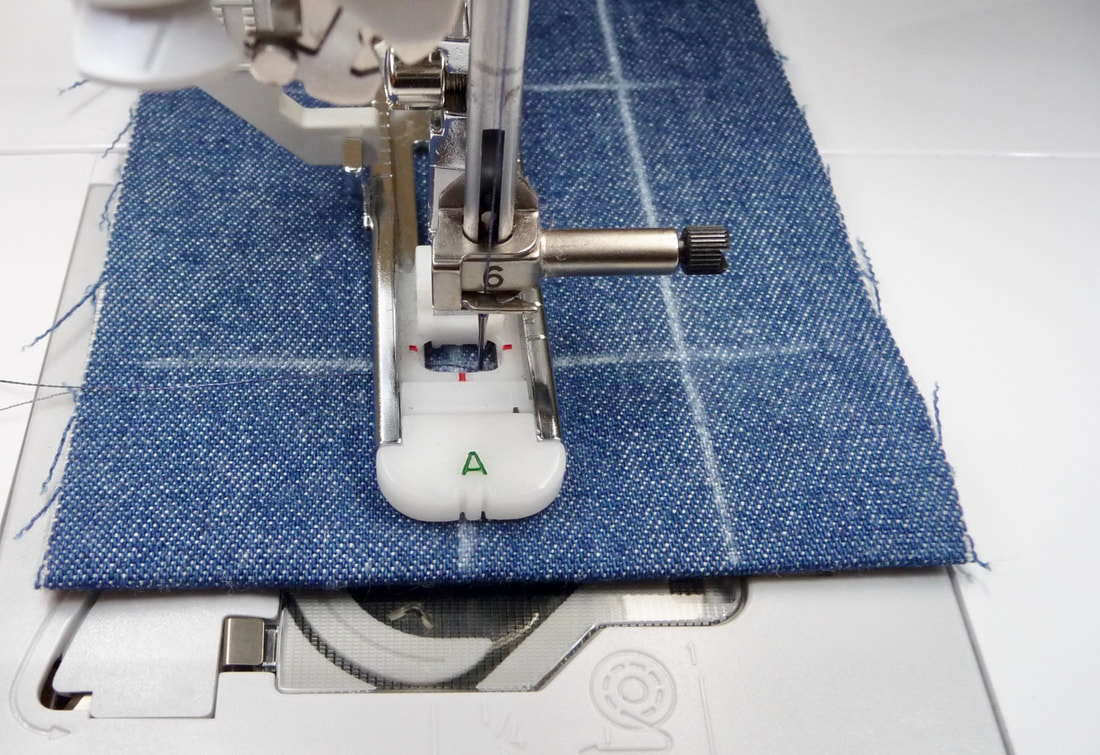
Double your sewing pleasure.  A double (or twin) needle opens a door to many creative and functional uses in your sewing repertoire.  Two needles are connected to a single shaft.  Double needles are available in a variety of sizes and types.  The space between the two needle points is described in millimeters and it’s the first number listed on the package, followed by the needle size.  The system number of the needle is also listed on the package.  The system number describes the proper type of needle for modern domestic machines. Most home sewing machines use a system number of 15 x 1, equivalent to the European 130 - 705 system number.  If you own a zigzag machine that threads from front to back, this needle system will fit your machine.
Important tip for machine owners with a twin needle button:
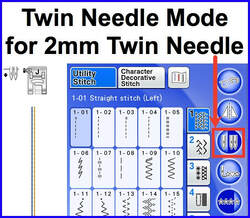
Check to see if your machine has a button to press for twin needle mode. Designed for use with a 2mm twin needle, touch this icon before you select a stitch. Your machine will protect you from selecting a stitch width that is too wide for use with the twin needle. Your machine will also recommend the proper presser foot. Remember that these settings are specifically for a 2mm twin needle. 
Picture

In its most basic form the double needle makes two rows of parallel stitching.  The bobbin thread “shares” the two needle threads, forming somewhat of a zigzag stitch on the underside.  When a decorative stitch is selected, it produces two rows of that particular pattern.  Two contrasting colors may be used and it will look as if it took two steps to produce this effect.  Many decorative stitches are suitable. Some heavy or dense stitches may need to have the stitch length adjusted. Always test the stitch first on a fabric scrap. Use a Stretch Twin needle for any fabric with stretch or elastic fibers woven into it such as a stretch woven.


When zigzag or decorative stitches are selected, you will need to calculate the maximum stitch width allowable.  This formula will be figured in millimeters, as that is how double needles are sized.  First, determine your machine’s maximum stitch width.  This is the largest size zigzag it will produce.  Subtract the double needle size between points.  The resulting figure is the maximum decorative stitch width you may use without risking needle breakage.  Always hand walk the needle as a precautionary measure before stitching to insure that your needle will not hit the side of the throat plate. For straight stitching, be sure to use the center needle position on your machine. When using a straight stitch, the maximum stitch width on your machine determines the maximum size double needle your machine will take.


Threading the Machine for Twin Needle Sewing


You will need two spools of thread with each one placed on its own spool pin.  Bobbins can be wound and used in place of a second spool of thread.  If you do use a bobbin, place a spool of thread on top of it just to keep it from “jumping” during stitching.  Follow these tips for proper threading:


1)  Place the first, or left, spool so that the thread reels off from behind the spool.  Place the second spool with the thread unwinding from the front of the spool.


2)  Both spools should be threaded in one operation, however, they will not share all the thread guides.


3)  If there is just one tension disc, both threads will share the disc. If there are two, at the point of the tension discs you will separate the threads, placing one thread on each side of the center tension disc.


4)  If there are two thread guides just above the needle, separate the threads there also.  In the case of one thread guide, place one thread inside the guide and leave one outside the guide.


5) Separate the threads when you reach the needles, making sure threads are not twisted.  Depending on the stitch desired, the top tension may be adjusted up or down. Bobbin tension will remain normal.
1 Comment

Designing with tone on tone for a foolproof color option.

2/26/2018

2 Comments

 
One hundred sewing and embroidery tips and tricks - #2
Picture
Feeling stuck when it comes to choosing a color scheme for a new project? Are you wanting to impress a friend with a gift but you're unsure of a good mix of colors? When in doubt consider designing with a classy, yet somewhat subtle tone-on-tone color scheme. If you are in making a gift, and you know your friend's all time favorite color you are good to go and ready to sew!!!

Take a look at the collection of fat quarters and trims in the photo above. They melt together with a soothing color scheme, yet they include just enough contrast due to the varying shades from one purple based color family.
When planning a machine embroidery project you may fall in love with the elements of a design yet the colors are all wrong for you personally, or for the intended project. Has this ever happened to you?  For me it seems to be a common occurrence. The artistic Floral Decorative design shown above happens to be one of my all time favorites. However, the color combo just doesn't mix with anything I have.
Picture
What do I do if my fabric is blue?!? Tone on tone to the rescue! By selecting embroidery thread colors in soft shades of blue the design takes on a whole new look! 
Picture
See what happens with the same concept in yellow. . .
Picture
In pink . . .
Picture
And in green . . .
Picture
Same exact design, same amount of color changes, but a whole new scheme with a mix of light, medium, and dark shades of the same color. Of course you can also minimize the amount of color changes by repeating one or more colors in the design. This is especially easy to do when you are working with shades of the same color.
It's hard to go wrong by stitching a medley of similar colors. You could examine your original design and replace lighter areas with light colors and darker areas with darker shades. If you have the option to change thread colors right on the screen of your machine you can preview and make changes before you stitch. Yet another option is to use computer software to make and preview changes.

Perhaps your machine has an option to automatically rearrange the colors or even create a different mix of colors on your behalf. Take a look at the two butterflies below. Same design, but two totally different butterflies emerge using an option called Color Shuffle™ with a specific selection for tone on tone, also known as gradient, for the new color scheme.
Picture
Picture
This quick change artistry is accomplished in a few simple steps. Note that the original design has seven color changes. Remember that you can minimize colors by repeating them, using using less colors overall.

In the first step color shuffling option is accessed from Edit mode by touching the color palette icon and then selecting the color shuffling option.
Picture


​Color Palette Icon

Picture
The option for tone on tone (Gradient) and the desired number of colors becomes available. This is also where the number of colors can be minimized if you wish. I left it at seven.
Picture
Picture
After selecting a specific color spool for the color family, the machine magically provides many pages of options. 

Picture
I chose the one below.
Picture
Are you ready to experiment with tone on tone for a future project, or is this already a "go to" favorite technique for you? I'd love  to hear about your experiences. Please let me know in the comments below.
2 Comments

Building Better Buttonholes

2/25/2018

2 Comments

 
One hundred sewing and embroidery tips and tricks - #1
Depending on your connection and your device, this video may take a minute to fully load.
​Click the arrow to watch.

I know my readers have a wide variety of machine models with either manual or computerized buttonholes built in. Click on the super short video above and you'll see a computerized "one step" buttonhole in action on a Brother machine. I'll talk more about buttonhole set-up in a minute but first let me describe what you are seeing when you watch the video.

At the starting point the buttonhole sews backwards with a straight stitch, tracing the exact length of the buttonhole as determined by the button inserted at the back of the foot. Next, the same straight stitch is sewn forward, followed by the left "leg" of the buttonhole which consists of narrow zigzag stitches forming from front to back. The machine straight stitches forward, a bar tack forms at the front end of the buttonhole and then the machine stitches backward to form the right leg of the buttonhole with narrow zig zag stitches, and finally finishes with the bar tack at the back end.

What's important to note is that the zigzag stitching for both the right and left leg of the buttonhole form in the same direction, stitching from front to back. This prevents shifting that occurs when a buttonhole stitches out in a "box" formation, moving in different directions for each side. 
Picture
Notice how the button sits snugly in a slot at the back of the buttonhole foot. The spacing created between the white and the silver protrusions coordinate with the buttonhole lever mechanism on the machine, sensing the length. The buttonhole lever (identified with the red arrow below) comes in contact with these two parts and that makes the magic happen.
Picture
Picture


​Now, how about 
​​a few more tips for building better buttonholes?
  • Buttonholes are essentially a heavy, dense satin stitch and need to be supported with interfacing. Normally interfacing is required in areas where buttonholes are stitches such as plackets, waistbands, and facings. I prefer Pellon Shir-Tailor for medium to heavier fabrics. If interfacing is not part of the plan you can use a temporary stabilizer on the wrong side. You'll want to note that unless the stabilizer washes aways some will remain under the buttonhole.

  • Mark the position for the center of the buttonhole as well as the beginning. I like to mark one more parallel line to help align the buttonhole foot on the fabric. If the side of the buttonhole foot and the parallel line alongside the foot are on track you are sure to end up with a buttonhole that forms perfectly straight. Notice how the the red marks on the inside opening of the foot show where the center of the buttonhole will be, and also where the buttonhole needs to begin.
Picture

  • When stitching buttonholes you always want to make a sample or tow to warm up and check your settings. I have an unusual thread choice when it comes to buttonholes with the recommendation for using embroidery thread in place of ordinary sewing thread. I thread top and bobbin with the embroidery thread and then shorten the stitch length for the buttonhole by one click, reducing it from (0.4) to (0.3). 
Picture
I think the sheen of the embroidery thread has a smooth look and mimics the old time silk buttonhole twist used for hand worked buttonholes in days gone by. In addition, embroidery thread is smoother than ordinary sewing thread. 

Take a look at the example below and you'll see ordinary sewing thread on top and embroidery thread on the bottom buttonhole next to the button. On the actual fabric sample the regular thread looks dull and the embroidery thread looks smooth and a little glossy. You decide what you prefer. 
Picture
  • Seam sealant is especially helpful to control fraying thread on open buttonholes. Apply sparingly to the unopened buttonhole, pat with a tissue or paper towel to absorb excess and let dry. When it's time to open the buttonhole it's a good idea to place pins at each end and then slice open the buttonhole from the center to the end using a sharp seam ripper. the pins will prevent you from cutting too far.
Picture
I hope you found these tips helpful! If you have buttonhole questions or comments feel free to leave them below :-)
2 Comments

SEW VERY VINTAGE

2/17/2018

15 Comments

 
Picture
My friends at scrapsmart.com carry lots of vintage images like the one you see here.
Have you noticed? Vintage is very much en vogue, tres chic, and making waves in the modern world of sewing! Particularly prominent lately are images, patterns, and books making headlines and taking us back in time with fashions and accessories from bygone eras. In this post I'd like to fill you in on a few blasts from the past that caught my attention recently.
Let's start with the 90th anniversary of Simplicity Pattern Company. If you visit the Simplicity site you'll see that they've been promoting a line of nostalgic images on everything from calendars, to tins, to notebooks, and more. It's fun to see these photos but it's even more fun to see some of the patterns reproduced into new patterns with modern measurements and pattern tissue complete with all the familiar markings for notches and other important information. 
Picture
I picked up a few intriguing options on a recent shopping trip. Take a look at the image above and you'll see three of my favorites. First there's is a set of sleeves from the 1930's, pattern 8506. I thought it would be fun to play around with these by adding them to a simple shell style blouse.

​Then a "folds flat" blouse for wovens from the 1940's caught my eye. View D of pattern 8593 looks fresh  and pretty with a yoke at the waist and a ruffle at the bottom. I think I have a piece of floral rayon waiting in the wings and perfectly sized for the yardage requirements.
Yet another blouse that goes from flat to fabulous is the 1950's pattern number 8452. 
Picture
This knit blouse takes less than a yard of fabric, has an interesting tutorial for putting it on, and looks like a real winner for travel and packability. ​Both of the blouses look like only an afternoon's worth of sewing time. Perfect timing on all three spring sewing and a wardrobe refresh!!!
While browsing the pattern book I came across one more "have to have it" pattern. Labeled as an authentic 1960's pattern, I first have to dispute the decade displayed on the envelope. You see, I remember buying this exact pattern and sewing the big shoulder bag from the tapestry fabric you see in the photo below. The year was 1977. Ahhh yes, I remember it well! 
Picture
It's quite a kick to see a favorite pattern make its way back into the pattern book. Talk about a trip down memory lane! I actually look but I didn't have the original pattern in my stash. Yes, I do still have some of my first patterns from the seventies carefully stored :-) The original pattern is not to be found but I did have that small remnant of the tapestry you see next to my new Simplicity 9553. This time around I want to make everything on the envelope, including the spats. Can you imagine the possibilities for adorning these with machine embroidery?
So how about you . . . do the nostalgic patterns hold any interest for you? Can you see yourself making any of these? I'd love to hear about your own favorite vintage patterns. Share your stories in the comments below!
15 Comments
    Picture

    Author:

    Joanne Banko
    Brother Ambassador


    I'd love to stay in touch with you!

    Click Here
    and Sign up for
    ​Sewing News, plus tips, tricks, and notifications about new blog posts.

    Archives

    March 2023
    February 2023
    January 2023
    December 2022
    November 2022
    October 2022
    September 2022
    August 2022
    July 2022
    June 2022
    May 2022
    April 2022
    March 2022
    January 2022
    December 2021
    October 2021
    August 2021
    July 2021
    June 2021
    May 2021
    April 2021
    March 2021
    February 2021
    November 2020
    October 2020
    June 2020
    May 2020
    April 2020
    March 2020
    February 2020
    January 2020
    November 2019
    August 2019
    July 2019
    June 2019
    May 2019
    March 2019
    February 2019
    January 2019
    December 2018
    September 2018
    August 2018
    July 2018
    June 2018
    March 2018
    February 2018
    December 2017
    September 2017
    August 2017
    June 2017
    April 2017
    February 2017
    January 2017
    December 2016
    September 2016
    July 2016
    June 2016
    May 2016
    March 2016
    February 2016
    January 2016
    December 2015
    October 2015
    September 2015
    July 2015
    June 2015
    May 2015
    March 2015
    January 2015
    October 2014
    July 2014
    May 2014
    March 2014
    January 2014

    *As a believer in full disclosure, I'd like you to know that Blog posts may contain affiliate links for products and services I know and trust. Purchasing items through a link marked * results in a small commission for me, with no extra charges for you.

    Categories

    All

    RSS Feed

© Copyright 2023 by Joanne Banko. All rights Reserved