letsgosew.com
  • Home
  • Contact
  • Privacy Policy
  • Sign Up for Sewing News, Freebies, & Updates
  • Order Just Jackets Embroidery Collection
  • Just Jackets FAQ
  • Order Wrapped in Embroidery Book by Joanne Banko
  • Joanne Banko's Blog
  • Machine Embroidery Survey
  • FREE Tutorials and Tip Sheets
    • NEW! Serger Sample Sheet
    • NEW! 2-Thread Serger Techniques-Pt.1
    • NEW! Basic Serger Stitches
    • New! Sew with Your Feet_Resources
    • New Project! Chic Triangle Scarf
    • New! Embroidered Sachet Envelope Project
    • Denim Re-design Hanging Organizer
    • Sewing a Cargo Pocket
    • NEW! Interfacings for Embroidery Tip Sheet
    • Making Kitchen Towels & FREE Cornucopia Applique Design
    • NEW! Embroidery Placement Positioning Tips
    • Tip sheet - 5 Reasons Quilters Need A Serger
    • Free In-the-Hoop Patch Pocket Design
    • Serging versus Sewing
    • FREE Project-Embroidered Gift Tag with Gift Bag
    • Tip Sheet - Pillow Pointers
    • Tip sheet_Sew Straight Laser for Seams
    • Embelishment Tips from dime V.111
    • Tip sheet - Shannon Embrace Double Gauze
    • Tip sheet - Fun with Fonts
    • Fabric Tip Sheet- Sewing Faux Suede
    • Tip sheet for Sewing & Embroidering with Metallic Thread
    • Fleece Ruana Pattern: As seen on PBS It's Sew Easy TV
    • Fabric Tip Sheet - Crepe Back Satin
    • Fabric Tip Sheet-Sewing Slinky Type Knit
    • Fabric Tip Sheet - Fleece
    • Fancy Footwork Tipsheet - About the Walking Foot
    • Fancy Footwork Tip Sheet_Basic Appliqué
    • Fancy Footwork Tip sheet - Ruffler Attachment
    • Fancy Footwork Tip Sheet - Narrow Hems with a Standard Foot
    • Fancy Footwork Tip Sheet - Non Stick Foot
    • Tip sheet - Machine Embroidery Pattern Connection Resources
    • Tutorial_Embroidered Greeting Card Project
    • Tip Sheet - Machine Set up for Shirring
    • Tip sheet - Snowman and Target Markers
    • Tip Sheet for Printing on Fabric
    • Tip sheet-Five Ways to Finish Fleece Blankets
    • T-Shirt Transformation Tutorial
    • Project- Serge a Little Girl's Sweet Summer Dress
    • Tip Sheet for Fleece Frame Shape Appliqué
    • Tip Sheet - Bobbin Work Sewing & Embroidery
    • Tip Sheet - Custom Covered Buttons
    • Tip Sheet - Liquid Stabilizers
    • Tip sheet - Appliqué with Brother XV8500D & ScanNCut
    • Project - Sheer Chiffon Wrap
    • Project - Pearl Trimmed Candle Ring
    • Tip Sheet -Mitered Satin Blanket Binding
    • Fabric Tip Sheet_Knit Know How
    • Tool School Tip Sheets
    • ITH Project Planner
  • As seen in DiME Magazine - Photo Gallery
  • Sewing and Embroidery Events
  • My Sewing Story
  • It's Sew Easy TV Online Blog
  • IT'S SEW EASY TV Videos & Bonus Files
    • NEW! It's Sew Easy TV Series 2100
    • It's Sew Easy TV_Series 2000
    • It's Sew Easy TV_Series 1500
    • It's Sew Easy TV - Series 1600
    • It's Sew Easy TV_Series 1700
    • It's Sew Easy TV Series 1800
    • It's Sew Easy TV Series 1900
    • NEW! Superstar Sewing Stitches
    • NEW! Classy Textured Cape
    • NEW! Baby Bath Wrap
    • NEW! Detachable Collar
    • Sew a Swimsuit
    • Machine Embroidered Garments
    • Kimono Blouses
    • Custom Covered Hangers
    • Sewing Beautiful Belts
    • Felted Flower Hat Trim
    • Sew a Waffle Weave Robe
    • Learn about Couching accessories!
    • Turn a Pashmina into a Trendy Topper
    • Machine Embroidered Reverse Applique
    • Machine Embroidered Knit Dress
    • Use Non-Stick Foot to sew a Custom Luggage Tag
    • Serge & Sew Broomstick Skirt
    • Machine Embroidered Western Jacket
    • Machine Embroidered Bobbin Work Pashmina
    • Embroidered Pajamas
    • Sewing Pearls and Sequins
    • Learn how to use the Fringe Foot
    • Quilted Pinwheel Patchwork Tote
    • Machine Embroidered Lace for Lingerie
    • Sewing Circles with a Circular Attachment
    • Sew with the Edge Joining Foot
    • Re-style Tops for Little Girls
    • Short Style Tip- Blouse Embellishment
    • Learn how to make pretty piping using the Piping Foot
    • Embellish with the Three Slot Cording Foot
    • Facebook Live Interview 12-4-2018
    • Machine Embroidery - Starter Tips

Fast, Flat Serger T-Shirt And Sewing  Machine Tips Too!

9/23/2023

1 Comment

 
Picture
Brother Ambassador
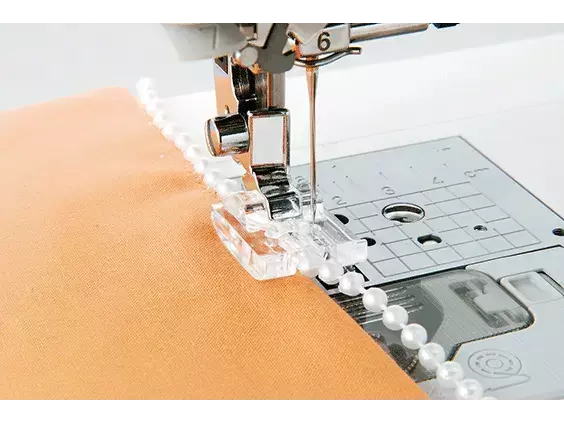
Are you ready to learn more about stitching a t-shirt with a serger? Recently, I demonstrated the fast, flat method for serging a T-shirt on the Sewing Machines Plus Sew Fest GRAND FINALE Friday show. You can CLICK HERE to watch my one hour long serger segment on the SMP YouTube channel.

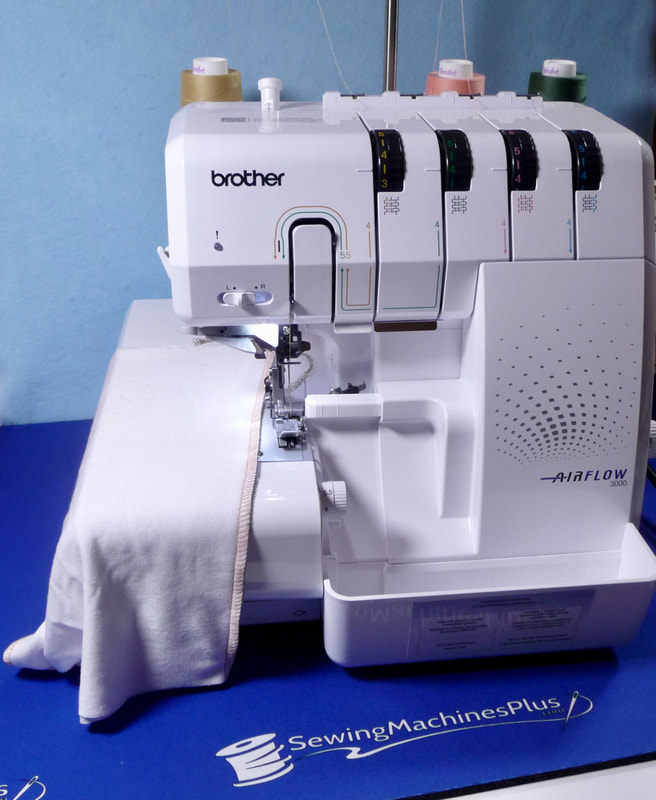
Using the Brother Airflow 3000 serger, I stitched the shirt from start to finish in less than one hour! You can too, if you're familiar with the basics on your own serger model and follow my instructions.
Picture
During the show I promised more info and resources for you so here we go!

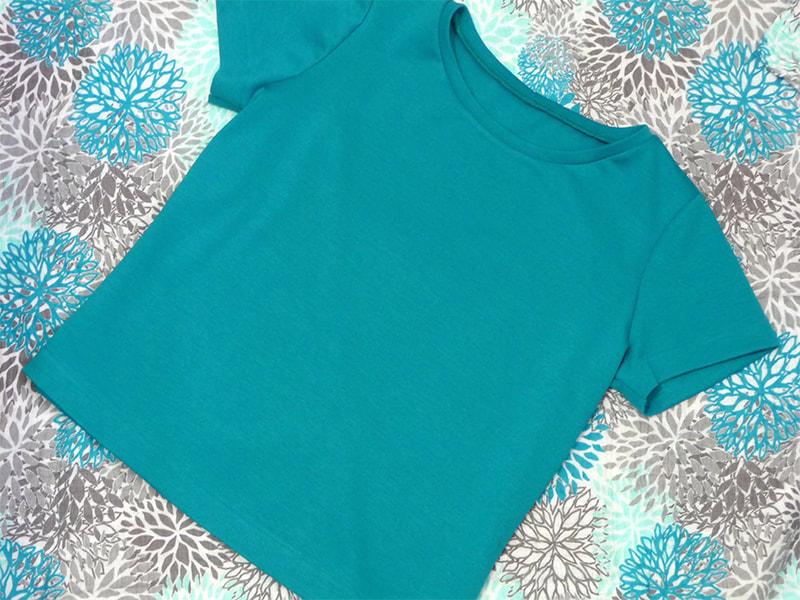
First things first, I have a complete T-Shirt tutorial archived on the Brother blog. In this tutorial you'll see detailed photos of the stitches and what they look like on the actual fabric. You'll find a link later in this post. Here's what the finished T-shirt in the tutorial looks like:
Picture
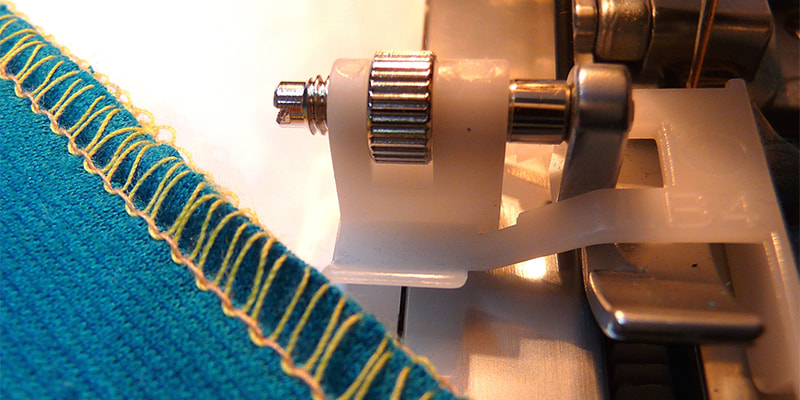
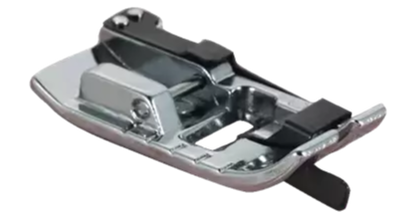
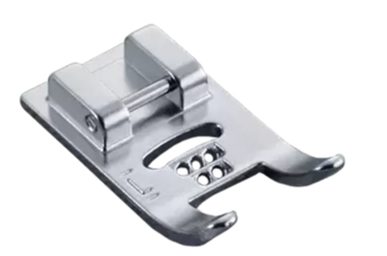
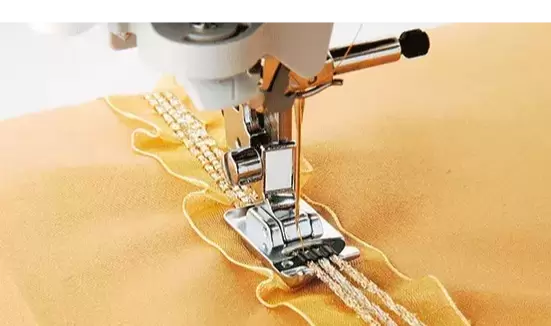
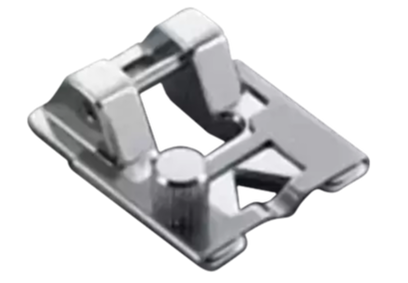
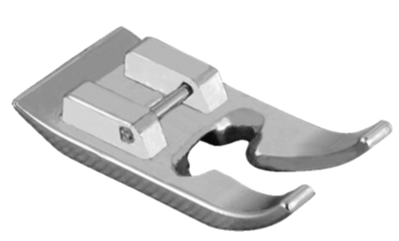
I stitched the hem of the sleeves and the bottom using a blind hem foot for the serger and a stitch called a flatlock stitch. Take a look at the serger blind hem foot below. If this was not included with your machine, chances are you can purchase one as an optional accessory.
Picture
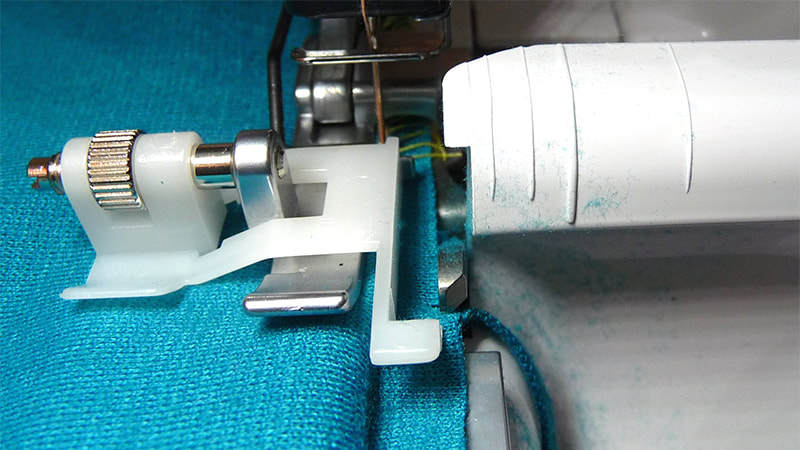
A flatlock setting is commonly used to join two pieces together, but it works equally as well as a blind hem stitch on the serger, especially when combined with the blind hem foot which makes it easy to guide the folded hem under the foot, keeping it in line with the guide for even stitching. A flatlock can be accomplished using two or three threads. I used the three thread stitch. Check your manual for flatlock settings. Generally, the left needle is set for zero, the upper looper stays about the same as it is for a balanced stitch, and the lower looper is relatively tight. Practice on scraps before starting your project.

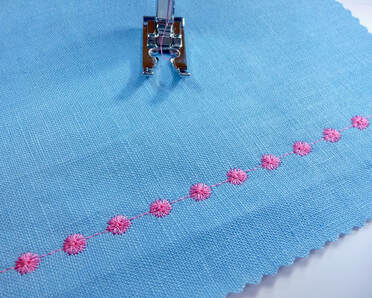
Here's what the flatlock stitch should look like on the top side of the stitch:
Picture
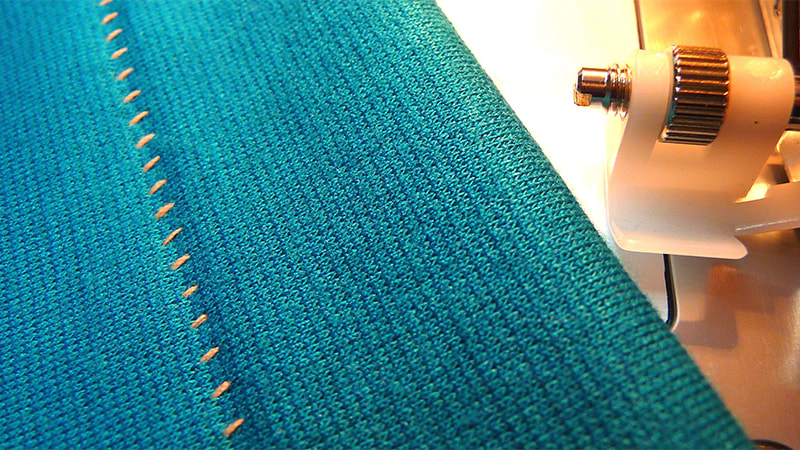
Here's what it should look like on the bottom side:
Picture
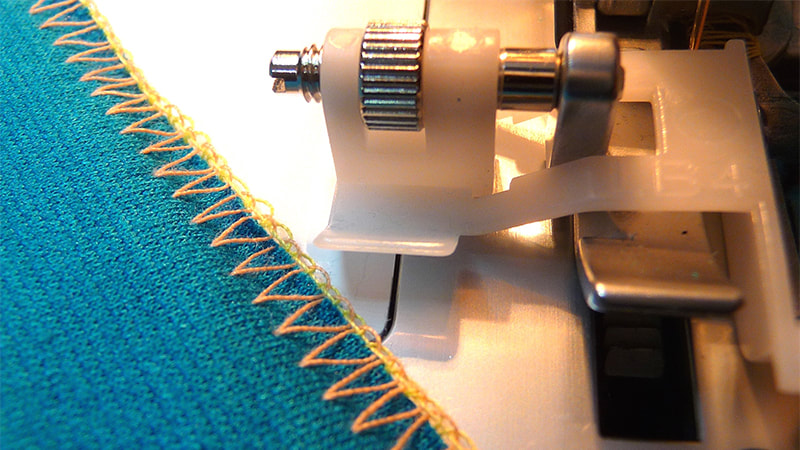
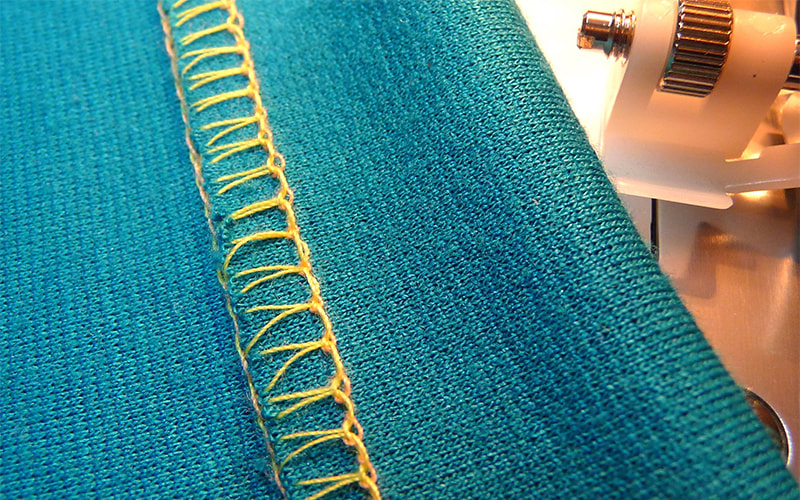
The "V" shaped stitch you see is formed by the loose needle thread. This is essential for allowing the stitch to be pulled flat. I used contrasting thread so you could readily see what it looks like but of course you would want to match your fabric as close as possible. Here is what the finished hem looks like on the outside of the T-Shirt:
Picture
And here is what it looks like on the wrong side:
Picture
You can follow all the steps for constructing the T-Shirt found in the tutorial HERE.

Now for a few more tips!
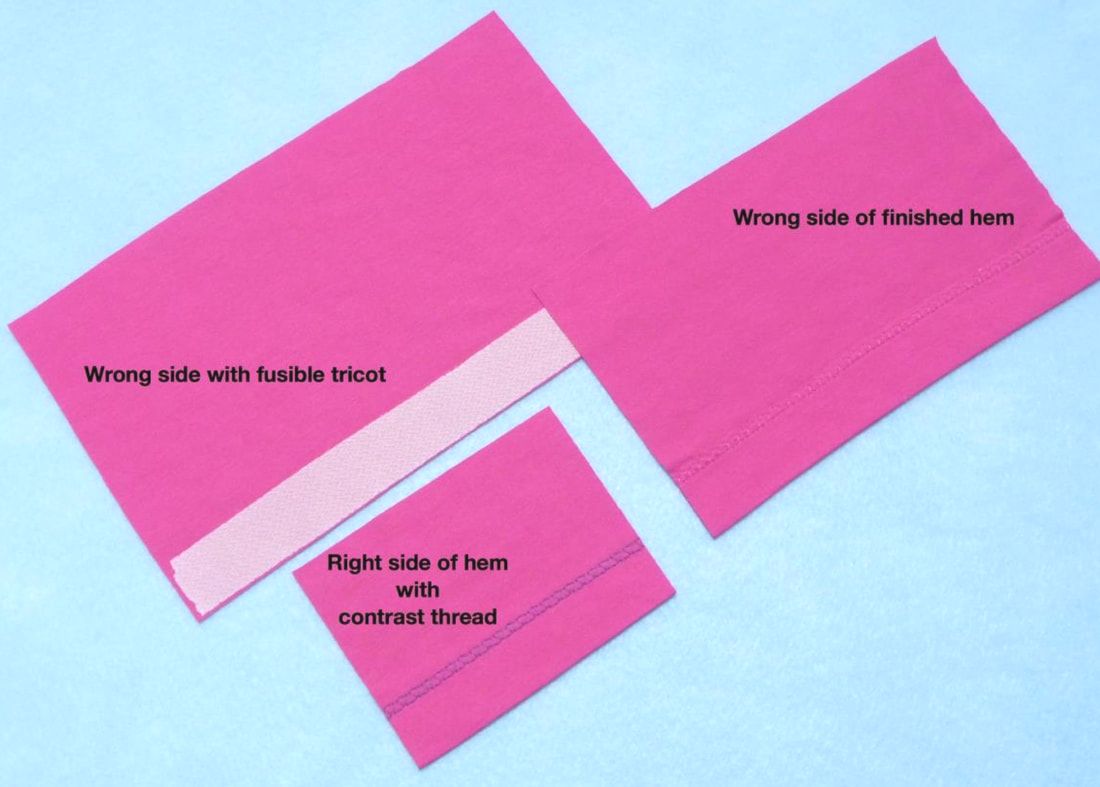
During the show I showed how my hem was stabilized prior to stitching with a strip of fusible interfacing. I cut one inch wide strips of tricot knit type interfacing, cutting them along the "stretchiest" grain of the interfacing.

Links to my favorite "knit interfacings are as follows:
Pellon SK135 - Fusible lightweight tricot with crosswise stretch and no stretch lengthwise. 
Pellon EK130 – Fusible, standard weight tricot. Same characteristics and use as above.
Pellon 460 - Very lightweight knit stabilizer with multi-directional stretch. (My favorite)

I fuse these strips to my knit hems, then turn up and press the one inch hem before hemming. This works well for hems that are topstitched with a twin needle, cover-hem machine, a stretch stitch on your machine, or the serger style blind hem.

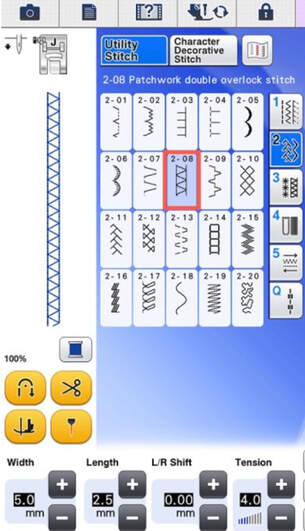
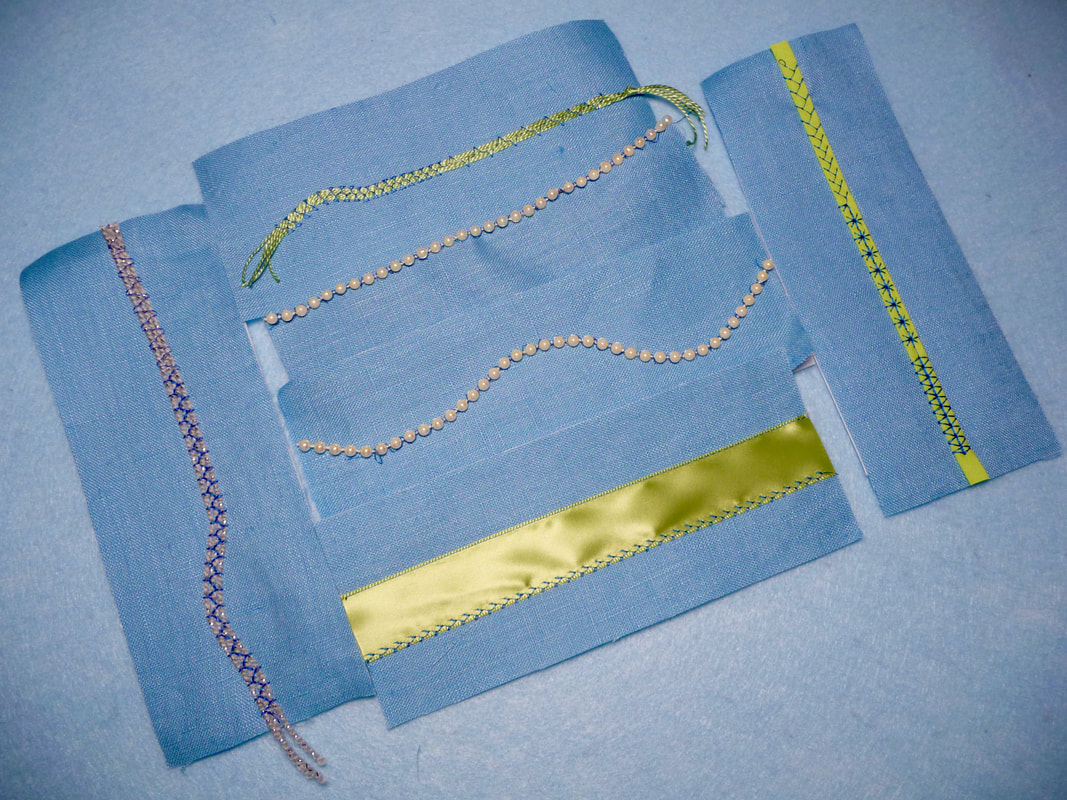
Below are pictures of an alternative T-Shirt hem with the hem stabilized with fusible tricot then stitched using a stitch on my machine that is not only pretty but has a bit of stretch. Note: Be sure to use a stretch needle size 11 for sewing knits on your sewing machine.
Picture
Picture
You can watch a video with more details for using this method, along with an alternative idea for stitching a neckline on a knit T-Shirt HERE on my YouTube Channel. This technique adds an elegant touch to a knit top! This video also includes tips for sewing a knit top on your standard sewing machine.
Pattern Tips
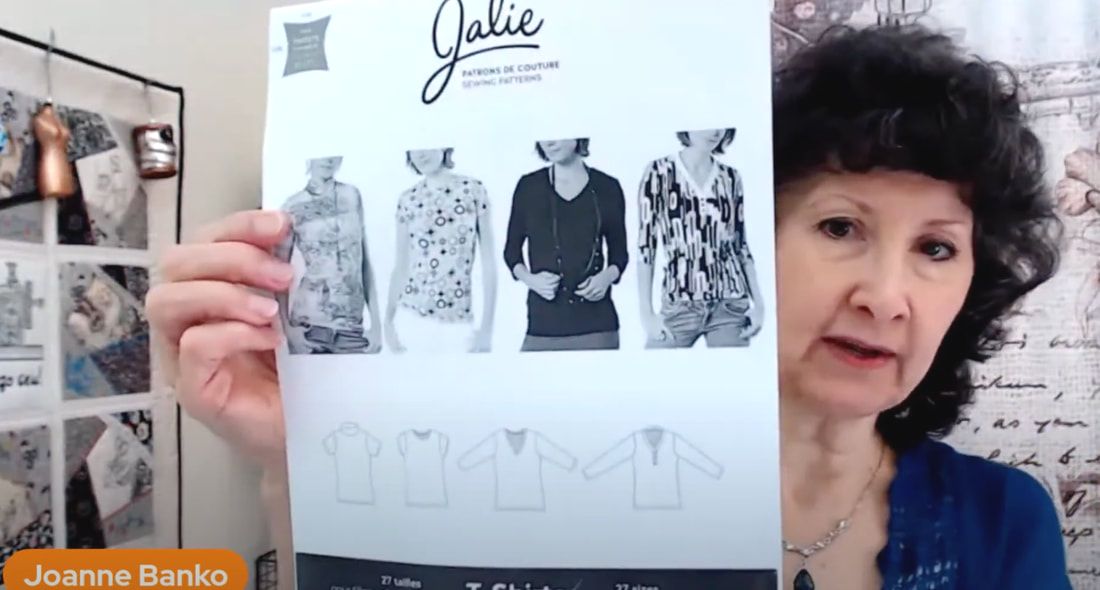
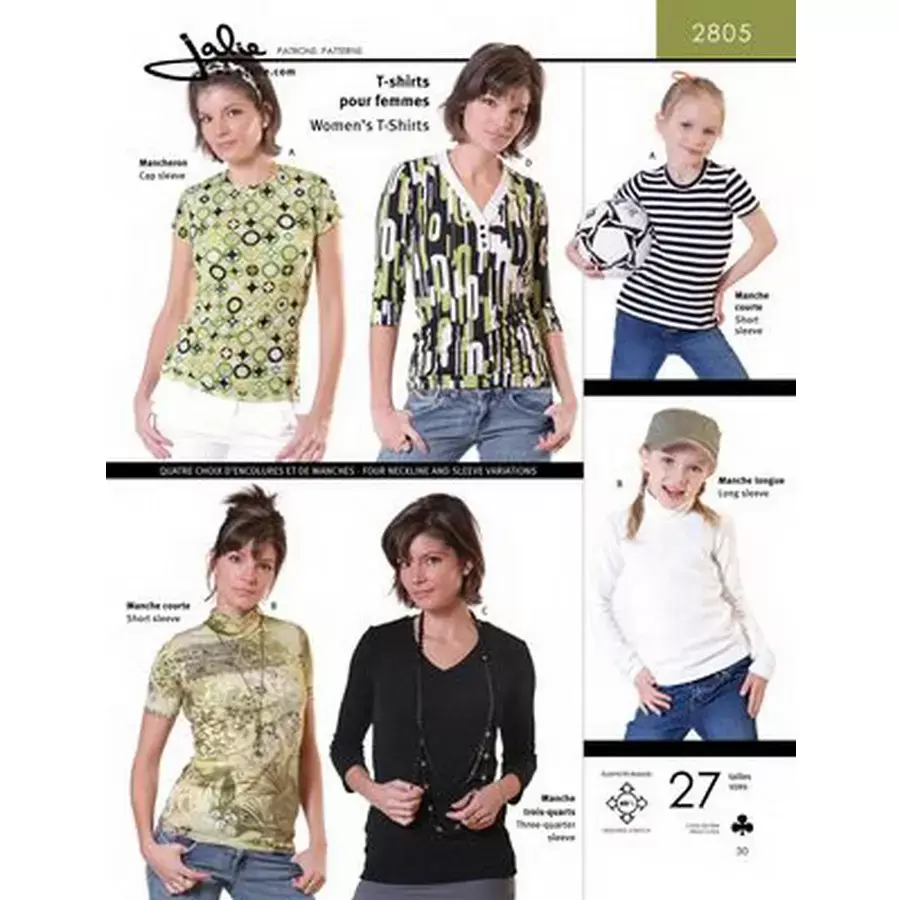
For the Sewing Machines Plus show, I used Jalie pattern 2805.
Picture

The 1/4-inch seam allowance included in this pattern makes it ideal for stitching with the serger. Take care to find fabric that meets the stretch requirements for this pattern. I always try to make a test garment when using a new pattern. Once I perfect the fit, I'm likely to use it over and over again so I transfer my perfected pattern to pattern transfer cloth such as Swedish Tracing Cloth, or Pellon 830 Easy Pattern.

For sizing my tiral garment, I like to pick my size using the measurements closest to my body, then add additional seam allowance so I have a total of 1-inch for side seams and corresponding sleeve seams, then I baste the seam at the one inch seamline, try on and adjust as necessary. That additional seam allowance can make or break the project as it's easier to take in that it sometimes is to let out a seam.

I hope this gives you some inspriation to make your own knit T-Top! If you'd like more serger sewing inspiration, check out this former live Q&A show titled What Can a Serger Do For You? on my YouTube channel HERE.

Oh wait! Just one more link to a serger Do's and Don'ts post. You'll find it HERE on my site.

As always, I welcome your questions and comments!
1 Comment

Fun With Your Sewing Machine Feet

9/17/2023

1 Comment

 
Picture
Brother Ambassador
​This post is an overview of information presented on Sewing Machines Plus Sew Fest 2023. You can CLICK HERE to watch my one hour long Fun with Your Feet segment on the SMP YouTube channel. You'll find all five days of this special broadcast on the SMP channel​.

​Everything you see that is highlighted in blue is a link that will take you to more information. I've packed a lot into this post so sit back and take some time to read, watch, and enjoy!
Picture
Picture
In this post I'll give you some additional information on each of the six featured embellishment feet shown in the live show, along with more video resources for you to check out on my Let's Go Sew with Joanne Banko YouTube channel. I would be honored if you would consider subscribing to the Let's Go Sew channel. Once you subscribe, click the bell for notifications for future live shows and new videos added to the channel!

Okay, let's get started with the feet, in the order I showed them at the machine during the video. NOTE: Each one is hyperlinked with the bold blue lettering so you can click directly on the part number to view the foot on the Brother site.

Generally, these feet are not included as standard accessories with the purchase of a Brother machine. They do work with the vast majority of Brother machine with a 7mm  throat plate opening. These are optional accessories and are not engraved with a letter like most included feet. 

For other brands, your machine accessory package may be different. Check with your machine manufacturer to see if there are similar feet for your machine, comparing them by the name of the foot and the image of the foot itself.


SA184 Brother Edge Joining Foot
Picture
As you saw in the presentation, this foot is one of my favorites for the ultimate in accuracy! Whether you're stitching on an edge or using the foot to join pieces together, the edge guide keeps you on track and makes your finished stitching look flawless!

​CLICK HERE to watch a short video showing how to stitch silk ribbon to a pashmina, with designs from my Wrapped in Embroidery book. You'll find downloadable instructions for this project HERE.

For craft and general home decor project I use polyester satin ribbon or grossgrain ribbon. In particular, grossgrain ribbon is very durable and highly washable.

For special projects like the pashminas that need to drape, I use silk ribbon and have sucessfully washed it with delicate handling. Here is a resouce for the silk ribbon:https://www.mjtrim.com/ribbons-jacquards/silk


SA150 Pearls and Sequins Foot
Picture
Craft pearls on a string are generally available in 3-5mm width, perfect for sliding under the foot. Adding a string of pearls by machine gives such a special look to the simplest of projects! Making a simple fabric gift bag and adding pearls to the top edge makes the bag a "keeper" and worthy of any precious gift you wish to give.

CLICK HERE to watch a short video with more ideas and information for sewing pearls and sequins with this foot.

CLICK HERE to view instructions for the gift bag with pearl trim.

SA157 Five Hole Cording Foot
Picture
​Once again, this foot gives you options for stitching with your desired amount of cords, anywhere from one to five! Designed for thinner cording, use a dental floss threader to guide cords into the slot.

I used this foot for a cute swimsuit cover-up in an archived post on the Brother blog. You can view the instructions when you CLICK HERE.

SA110 Three-Slot Cording Foot
Picture
I have used this foot a ton over the years! With three slots you have so much versatility, and this foot allows for a variety of cording weights. Remember, if the cord slides into the slot of the foot and slips back and forth easily, it is fair game to try with this foot!

​CLICK HERE  to watch a short video with more ideas and information for using this foot to add corded embellishment.

SA141 Braiding Foot
Picture
I've literally been using this foot for years! It may very well be one of the first embellishment feet I ever purchased.

The opening on this foot is adjustable to fit a variety of widths of cord, ribbon, and trim up to 1/4-inch wide. I like to use 1/4-inch bias trim with this foot. There are so many possibilities with this foot! 

SA193 Candlewicking Foot
Picture
Yes indeed! This is another one of my favorites! This foot was specifically designed for use with Candlewicking stitches developed for the Brother machines. Take a look at the beautiful decorative candlewicking stitches on the  pillow below, with rose embroidery designs added from my Just Jackets embroidery design collection:
Picture
CLICK HERE to see how to use the My Custom Stitch feature found on many Brother machines to create your own candlewicking stitch.
IMPORTANT additional notes:

​Samples were stitched on blue medium weight linen. Any medium weight woven fabric is good for stitching these samples. I just happen to have a remnant leftover and the blue shows up well on camera.

Be sure to stabilize fabric that is not firm in and of itself. I use a tear away if the wrong side will not show, carefully tearing away the excess when my stitching is complete. Stay Perfect Tear Away stabilizer from Sewing Machines Plus is an ideal choice: https://www.sewingmachinesplus.com/stayperfect-precut-medium-tearaway.php 

Wash away stabilizer is another option when you need to be able to remove the stabilizer completely. Always test your combination before using on your actual project.

If your project allows for it, you can leave a little extra trim at each end and trim excess when you're finished stitching.

I did get some questions about needles and thread. Here are some tips: If my fabric or trim is shiny I use polyester embroidery thread. If I want my stitch to “disappear” I use good quality monofilament thread, clear (for lights), or smoke (for darks). Sewing machine shops will likely carry the best brand of monofilament so check there for availability first. I have also used Sulky Find .004 Soft monofilament on the 2,200 yard spool. Smaller spools tend to kink more so I prefer the larger ones. You may want to decrease the needle tension 1 number or so when using monofilament. A size 11-14 Top-stitch needle works best for monofilament thread. In addition, it is not recommended to use an automatic needle threader with monofilament.

Most often, I use an embroidery needle (size 11), with embroidery thread. Other times, I will match my needle type and size to the fabric I am stitching on, i.e. Jeans needle for denim, topstitch, micortex, or quilting needle when I need a sharp needle. For a full tutorial on selecting needles, visit my YouTube channel where I interviewed Rhonda Pierce, the needle expert from Schmetz Needle Co: CLICK HERE
I welcome any additional comments or questions you might have! Please leave them below.
1 Comment
    Picture

    Author:

    Joanne Banko
    Freelance Sewing Educator

    I'd love to stay in touch with you!

    Click Here
    and Sign up for
    ​Sewing News, plus tips, tricks, and notifications about new blog posts.

    Archives

    June 2025
    May 2025
    March 2025
    February 2025
    December 2024
    October 2024
    September 2024
    March 2024
    February 2024
    September 2023
    July 2023
    June 2023
    May 2023
    March 2023
    February 2023
    January 2023
    December 2022
    November 2022
    October 2022
    September 2022
    August 2022
    July 2022
    June 2022
    May 2022
    April 2022
    March 2022
    January 2022
    December 2021
    October 2021
    August 2021
    July 2021
    June 2021
    May 2021
    April 2021
    March 2021
    February 2021
    November 2020
    October 2020
    June 2020
    May 2020
    April 2020
    March 2020
    February 2020
    January 2020
    November 2019
    August 2019
    July 2019
    June 2019
    May 2019
    March 2019
    February 2019
    January 2019
    December 2018
    September 2018
    August 2018
    July 2018
    June 2018
    March 2018
    February 2018
    December 2017
    September 2017
    August 2017
    June 2017
    April 2017
    February 2017
    January 2017
    December 2016
    September 2016
    July 2016
    June 2016
    May 2016
    March 2016
    February 2016
    January 2016
    December 2015
    October 2015
    September 2015
    July 2015
    June 2015
    May 2015
    March 2015
    January 2015
    October 2014
    July 2014
    May 2014
    March 2014
    January 2014

    *As a believer in full disclosure, I'd like you to know that Blog posts may contain affiliate links for products and services I know and trust. Purchasing items through a link marked * results in a small commission for me, with no extra charges for you.

    Categories

    All

    RSS Feed

© Copyright 2025 by Joanne Banko. All rights Reserved