letsgosew.com
  • Home
  • Contact
  • Privacy Policy
  • Sign Up for Sewing News, Freebies, & Updates
  • Order Just Jackets Embroidery Collection
  • Just Jackets FAQ
  • Order Wrapped in Embroidery Book by Joanne Banko
  • Joanne Banko's Blog
  • Machine Embroidery Survey
  • FREE Tutorials and Tip Sheets
    • NEW! Serger Sample Sheet
    • NEW! 2-Thread Serger Techniques-Pt.1
    • NEW! Basic Serger Stitches
    • New! Sew with Your Feet_Resources
    • New Project! Chic Triangle Scarf
    • New! Embroidered Sachet Envelope Project
    • Denim Re-design Hanging Organizer
    • Sewing a Cargo Pocket
    • NEW! Interfacings for Embroidery Tip Sheet
    • Making Kitchen Towels & FREE Cornucopia Applique Design
    • NEW! Embroidery Placement Positioning Tips
    • Tip sheet - 5 Reasons Quilters Need A Serger
    • Free In-the-Hoop Patch Pocket Design
    • Serging versus Sewing
    • FREE Project-Embroidered Gift Tag with Gift Bag
    • Tip Sheet - Pillow Pointers
    • Tip sheet_Sew Straight Laser for Seams
    • Embelishment Tips from dime V.111
    • Tip sheet - Shannon Embrace Double Gauze
    • Tip sheet - Fun with Fonts
    • Fabric Tip Sheet- Sewing Faux Suede
    • Tip sheet for Sewing & Embroidering with Metallic Thread
    • Fleece Ruana Pattern: As seen on PBS It's Sew Easy TV
    • Fabric Tip Sheet - Crepe Back Satin
    • Fabric Tip Sheet-Sewing Slinky Type Knit
    • Fabric Tip Sheet - Fleece
    • Fancy Footwork Tipsheet - About the Walking Foot
    • Fancy Footwork Tip Sheet_Basic Appliqué
    • Fancy Footwork Tip sheet - Ruffler Attachment
    • Fancy Footwork Tip Sheet - Narrow Hems with a Standard Foot
    • Fancy Footwork Tip Sheet - Non Stick Foot
    • Tip sheet - Machine Embroidery Pattern Connection Resources
    • Tutorial_Embroidered Greeting Card Project
    • Tip Sheet - Machine Set up for Shirring
    • Tip sheet - Snowman and Target Markers
    • Tip Sheet for Printing on Fabric
    • Tip sheet-Five Ways to Finish Fleece Blankets
    • T-Shirt Transformation Tutorial
    • Project- Serge a Little Girl's Sweet Summer Dress
    • Tip Sheet for Fleece Frame Shape Appliqué
    • Tip Sheet - Bobbin Work Sewing & Embroidery
    • Tip Sheet - Custom Covered Buttons
    • Tip Sheet - Liquid Stabilizers
    • Tip sheet - Appliqué with Brother XV8500D & ScanNCut
    • Project - Sheer Chiffon Wrap
    • Project - Pearl Trimmed Candle Ring
    • Tip Sheet -Mitered Satin Blanket Binding
    • Fabric Tip Sheet_Knit Know How
    • Tool School Tip Sheets
    • ITH Project Planner
  • As seen in DiME Magazine - Photo Gallery
  • Sewing and Embroidery Events
  • My Sewing Story
  • It's Sew Easy TV Online Blog
  • IT'S SEW EASY TV Videos & Bonus Files
    • NEW! It's Sew Easy TV Series 2100
    • It's Sew Easy TV_Series 2000
    • It's Sew Easy TV_Series 1500
    • It's Sew Easy TV - Series 1600
    • It's Sew Easy TV_Series 1700
    • It's Sew Easy TV Series 1800
    • It's Sew Easy TV Series 1900
    • NEW! Superstar Sewing Stitches
    • NEW! Classy Textured Cape
    • NEW! Baby Bath Wrap
    • NEW! Detachable Collar
    • Sew a Swimsuit
    • Machine Embroidered Garments
    • Kimono Blouses
    • Custom Covered Hangers
    • Sewing Beautiful Belts
    • Felted Flower Hat Trim
    • Sew a Waffle Weave Robe
    • Learn about Couching accessories!
    • Turn a Pashmina into a Trendy Topper
    • Machine Embroidered Reverse Applique
    • Machine Embroidered Knit Dress
    • Use Non-Stick Foot to sew a Custom Luggage Tag
    • Serge & Sew Broomstick Skirt
    • Machine Embroidered Western Jacket
    • Machine Embroidered Bobbin Work Pashmina
    • Embroidered Pajamas
    • Sewing Pearls and Sequins
    • Learn how to use the Fringe Foot
    • Quilted Pinwheel Patchwork Tote
    • Machine Embroidered Lace for Lingerie
    • Sewing Circles with a Circular Attachment
    • Sew with the Edge Joining Foot
    • Re-style Tops for Little Girls
    • Short Style Tip- Blouse Embellishment
    • Learn how to make pretty piping using the Piping Foot
    • Embellish with the Three Slot Cording Foot
    • Facebook Live Interview 12-4-2018
    • Machine Embroidery - Starter Tips

Sewing in Circles with the Circular Sewing Attachment

10/24/2020

11 Comments

 
This 45-minute video features tips and techniques shared on a recent Quilts & Lace Facebook live show.

We talked specifically about the Brother Circular Sewing Attachment for sewing and embellishment. There are other simple circle sewing tools available for generic use. Check with your sewing machine dealer to learn about options for your particular machine.

Below you'll find addtional circular sewing ideas and project links. I hope this video and the ideas presented here will inspire you to make something special with a circular attachment!

​In the first part of this post I'm showing the parts included with the Brother Circular Sewing Attachment bundle, (SACIRC1). This accessory item works on a wide variety of Brother machines. Check with your dealer for a current catalog of Brother accessories and compatible models. SAMDRIVER1, the Brother multi-purpose screwdriver is ideal for attaching the screw for the circular attachment.
Picture
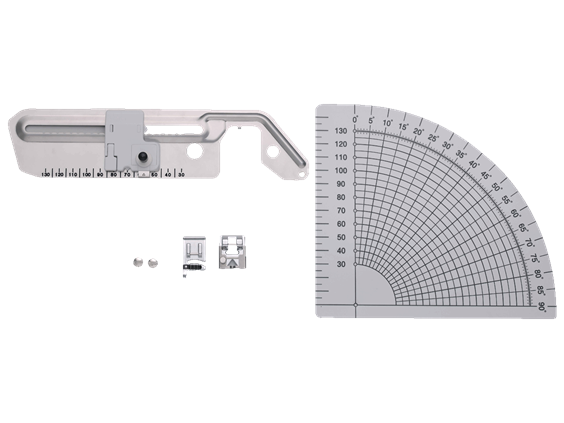
The bundle includes the circular attachment and placement pin for the machine, two embellishment feet (SA110, the 3 slot Cording foot & SA141, the Braiding foot), a protractor for figuring exact spacing for decorative stitching on circles, and two screws. Note: You only need one screw to secure the attachment. The second one is "just in case" you misplace the first one.
Picture
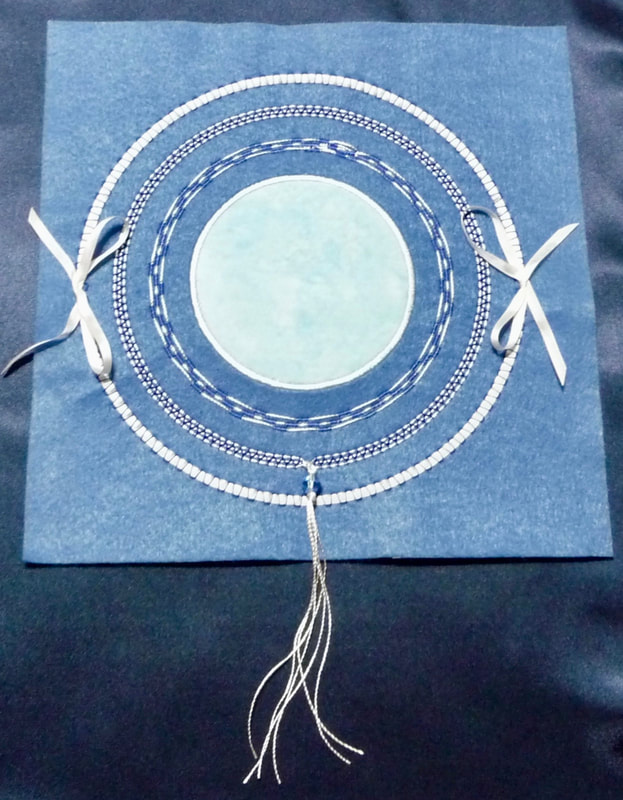
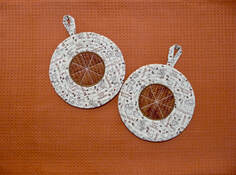
In the above photo you can see a circular sample where I used both embellishment feet to add interest and texture to the circle. These are two of my favorite embellishment feet and I use them for much more than circle stitching.
Picture
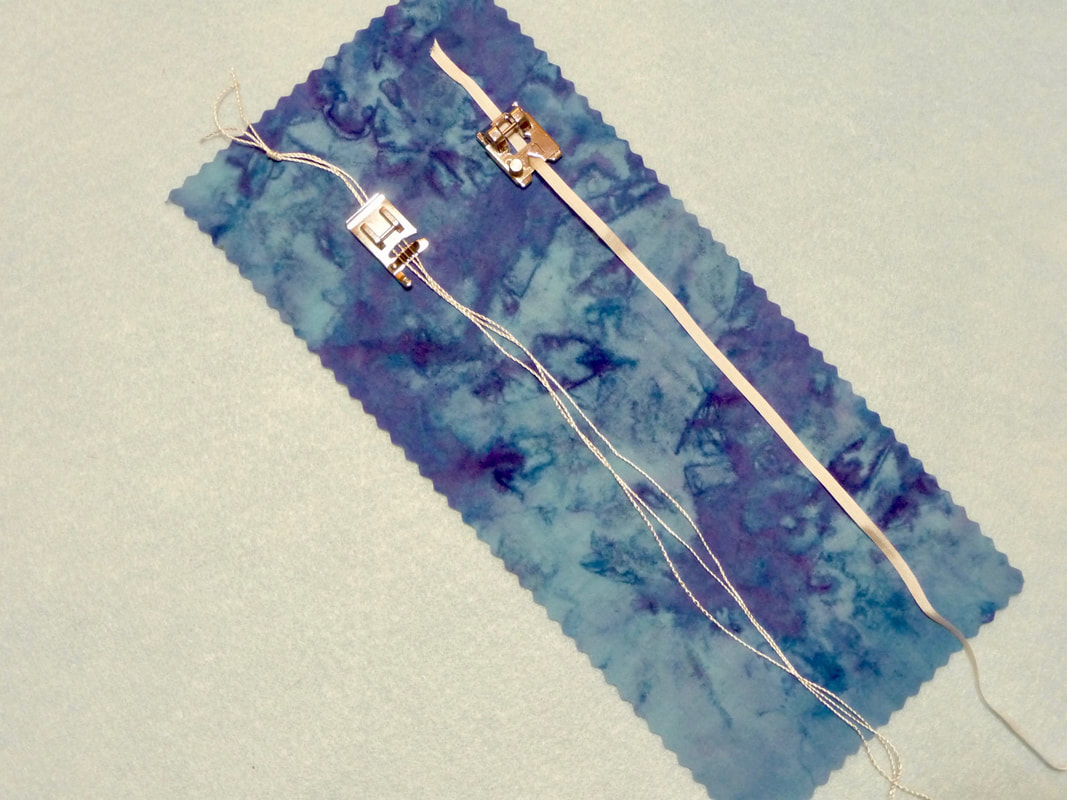
The three slot cording foot on the left is perfect for couching cords that are on the thin side. You can learn more about this foot HERE. The braiding foot is ideal for couching narrow ribbons. I used 4mm silk ribbon for this example.
Picture
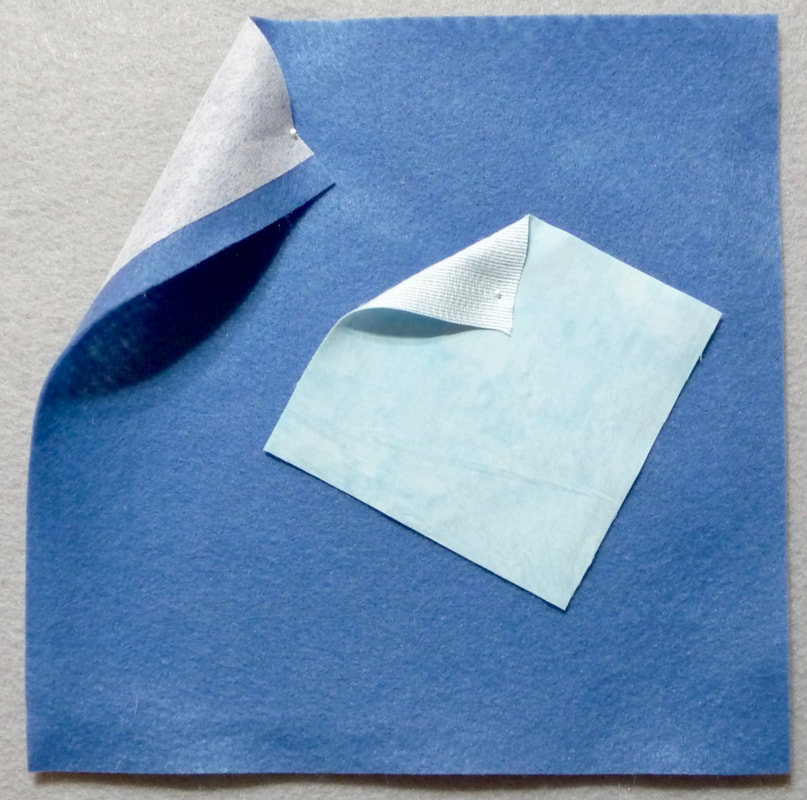
This attachment makes it really easy to sew a perfect appliqué in the shape of a circle. I started with a square backed with interfacing and placed it in the center of my felt practice piece.
Picture
Picture
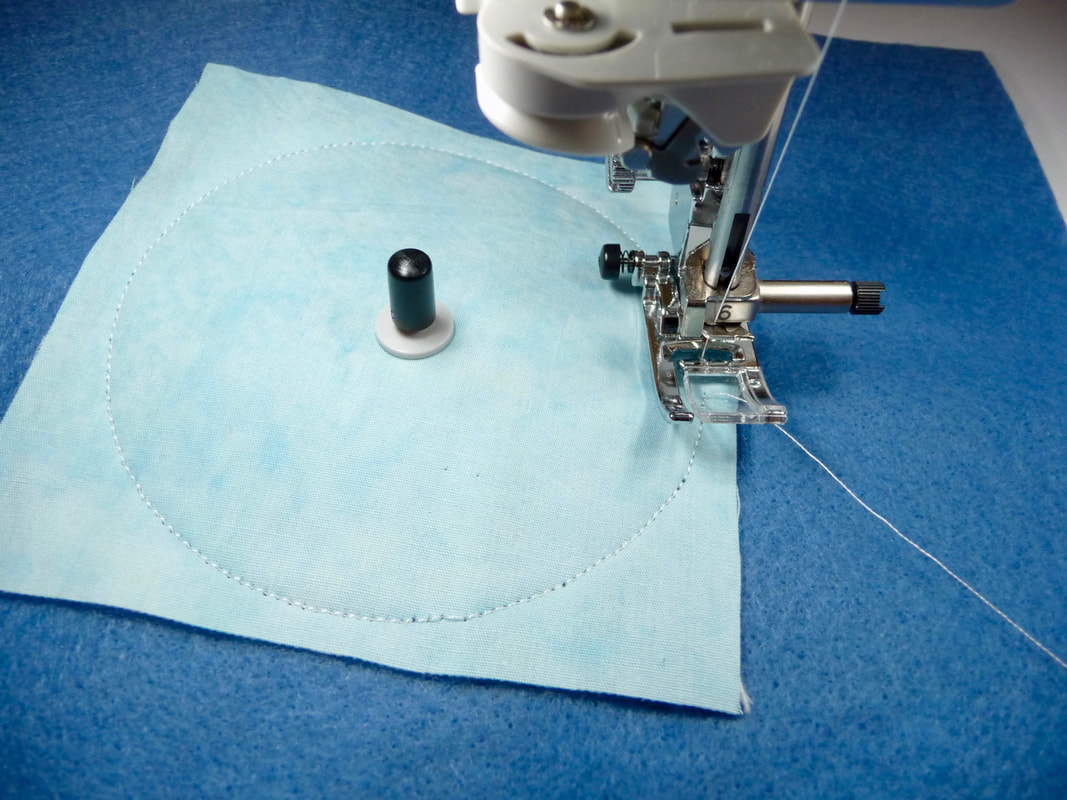
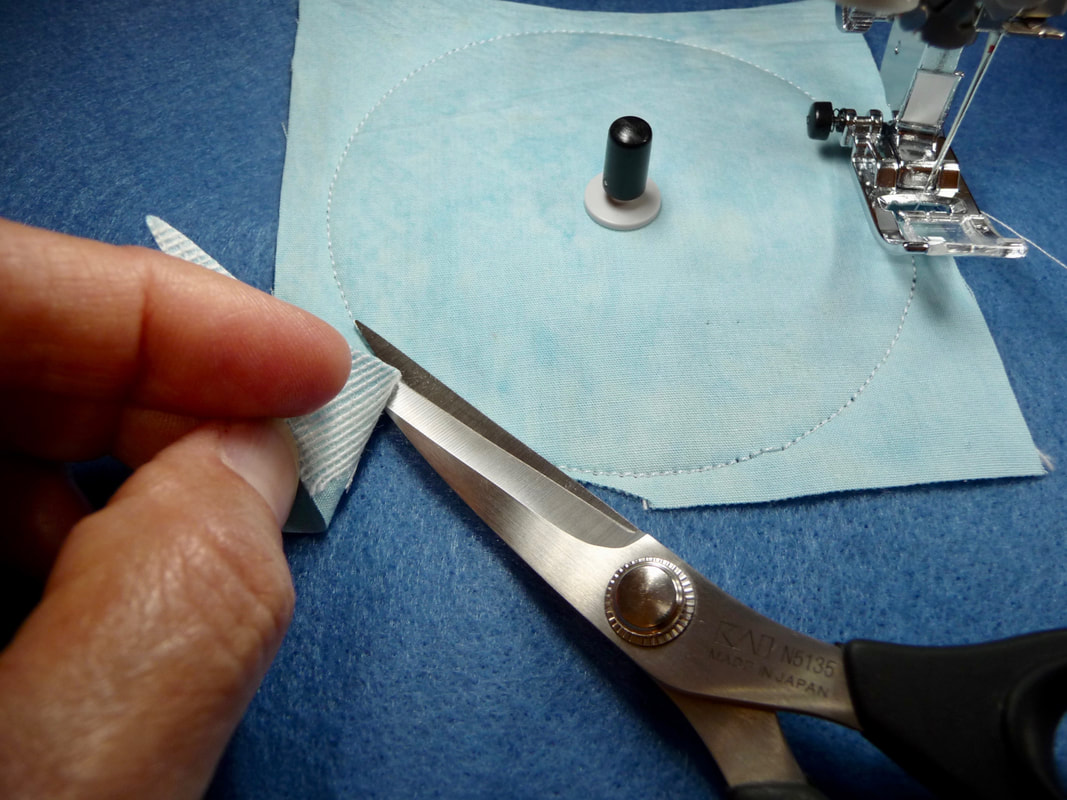
I set the circular attachment to sew a small circle using a straight stitch and then trimmed close to the stitching.
Picture
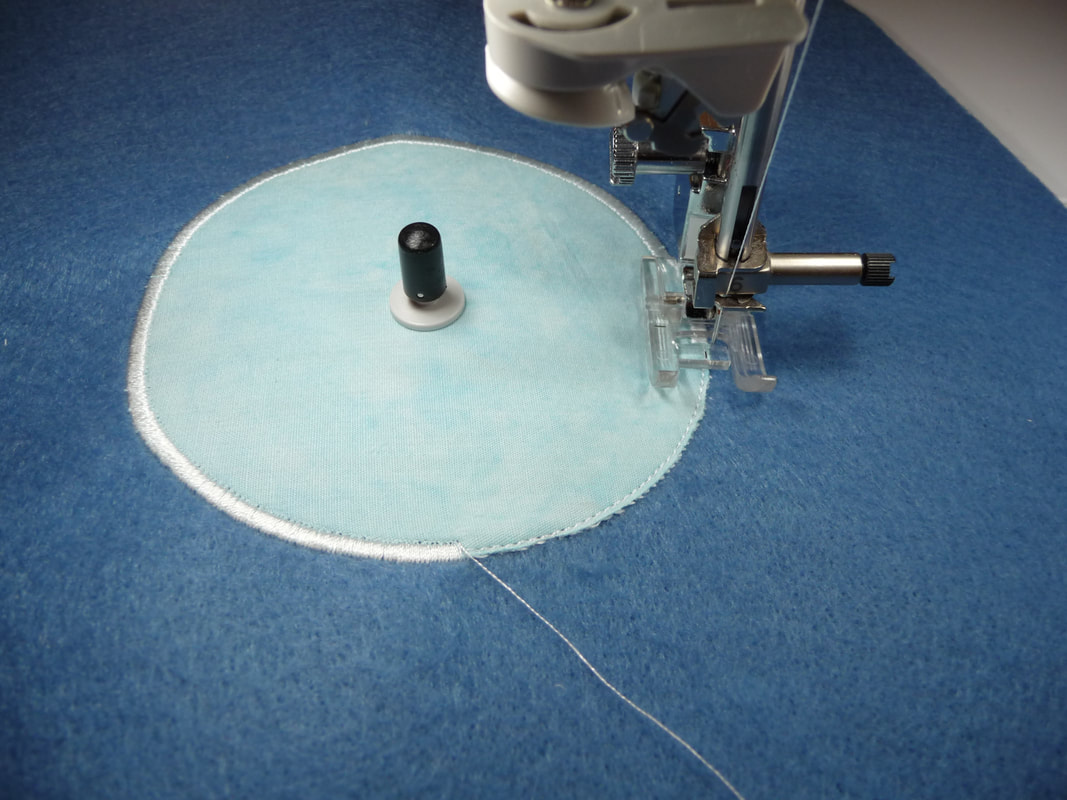
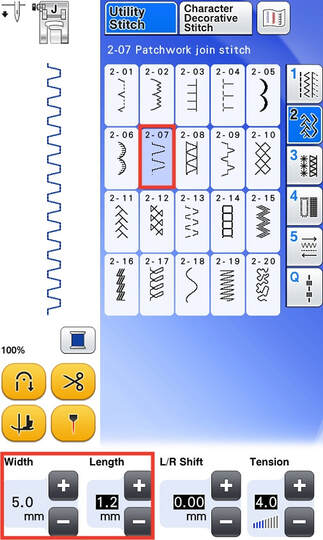
Next, I selected a zig zag stitch and set it for a medium width and a short stitch length to make it into a satin stitch. I switched to the Clearview foot and sewed all around the circle to cover the raw edge.

Picture
Picture
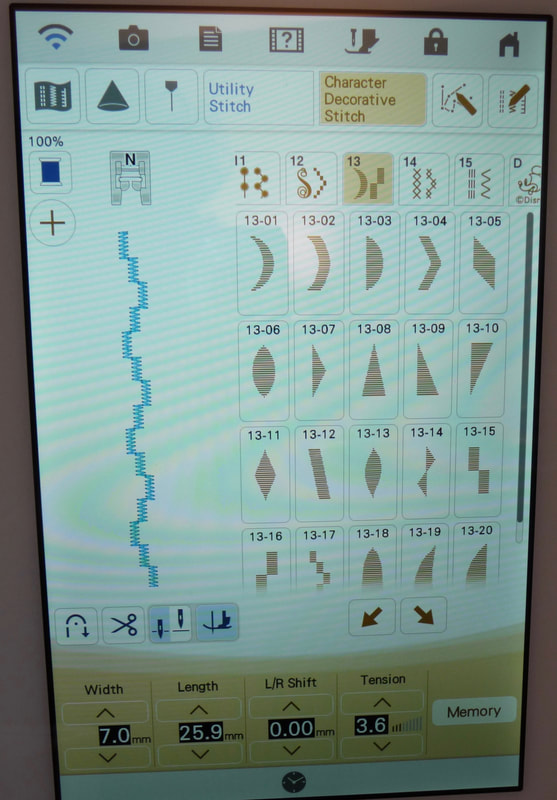
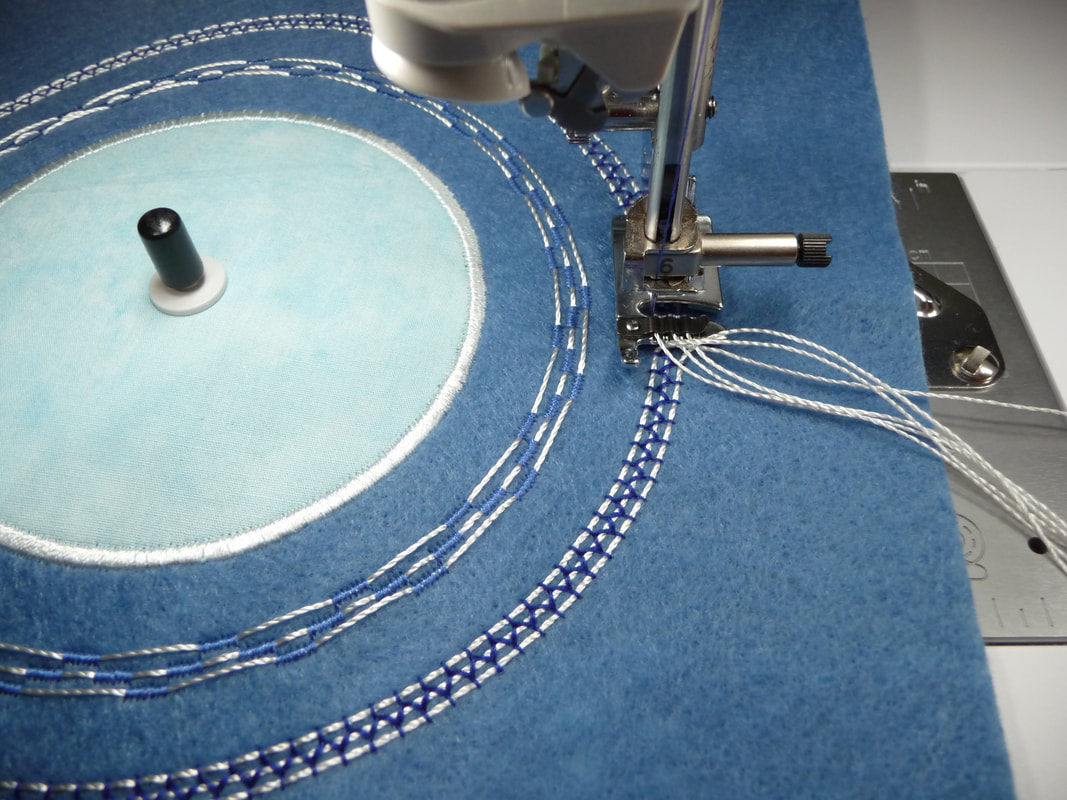
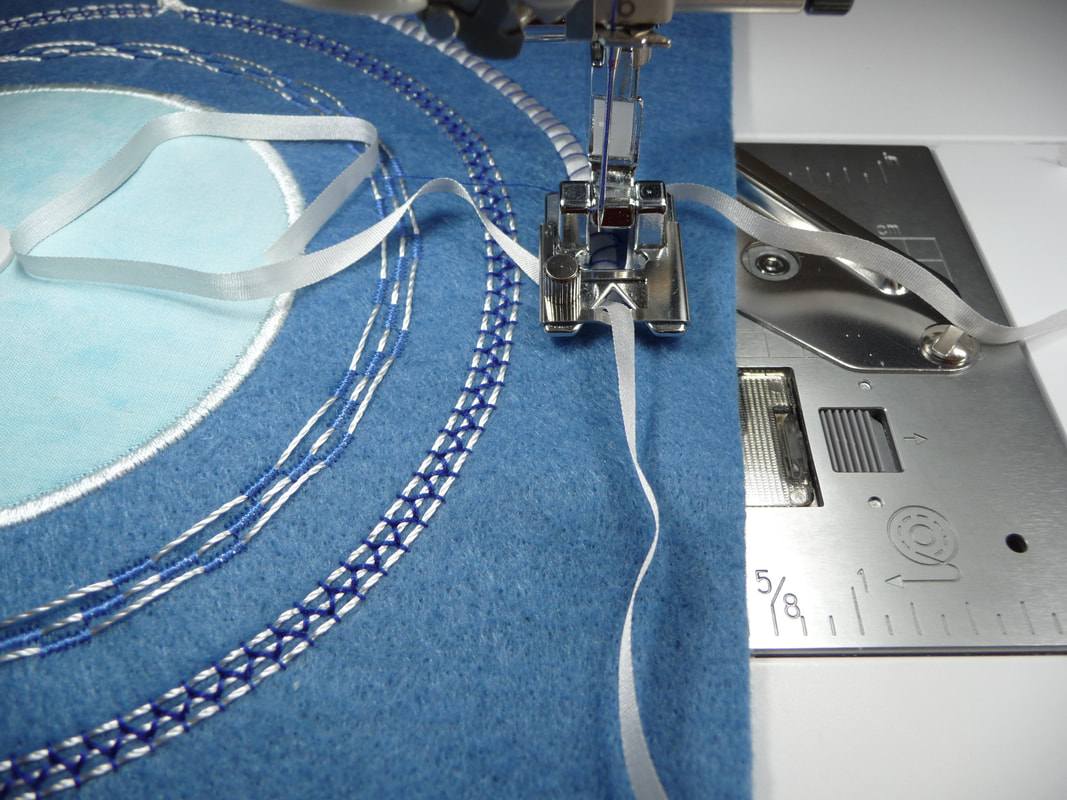
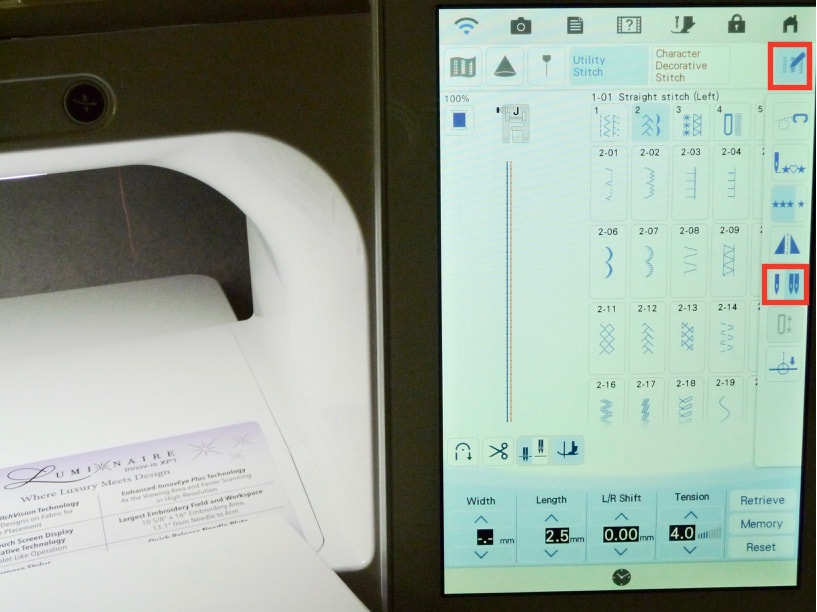
To couch down the cording I selected a stitch from the Character/Decorative menu. I love using this checkerboard style stitch to couch cords with the cording foot. The circular attachment makes it easy to do this in a perfect circle!
Picture
I started by threading the cords in the foot, knotting them at the back to keep them from slipping out.
Picture
I stitched all around the circle overlaping  stitches just a "smidge."
Picture
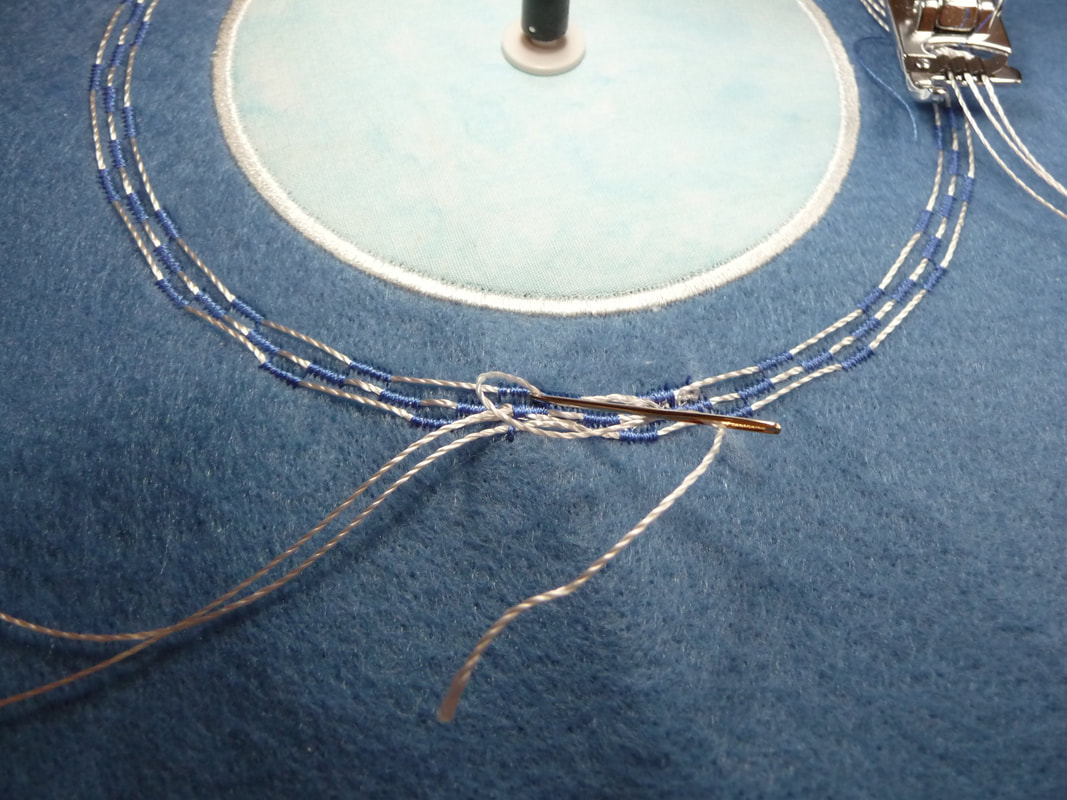
After using the tie off feature for decorative stitches, I fed the tails of the cord to the wrong side of the fabric using a tapestry needle.
Picture
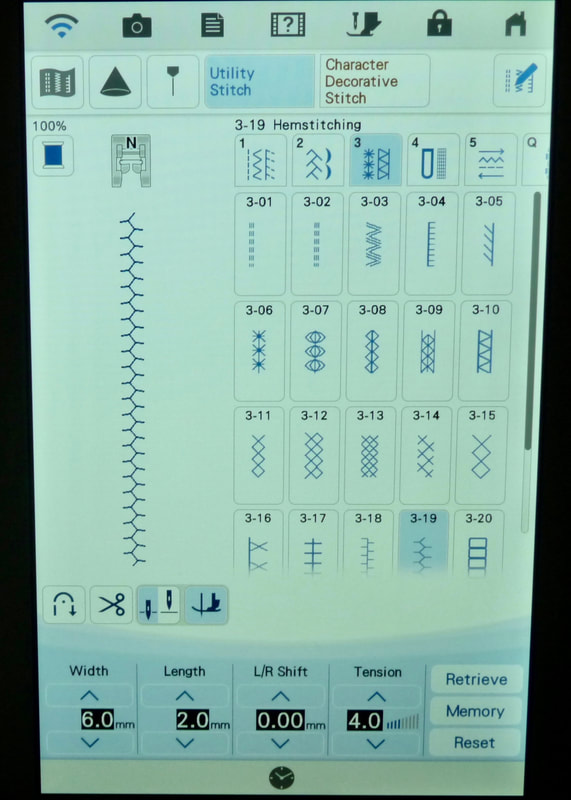
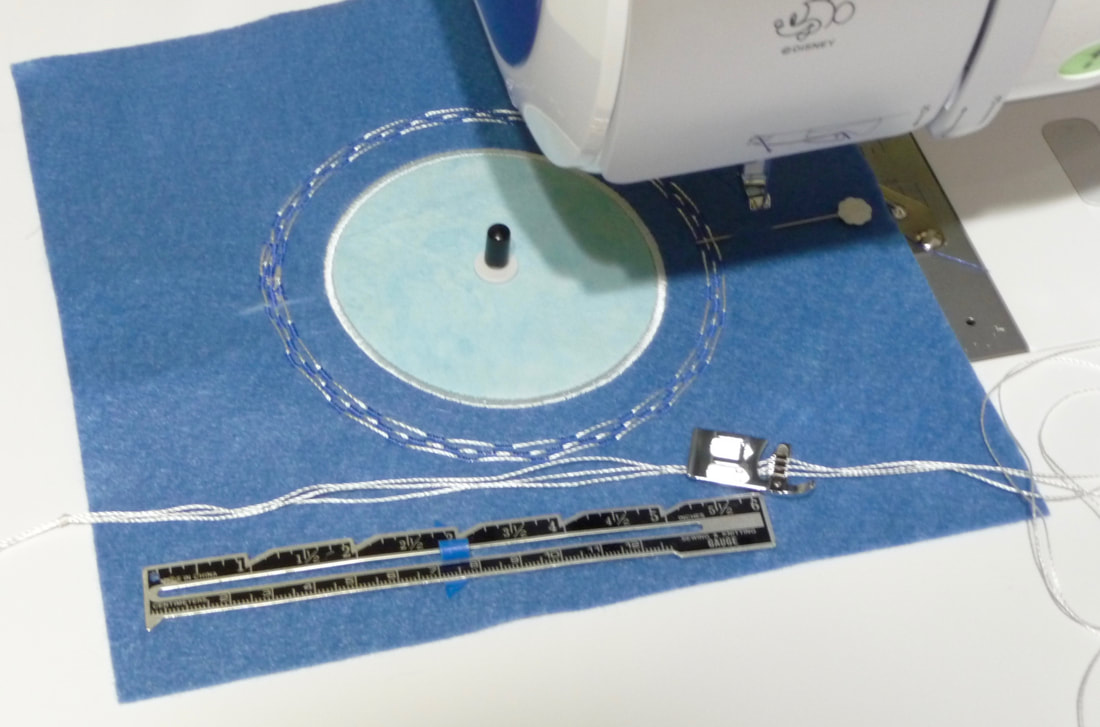
For the next circle I selected yet another favorite stitch. This one is considered an heirloom hemstitch but I htink it's perfect for couching down thin cords. Tip: In my example I used Pearl Crown Rayon, a decorative serger thread. A similar, easy to find alternative would be pearl cotton sold on skeins for hand embroidery.
Picture
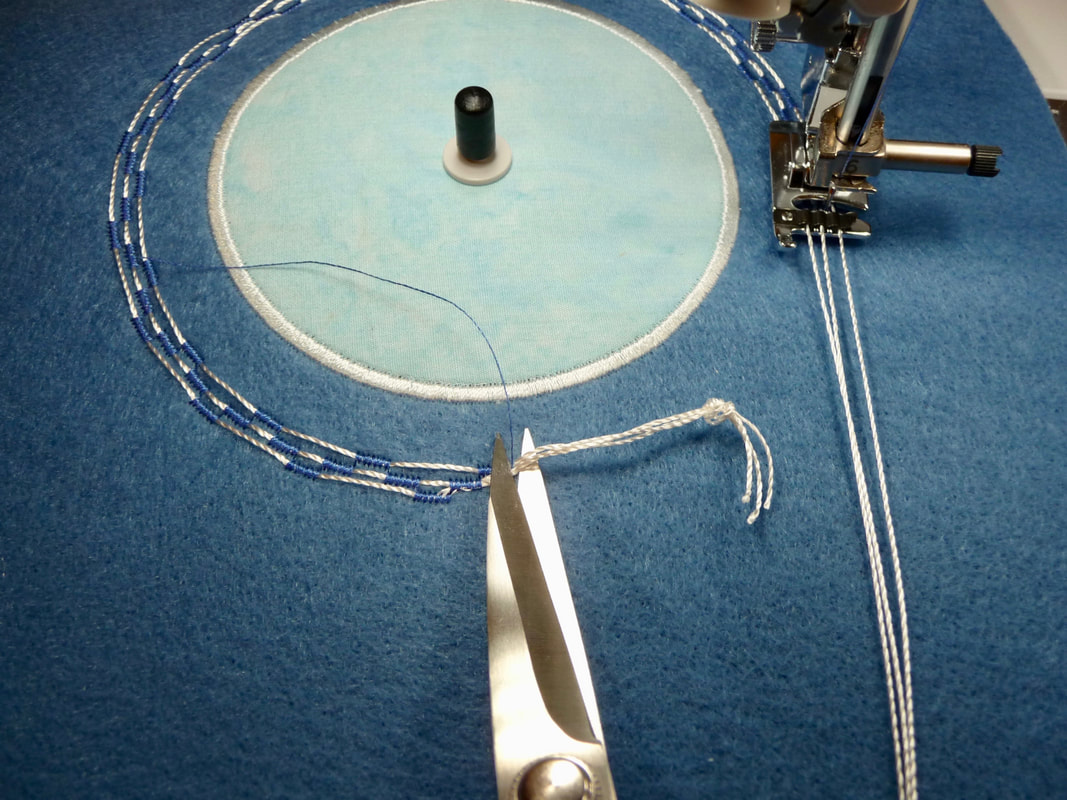
This time I left tails of cording at the beginning and the end of the stitching.

Picture
Tie loose cords together and for a tassel effect.

Picture
I decided to tie them in a knot, add a bead, and then tie more knots to keep the bead in place.

Picture
Picture
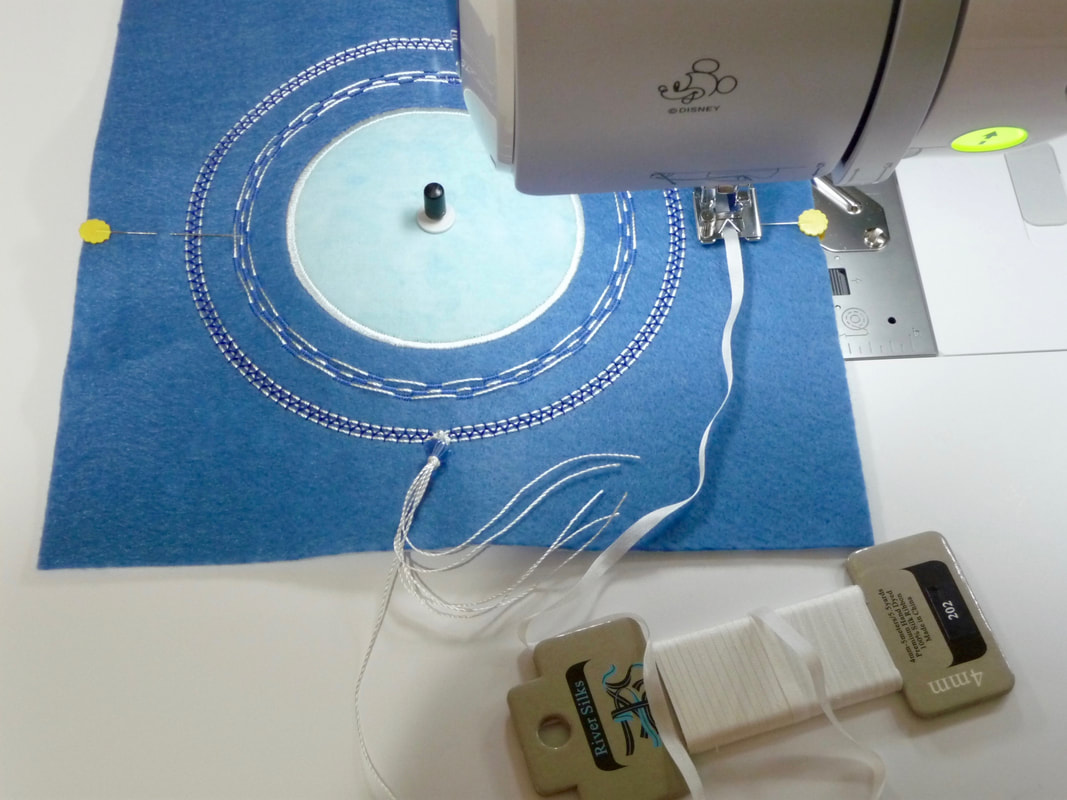
For my final row I threaded 4mm silk ribbon into the braiding foot. I selected another stitch that works well to couch ribbon in place. This time I started stitching at the side of the circle, sewing two half circles, leaving a tail of ribbon free at each end.
Picture

See how I started and stopped at the half-way point, left tails, and then sewed a second half circle.
Picture
I finished by tying the ribbons in pretty bows.

Looking for more circular sewing projects?
Here are a few links to explore on the Brother blog, where I contributed projects wearing my Brother Ambassador hat. Click on each image and it will take you directly to the project.
Picture
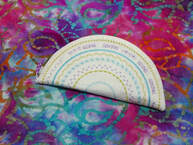
Going Sewing Circle Bag

Picture
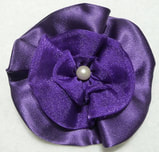
Glamourous Circular Rosette

Picture
Circular Potholders

If you have any comments or questions please let me know. I'd love to know if you have played with sewing in circles on your machine!
11 Comments

Tips for Sewing With a Twin Needle

10/10/2020

2 Comments

 
Picture
Twin or "double" needles ​have been around for a long time. Machines with even the most basic stitches can use a twin needle. As long as the machine has zig zag capability a twin needle will work on most all modern machines. Of course machines with extra stitches means extra opportunities! this post will introduce you to some of the many ways a twin needle can expand your sewing repertoire!
Decorative stitches from the utility menu look spectacular when stitched with a 2mm twin needle!
Picture
​​The tips are 2mm apart on this twin needle. Many machines come with this twin needle in the box of included accessories.
Picture
Check your machine for a twin needle key.
On Brother machines activating this key prevents you from choosing an improper stitch or stitch width.

IMPORTANT!!! Machine “thinks” you’re using a needle no larger than the 2mm version when you select this key.

Manually test other twin needles with all stitches to be sure needle does not hit the throat plate.
Picture
This blouse with corded 2mm pintucks was recently featured on It’s Sew Easy TV show 2002-1. CLICK HERE to read instructions and you'll find a link to watch the show!
Looking for more twin needle tips?
Picture
Wearing my Brother Ambassador hat I contributed a blog post on the topic of twin needle decorative stitching. You can read the post HERE.
But wait . . . there's more!
As a follow up to the original Brother blog post, I appeared on the Brother sponsored Facebook/YouTube Live show where we had a lively discussion on the topic of twin needles. I've posted the re-run here for you to watch.
This 55 minute video aired on the BrotherSews YouTube channel.
​I hope you enjoy watching it!
As I promised in the above video, here is my top ten list for twin needle techniques:
Top Ten Tips for Twin Needle Stitchery

  1. Check your machine manual for proper threading with a twin needle. Note that you cannot use any needle threader mechanism with twin needles.
  2. For best results use two identical spools of thread, same weight, same fiber content, and same brand if possible. Match the bobbin thread with your top thread. If you are doing only a small amount of stitching, and you have only one spool of thread, you can wind a bobbin to use as your second spool. You may need to be a bit creative as to how you position this extra bobbin on the machine. Make sure the thread reels off the bobbin smooth and easy, as it would for a standard spool of thread.
  3. Choose needle size and style based on your fabric. Twin needles are commonly found in the following types and sizes: Universal needles for a wide variety of woven fabrics, 1.6/70, 2.0/80, 2.5/80, 3.0/90, 4.0/100, and Stretch needles for knits, 2.5/75 and 4.0/75. If you are sewing on multiple layers of fabric or fabrics that are heavier such as canvas or denim, you may want to use a larger size needle. In my experience, stretch needles are essential when hemming knits. The style and tip of the stretch needle helps prevent skipped stiches and does not damage fine knitted fabrics.
  4. Topstitching with a 4.0 STRETCH TWIN needle on knits imitates the look of a cover hem stitch, although it is not nearly as “stretchy. With a twin needle, each needle shares the bobbin thread making a slight zigzag on the wrong side of the stitch.
  5. Topstitching is a common use for twin needles, resulting in a professional “ready made” look. With a twin needle you can sew two perfectly spaced rows. However, this stitch only looks good on the right side of the fabric. It is not suitable as a topstitch where the wrong side may show.
  6. Pretty little pintucks are possible when you use 1.6 or 2.0 needle. Pair the needle with a seven groove pintuck foot for heirloom style evenly spaced tucks. Note that tightening the upper tension may be necessary for pintucks that stand up. Use optional cording on the underside for a raised effect. Also, consider colored cording for “shadow pintucks” on translucent fabric.
  7. Thread slowly and carefully. If your machine has just one tension disc, both threads will share the disc. If there are two separate disks, at the point of the tension discs you will separate the threads, placing one thread on each side of the center tension disc.
  8. If your twin needle stitch is tunneling or not laying as flat as you like, simply loosen the upper tension a small amount at a time until the stitch is smooth and flat. On some lighter weight fabrics this may not be possible. If that is the case, consider addling permanent or temporary stabilizer to the wrong side of the fabric. Firming up the fabric will help keep the stitch flat.
  9. Sew at a slower speed when stitching with a twin needle, especially if you have threaded the machine with decorative (embroidery) thread.
  10. For straight stitching, be sure to use the center needle position on your machine. When zigzag or decorative stitches are selected, begin with a stitch width of 4.0mm and hand walk the needle as a precautionary measure before stitching to ensure that your needle will not hit the side of the throat plate. If you increase the stitch width you will need to keep checking to make sure the needles have clearance. Many decorative stitches are suitable. Some heavy or dense stitches may need to have the stitch length adjusted. Always test the stitch first on a fabric scrap.
If you have questions or comments I'd love to hear from you!
2 Comments
    Picture

    Author:

    Joanne Banko
    Freelance Sewing Educator

    I'd love to stay in touch with you!

    Click Here
    and Sign up for
    ​Sewing News, plus tips, tricks, and notifications about new blog posts.

    Archives

    June 2025
    May 2025
    March 2025
    February 2025
    December 2024
    October 2024
    September 2024
    March 2024
    February 2024
    September 2023
    July 2023
    June 2023
    May 2023
    March 2023
    February 2023
    January 2023
    December 2022
    November 2022
    October 2022
    September 2022
    August 2022
    July 2022
    June 2022
    May 2022
    April 2022
    March 2022
    January 2022
    December 2021
    October 2021
    August 2021
    July 2021
    June 2021
    May 2021
    April 2021
    March 2021
    February 2021
    November 2020
    October 2020
    June 2020
    May 2020
    April 2020
    March 2020
    February 2020
    January 2020
    November 2019
    August 2019
    July 2019
    June 2019
    May 2019
    March 2019
    February 2019
    January 2019
    December 2018
    September 2018
    August 2018
    July 2018
    June 2018
    March 2018
    February 2018
    December 2017
    September 2017
    August 2017
    June 2017
    April 2017
    February 2017
    January 2017
    December 2016
    September 2016
    July 2016
    June 2016
    May 2016
    March 2016
    February 2016
    January 2016
    December 2015
    October 2015
    September 2015
    July 2015
    June 2015
    May 2015
    March 2015
    January 2015
    October 2014
    July 2014
    May 2014
    March 2014
    January 2014

    *As a believer in full disclosure, I'd like you to know that Blog posts may contain affiliate links for products and services I know and trust. Purchasing items through a link marked * results in a small commission for me, with no extra charges for you.

    Categories

    All

    RSS Feed

© Copyright 2025 by Joanne Banko. All rights Reserved