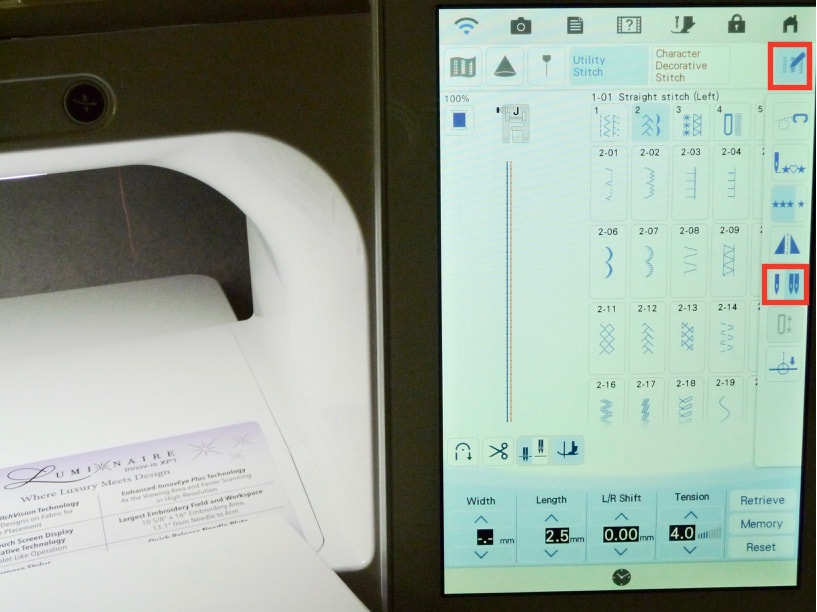
On Brother machines activating this key prevents you from choosing an improper stitch or stitch width.
IMPORTANT!!! Machine “thinks” you’re using a needle no larger than the 2mm version when you select this key.
Manually test other twin needles with all stitches to be sure needle does not hit the throat plate.
I hope you enjoy watching it!
- Check your machine manual for proper threading with a twin needle. Note that you cannot use any needle threader mechanism with twin needles.
- For best results use two identical spools of thread, same weight, same fiber content, and same brand if possible. Match the bobbin thread with your top thread. If you are doing only a small amount of stitching, and you have only one spool of thread, you can wind a bobbin to use as your second spool. You may need to be a bit creative as to how you position this extra bobbin on the machine. Make sure the thread reels off the bobbin smooth and easy, as it would for a standard spool of thread.
- Choose needle size and style based on your fabric. Twin needles are commonly found in the following types and sizes: Universal needles for a wide variety of woven fabrics, 1.6/70, 2.0/80, 2.5/80, 3.0/90, 4.0/100, and Stretch needles for knits, 2.5/75 and 4.0/75. If you are sewing on multiple layers of fabric or fabrics that are heavier such as canvas or denim, you may want to use a larger size needle. In my experience, stretch needles are essential when hemming knits. The style and tip of the stretch needle helps prevent skipped stiches and does not damage fine knitted fabrics.
- Topstitching with a 4.0 STRETCH TWIN needle on knits imitates the look of a cover hem stitch, although it is not nearly as “stretchy. With a twin needle, each needle shares the bobbin thread making a slight zigzag on the wrong side of the stitch.
- Topstitching is a common use for twin needles, resulting in a professional “ready made” look. With a twin needle you can sew two perfectly spaced rows. However, this stitch only looks good on the right side of the fabric. It is not suitable as a topstitch where the wrong side may show.
- Pretty little pintucks are possible when you use 1.6 or 2.0 needle. Pair the needle with a seven groove pintuck foot for heirloom style evenly spaced tucks. Note that tightening the upper tension may be necessary for pintucks that stand up. Use optional cording on the underside for a raised effect. Also, consider colored cording for “shadow pintucks” on translucent fabric.
- Thread slowly and carefully. If your machine has just one tension disc, both threads will share the disc. If there are two separate disks, at the point of the tension discs you will separate the threads, placing one thread on each side of the center tension disc.
- If your twin needle stitch is tunneling or not laying as flat as you like, simply loosen the upper tension a small amount at a time until the stitch is smooth and flat. On some lighter weight fabrics this may not be possible. If that is the case, consider addling permanent or temporary stabilizer to the wrong side of the fabric. Firming up the fabric will help keep the stitch flat.
- Sew at a slower speed when stitching with a twin needle, especially if you have threaded the machine with decorative (embroidery) thread.
- For straight stitching, be sure to use the center needle position on your machine. When zigzag or decorative stitches are selected, begin with a stitch width of 4.0mm and hand walk the needle as a precautionary measure before stitching to ensure that your needle will not hit the side of the throat plate. If you increase the stitch width you will need to keep checking to make sure the needles have clearance. Many decorative stitches are suitable. Some heavy or dense stitches may need to have the stitch length adjusted. Always test the stitch first on a fabric scrap.


 RSS Feed