Let's go Sew LIVE shows for the past two months have been all about the world of sergers. While both of these shows are packed with information, I will readily admit they just scratch the surface. I've got plans for additional videos with more in-depth tutorials for you so stay tuned!
By way of introduction, I got into the serger universe before they were available to the home sewing market. In fact, my first serger experience was at the tender age of 16 when I started working for a custom drapery manufacturer.
The first serger I touched sat in a pan of oil, stitched at lightning speed, had no manual to reference and no color coding or threading chart to guide the operator of such a beast. I use the term beast, tongue in cheek. While it was a bit of a challenge to master, it operated flawlessly and made quick work of seaming together panels of expensive fabric for designer jobs and high-end department stores.
I could tell lots of stories of what it was like to work there for several years during high school and then part time as I attended fashion school. However, that's a topic for another time. Let's just say it was a real opportunity to get in on the ground floor serger wise. In fashion school several of us bought the first home model type of serger, which at that time was sold by industrial dealers that catered to small business and cottage industries. After graduating from Progressive Fashion School in good old Cleveland, Ohio, I used that machine in my start up custom dressmaking business. It was a huge asset to finish seams, so they looked like they came from ready to wear.
I say all this to set the stage for the start of a series of serger related blog posts along with links to current & recent videos on the topic. If you've been following my Sew . . . Tell Me Live shows you know that I did two in a row based on commonly asked serger questions. I'll link to these videos at the end of this post.
For today, I'm sharing images and descriptions of a few of the most commonly used serger stitches, with both graphics and actual photos. Let's talk about choosing and using common serger stitches. Here we go!
It’s true that an ordinary straight stitch machine can be used to execute most any type of sewing project. Sergers however, are very unique in that they produce stitches that are unavailable on any sewing machine. Even if you posess the latest computer equipped model you will benefit from adding a serger to your repertoire. While never meant to replace your sewing machine, it is the perfect addition to a well-equipped sewing room.
Contemporary sergers are capable of forming many different types of stitches. My intent is to give a brief overview of serger stitches that can be utilized for construction techniques and some decorative effects. We'll start with the 4, 3, and 2 thread stitches. I’ve listed some of these common stitches along with some of the best ways to make use of them. Stay tuned for more serger stitches and tips in future posts.
Contemporary sergers are capable of forming many different types of stitches. My intent is to give a brief overview of serger stitches that can be utilized for construction techniques and some decorative effects. We'll start with the 4, 3, and 2 thread stitches. I’ve listed some of these common stitches along with some of the best ways to make use of them. Stay tuned for more serger stitches and tips in future posts.
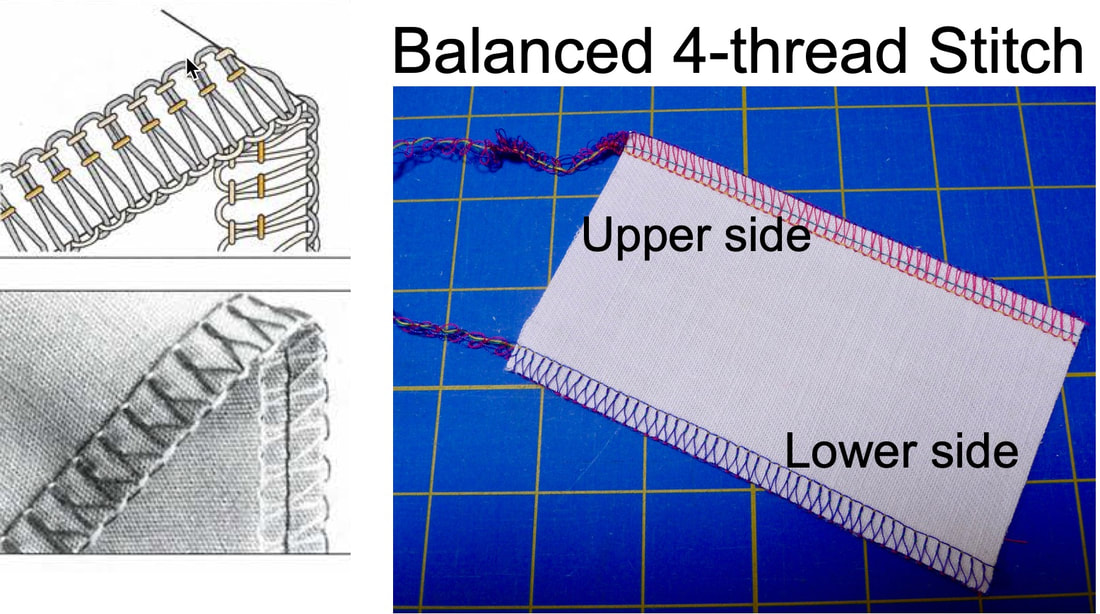
This is by far the most common and perhaps the most basic stitch found on today’s sergers. Here, the machine uses two needles in combination with the upper and lower looper to form a stitch approximately 1/4 inch wide. While it doesn’t lock quite as tight as a regular sewing machine stitch, it does sew a seam and overlock the raw edges in one step.
It's ideal for sewing and finishing seams on most any fabric. With two needle lines forming the seam, it is a strong stitch. High stress areas such as armholes and crotch seams should be re-enforced by sewing alongside or on top of the serger stitch with a conventional straight stitch. Remember, a serger stitch is a “looped” stitch. This makes it more flexible than a sewing machine stitch but also makes it possible for some of the stitch to show form the right side if there is significant stress put on the seam. On many fabrics such as spongy knits, the threads making up the stitch are “absorbed” by the fabric, so they aren't seen from the right side.
Tip: It's nice to have all 4-threads perfectly match your fabric so your seam is totally color coordinated on both right and wrong side. However, it's perfectly okay to blend threads and use a mix of colors. Just know that the leftmost needle and the lower looper are the two threads that should match your fabric best. If there is a slight amount of pull on the seam on the right side, these are the two thread that will show. The other two are only visible on the wrong side.

One needle, along with the upper and lower looper are necessary in order to form this stitch. Most sergers use the left needle to achieve a wide stitch and the right needle to achieve a stitch that is narrower. I prefer this stitch for seaming knit fabric. It provides for stretch and recovery of the seam. Although the 4-thread stitch can be used for more stable knits, the extra needle thread in a 4-thread seam somewhat inhibits the flexibility of the seam on lighter and more stretchy knits so I prefer to drop the right needle and serger with 3 threads.
The 3-thread stitch also neatly finishes the raw edges of seams that are sewn on a conventional machine. Using a combination of your regular sewing machine straight stitch along with a 3-thread overlock allows you to produce a seam that is sewn securely, as well as being neatly finished at the raw edges.
Serge finish edges and sew a conventional seam, pressing seams open, or sew, then serge and trim excess seam allowance for a seam pressed to one side. Use whatever method is best for your project.
A 3-thread stitch is ideal for finishing raw edges that traditionally required “clean finishing” by zig zagging or overcasting, turned under edges under, or bound edges. Hem and facing edges are prime examples.
Since a balanced three thread stitch looks almost identical on both the upper and lower looper side, it makes for a reversible stitch particularly when heavy threads are used in the loopers for decorative serging.
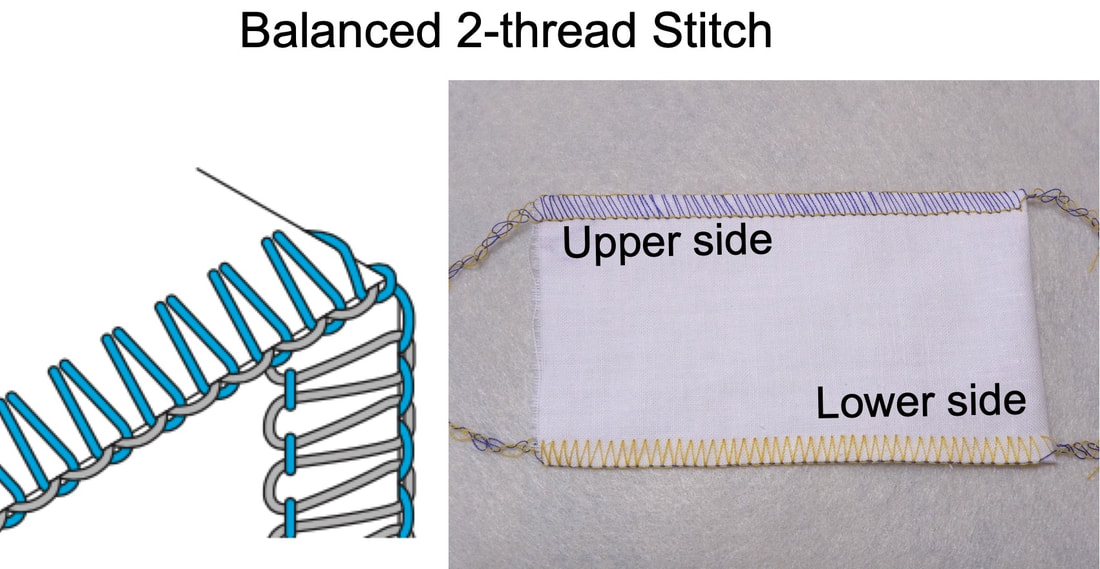
Little known and infrequently used, this stitch has become much more common on many serger models. In my opinion it is a valuable and useful option.
An attachment is used to de-activate the upper looper so that only one needle and the lower looper are used to form the stitch. This stitch does not lock at the seamline, making it unsuitable for use as a regular seam, unless you are using it as a flatlock stitch to seam two ravel proof materials together. Again, not trying to tease you but I'll have more on that technique in a future post.
A 2-thread stitch produces a lightweight finish requiring only two thread spools or cones. This makes it economical, especially for those who sew with a wide variety of colors and like their serger thread to match their fabric perfectly.
When used to finish the raw edge of fabrics this stitch is properly called overcast, not an overlock as it overcasts the raw edge without locking at the seamline.
A 2-thread stitch can also be used for a variety of decorative finishes. In addition, a variation of this stitch can be used to form a rolled hem. Using only two threads makes it a lighter weight counterpart to the three-thread version. More on the rolled hem coming soon!
I hope this gives you some insight into serger stitches that will help you sew neater, nicer, and more professional looking projects. Please feel free to leave your comments and questions below. I'll make note of them for future posts and videos.
You can watch the first live show with serger Q&A when you CLICK HERE to watch on my YouTube channel.
You can watch the second live show with serger Q&A when you CLICK HERE to watch on my YouTube channel.
And, if you haven't already done so, I invite you to CLICK HERE to subscribe to the channel and hit the bell for notifications so you never miss a new video.
You can watch the second live show with serger Q&A when you CLICK HERE to watch on my YouTube channel.
And, if you haven't already done so, I invite you to CLICK HERE to subscribe to the channel and hit the bell for notifications so you never miss a new video.
Download this article in PDF form:
| got_the_urge_to_serge_5_27_23.pdf |

 RSS Feed