letsgosew.com
  • Home
  • Contact
  • Privacy Policy
  • Sign Up for Sewing News, Freebies, & Updates
  • Order Just Jackets Embroidery Collection
  • Just Jackets FAQ
  • Order Wrapped in Embroidery Book by Joanne Banko
  • Joanne Banko's Blog
  • Machine Embroidery Survey
  • FREE Tutorials and Tip Sheets
    • NEW! Serger Sample Sheet
    • NEW! 2-Thread Serger Techniques-Pt.1
    • NEW! Basic Serger Stitches
    • New! Sew with Your Feet_Resources
    • New Project! Chic Triangle Scarf
    • New! Embroidered Sachet Envelope Project
    • Denim Re-design Hanging Organizer
    • Sewing a Cargo Pocket
    • NEW! Interfacings for Embroidery Tip Sheet
    • Making Kitchen Towels & FREE Cornucopia Applique Design
    • NEW! Embroidery Placement Positioning Tips
    • Tip sheet - 5 Reasons Quilters Need A Serger
    • Free In-the-Hoop Patch Pocket Design
    • Serging versus Sewing
    • FREE Project-Embroidered Gift Tag with Gift Bag
    • Tip Sheet - Pillow Pointers
    • Tip sheet_Sew Straight Laser for Seams
    • Embelishment Tips from dime V.111
    • Tip sheet - Shannon Embrace Double Gauze
    • Tip sheet - Fun with Fonts
    • Fabric Tip Sheet- Sewing Faux Suede
    • Tip sheet for Sewing & Embroidering with Metallic Thread
    • Fleece Ruana Pattern: As seen on PBS It's Sew Easy TV
    • Fabric Tip Sheet - Crepe Back Satin
    • Fabric Tip Sheet-Sewing Slinky Type Knit
    • Fabric Tip Sheet - Fleece
    • Fancy Footwork Tipsheet - About the Walking Foot
    • Fancy Footwork Tip Sheet_Basic Appliqué
    • Fancy Footwork Tip sheet - Ruffler Attachment
    • Fancy Footwork Tip Sheet - Narrow Hems with a Standard Foot
    • Fancy Footwork Tip Sheet - Non Stick Foot
    • Tip sheet - Machine Embroidery Pattern Connection Resources
    • Tutorial_Embroidered Greeting Card Project
    • Tip Sheet - Machine Set up for Shirring
    • Tip sheet - Snowman and Target Markers
    • Tip Sheet for Printing on Fabric
    • Tip sheet-Five Ways to Finish Fleece Blankets
    • T-Shirt Transformation Tutorial
    • Project- Serge a Little Girl's Sweet Summer Dress
    • Tip Sheet for Fleece Frame Shape Appliqué
    • Tip Sheet - Bobbin Work Sewing & Embroidery
    • Tip Sheet - Custom Covered Buttons
    • Tip Sheet - Liquid Stabilizers
    • Tip sheet - Appliqué with Brother XV8500D & ScanNCut
    • Project - Sheer Chiffon Wrap
    • Project - Pearl Trimmed Candle Ring
    • Tip Sheet -Mitered Satin Blanket Binding
    • Fabric Tip Sheet_Knit Know How
    • Tool School Tip Sheets
    • ITH Project Planner
  • As seen in DiME Magazine - Photo Gallery
  • Sewing and Embroidery Events
  • My Sewing Story
  • It's Sew Easy TV Online Blog
  • IT'S SEW EASY TV Videos & Bonus Files
    • NEW! It's Sew Easy TV Series 2100
    • It's Sew Easy TV_Series 2000
    • It's Sew Easy TV_Series 1500
    • It's Sew Easy TV - Series 1600
    • It's Sew Easy TV_Series 1700
    • It's Sew Easy TV Series 1800
    • It's Sew Easy TV Series 1900
    • NEW! Superstar Sewing Stitches
    • NEW! Classy Textured Cape
    • NEW! Baby Bath Wrap
    • NEW! Detachable Collar
    • Sew a Swimsuit
    • Machine Embroidered Garments
    • Kimono Blouses
    • Custom Covered Hangers
    • Sewing Beautiful Belts
    • Felted Flower Hat Trim
    • Sew a Waffle Weave Robe
    • Learn about Couching accessories!
    • Turn a Pashmina into a Trendy Topper
    • Machine Embroidered Reverse Applique
    • Machine Embroidered Knit Dress
    • Use Non-Stick Foot to sew a Custom Luggage Tag
    • Serge & Sew Broomstick Skirt
    • Machine Embroidered Western Jacket
    • Machine Embroidered Bobbin Work Pashmina
    • Embroidered Pajamas
    • Sewing Pearls and Sequins
    • Learn how to use the Fringe Foot
    • Quilted Pinwheel Patchwork Tote
    • Machine Embroidered Lace for Lingerie
    • Sewing Circles with a Circular Attachment
    • Sew with the Edge Joining Foot
    • Re-style Tops for Little Girls
    • Short Style Tip- Blouse Embellishment
    • Learn how to make pretty piping using the Piping Foot
    • Embellish with the Three Slot Cording Foot
    • Facebook Live Interview 12-4-2018
    • Machine Embroidery - Starter Tips

Happy Hemstitching by Brother Ambassador Joanne Banko

8/20/2022

18 Comments

 
Picture
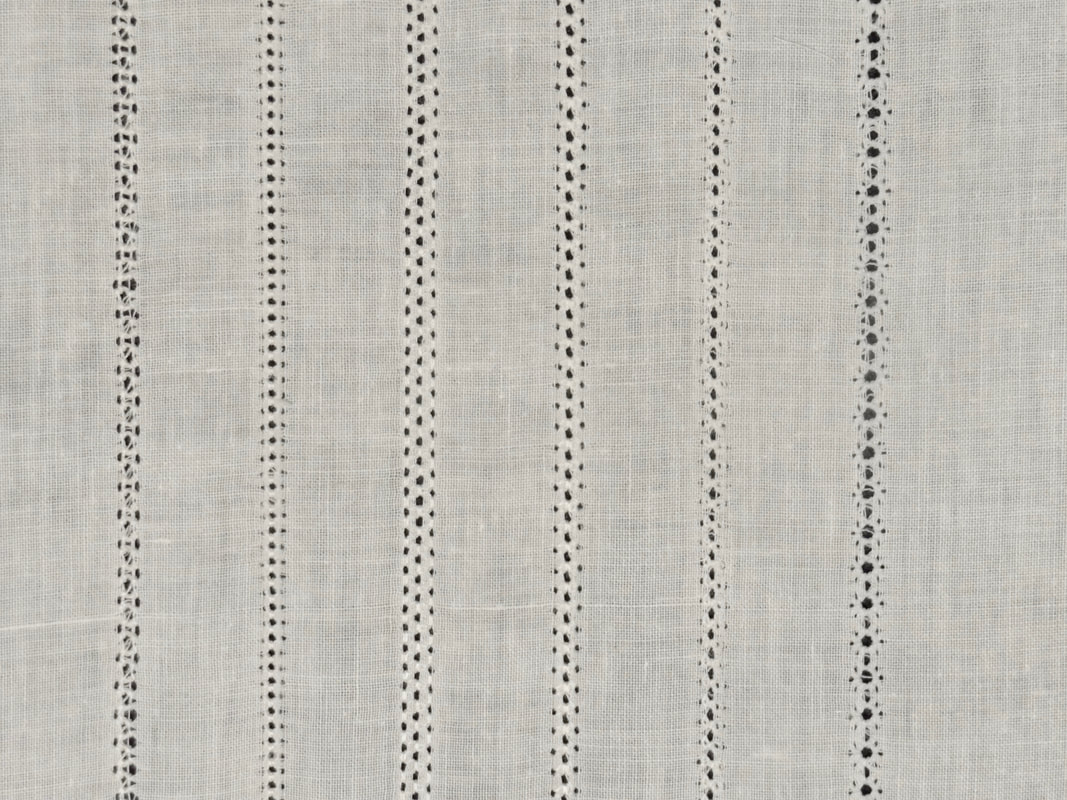
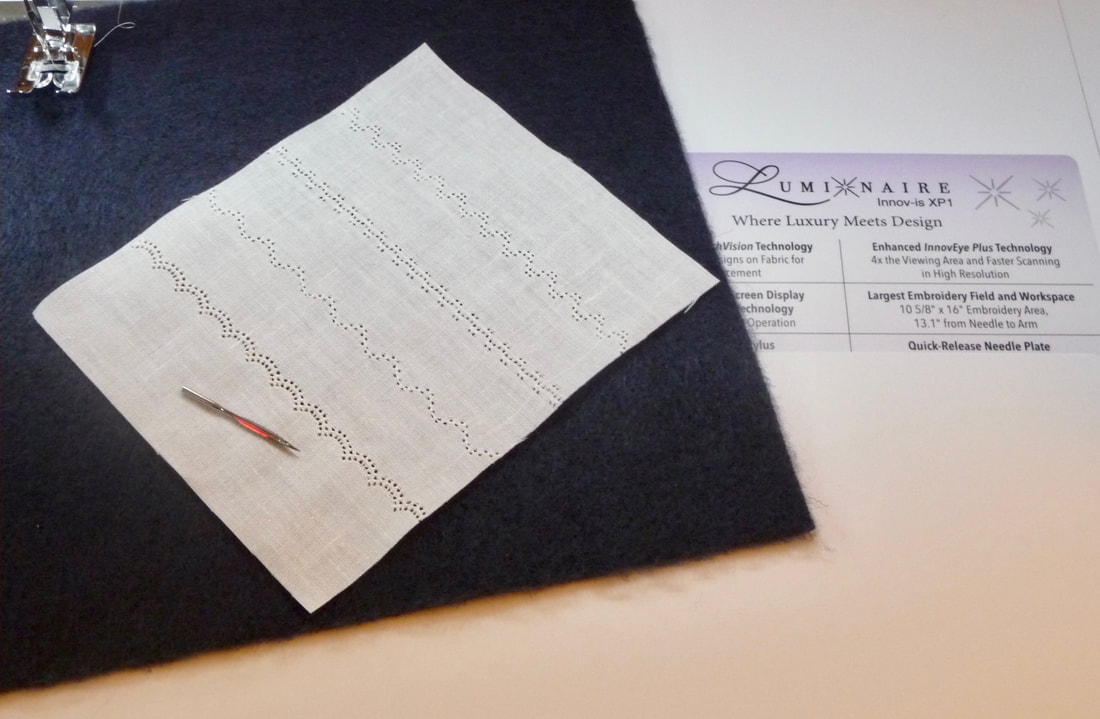
In this tutorial I’d like to introduce you to the art of hemstitching with various stitches included in the hemstitching category on my machine. The images and stitches you see here are from the Brother Luminaire, but if you look closely at the stitches, you'll likely find identical or similar stitches on your own machine.
Picture
Hemstitched items have been around for many years. Formerly created with tedious handwork, in the late 1800’s a machine was developed to produce hemstitching in a fraction of the time it took to create by hand.

Somewhere along the line a specialty needle called a wing needle was developed for modern, household machines. Combined with special decorative stitches suited for use with a wing needle, sewing enthusiasts can now create hemstitched effects as easily as sewing a straight stitch! In this tutorial you’ll learn more about creating these delicate, delightful stitches yourself. Are you ready? Let’s go sew!
Picture
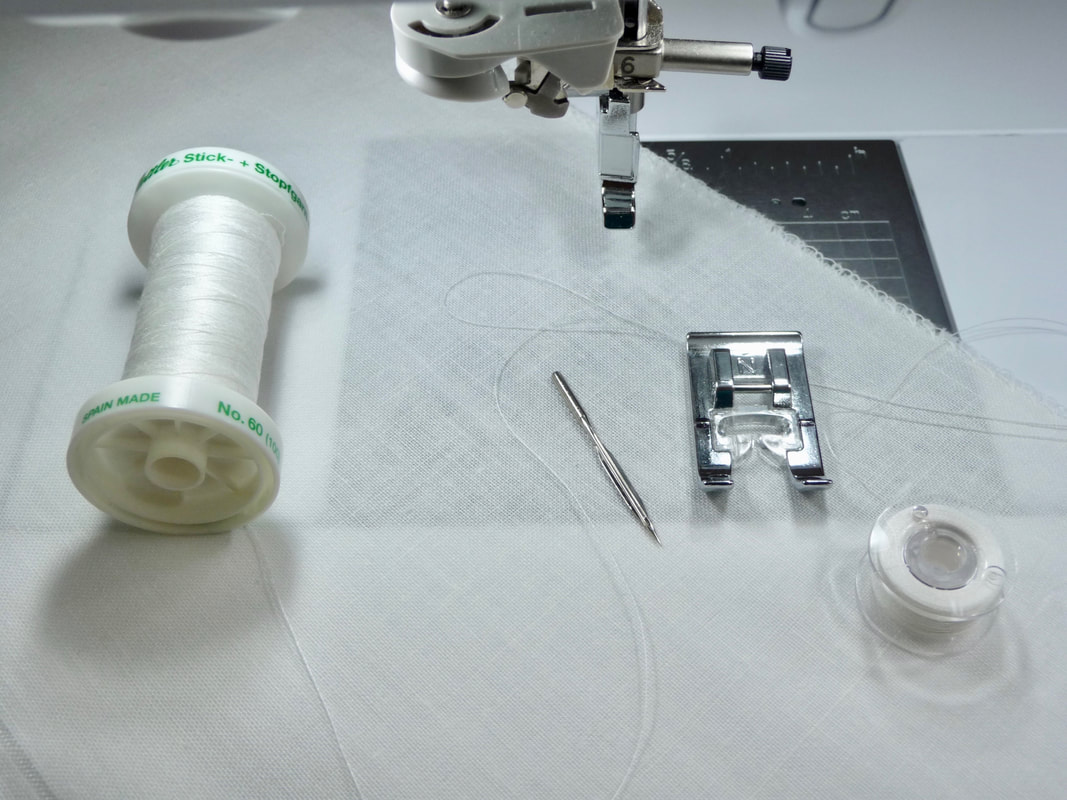
You'll need some basic supplies to get started.
  • Fine, smooth thread such as 60 weight silk finish cotton, 80 weight cotton, or 100 weight silk. Feel free to experiment with other threads. In general, natural fiber threads work best. You’ll want the thread weight not to exceed 60 weight. Thicker thread will not produce pretty stitches. Check the numbers on the spool and always use good quality thread.
  • Optional – Fine crochet cotton or thin decorative cord, for threading through wing needle stitching.
  • Large-eyed tapestry needle for threading crochet cotton through holes.
  • Wash out marker for marking lines on fabric.
  • Preferred fabrics include natural fiber fabrics that are not tightly woven. I have successfully hemstitched on the following: Linen, linen/ramie or linen/cotton blends, cotton batiste and cotton lawn. Feel free to try other fabrics, keeping in mind the fact that holes created by the needle are more prominent on lightweight natural fibers without a tight weave. Polyester has memory and does not produce wing needle holes.
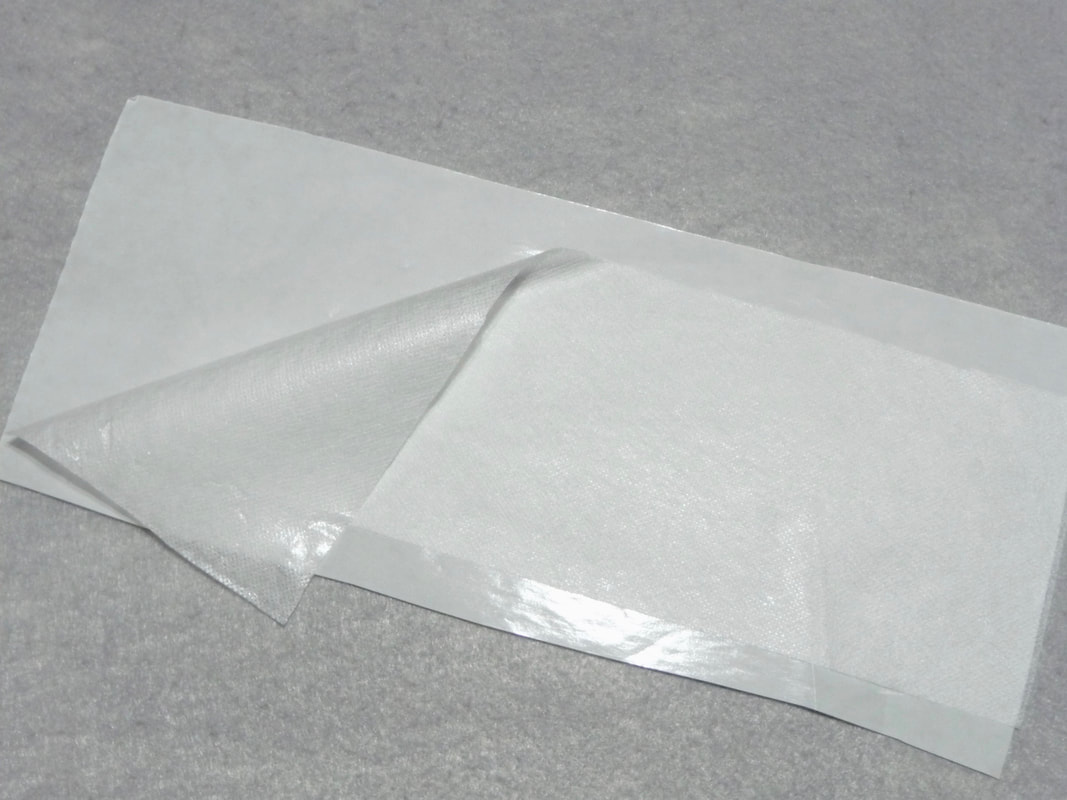
  • Adhesive backed water-soluble stabilizer, such as Brother product #SA5906
  • Ordinary fabric spray starch or other wash out stiffener. Read more about temporary fabric stiffener in this post HERE.
  • Wing needle, size 16 to 19.
More about the wing needle: This specialty needle is large, with wide “wings” or flanges on each side of the eye of the needle. When used with stitches that enter the same spot on the fabric multiple times, the wing pierces the fabric and spreads apart the threads that make up the weave of the fabric. Stitches then fill the area around the hole, keeping the threads separated and creating a lacy, open work look. It’s essential that the fibers are easily pushed apart and the thread is thin so that the hole is not filled up from the thickness of the thread. Natural fibers work best because they stay in place. Synthetics have memory and tend to “bounce back, while the natural fibers stay pushed apart.

Below are some important set-up guidelines and general rules to follow for hemstitching: 
  • Begin with a clean machine. Pop up the throat plate and clean out the dust bunnies. Be sure your bobbin case is seated correctly when you put the machine pack together.
  • Wind a matching bobbin with your chosen thread. When threading the machine do not use the automatic needle threader. Simply thread the eye of the needle by hand. In addition, do not use the auto cut function or the scissors key.
  • When sewing, be sure to stitch at a slow to medium speed so the holes have the chance to form properly. I like to pull one or two vertical threads out of the fabric to both mark my lines of stitching and give the wing needle an improved chance of spreading the fibers apart. If this is easy for you to do, go ahead and try it. If not, it’s perfectly okay to skip this step.
  • Pre-treat fabric with spray starch to make it smooth and somewhat firm. If you choose to use strips of the water-soluble stabilizer you will not need to heavily starch your fabric. However, without this stabilizer you’ll need several applications of starch, ironing until the fabric is completely dry between each application of spray. Tip: I prefer an old-fashioned flat bottom dry iron for this process. The addition of strips of water-soluble attached to the wrong side of your fabric underneath the stitching area makes it really easy to stabilize the fabric for this type of stitching. I like to save leftover strips from embroidery to use for decorative stitching like this. Peel away the paper and apply the adhesive to the wrong side after lightly starching the fabric. See image below:​
Picture
I like to mark stitching lines either by pulling thread(s) along the grain of the fabric, or using a wash out pen. Tip: If you're able to pull a few threads, you'll find that wing needle holes are more prominent in your fabric.

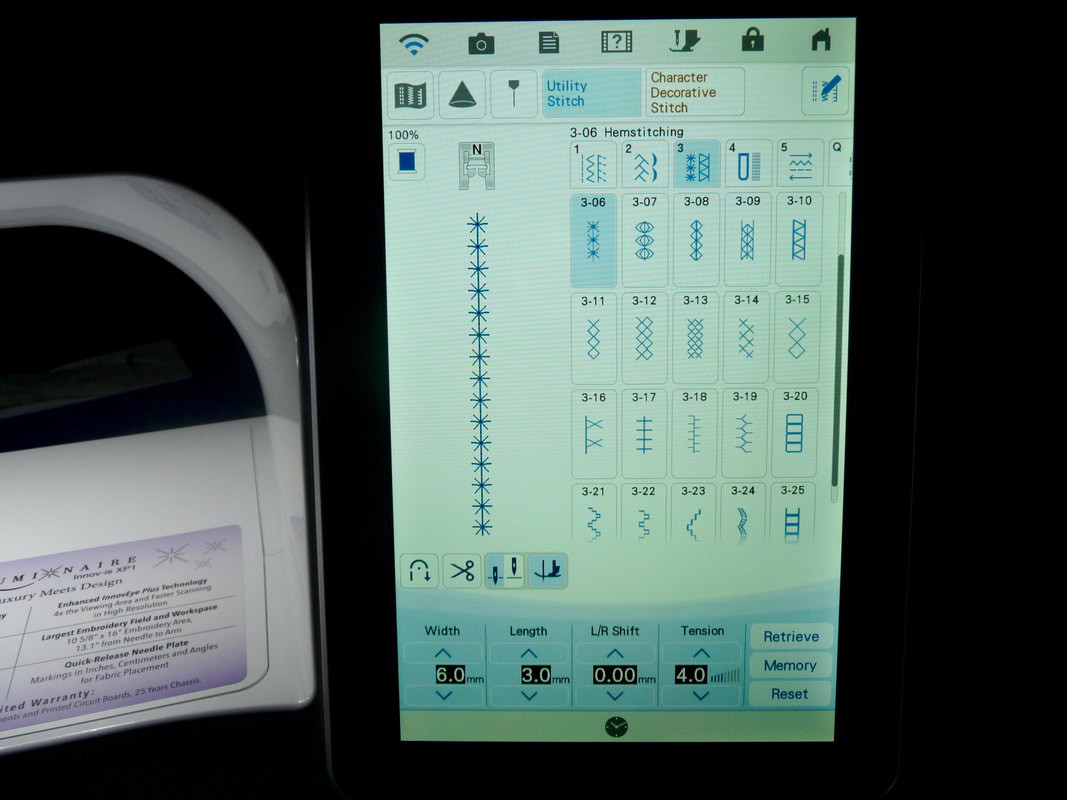
Insert needle in machine, making sure it is pushed all the way up. Select menu in your machine with included hemstitches. Hemstitches vary but they all have one thing in common, the needle enters the same spot multiple times. This is essential for forming the distinctive holes. Tip: Feel free to experiment with other stitches that have the same characteristics of hemstitches, making certain that your stitch width stays between 5-6 mm. Important! Hand walk the stitch with the flywheel before you start to sew.

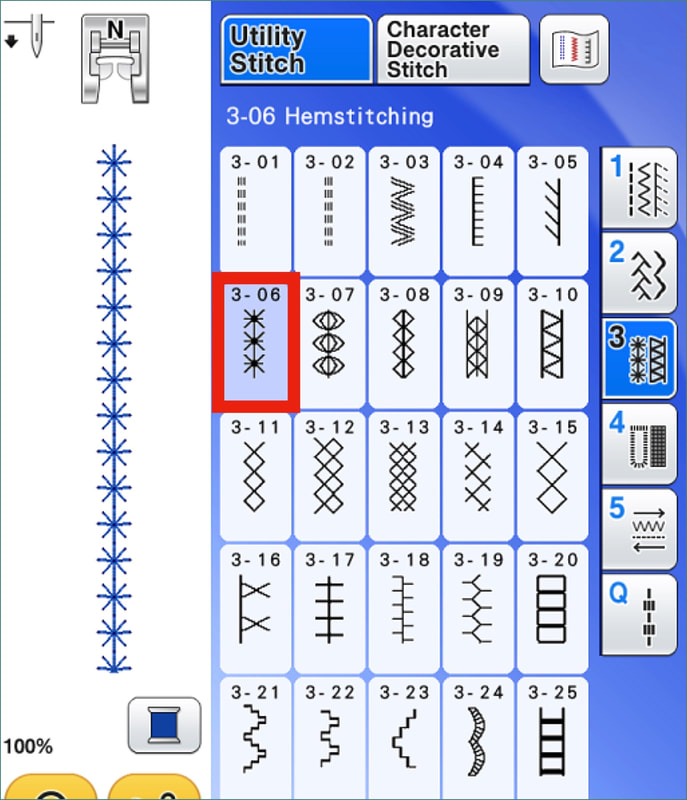
Sew along the lines with various hemstitches. Tip: Stitch No.3-06, shown below, is commonly found stitch on many machines. I like to call it the star stitch. It is one of my all-time favorites for wing needle stitchery. 
Picture
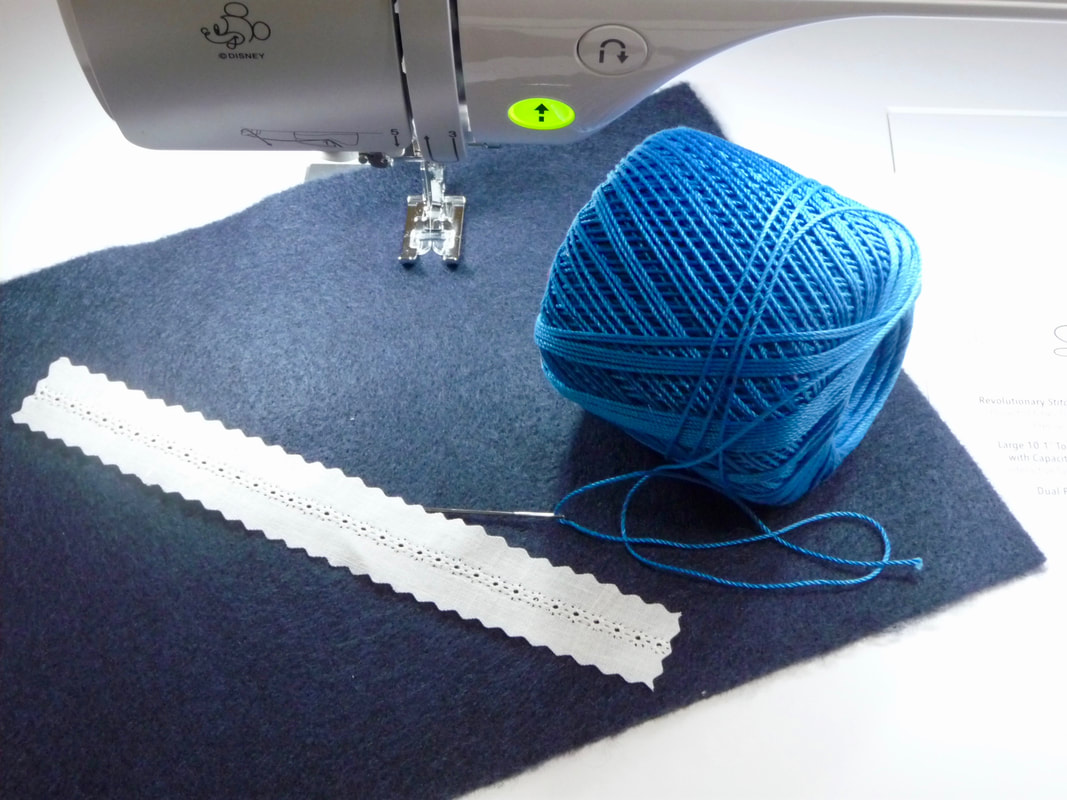
The prominent holes in the center of this stitch make it ideal for inserting cording through the stitches. 
Picture
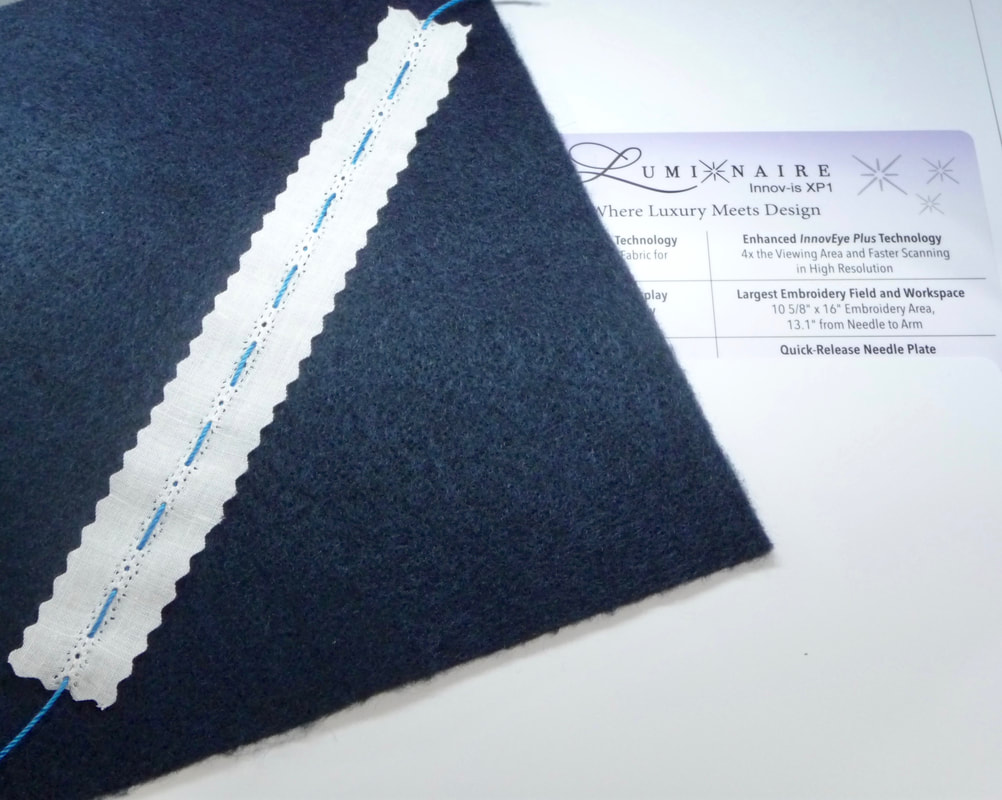
Here you see where I used a large eyed tapestry needle to weave crochet cotton into every other hole. Again, there are so many possibilities with these stitches!
Picture
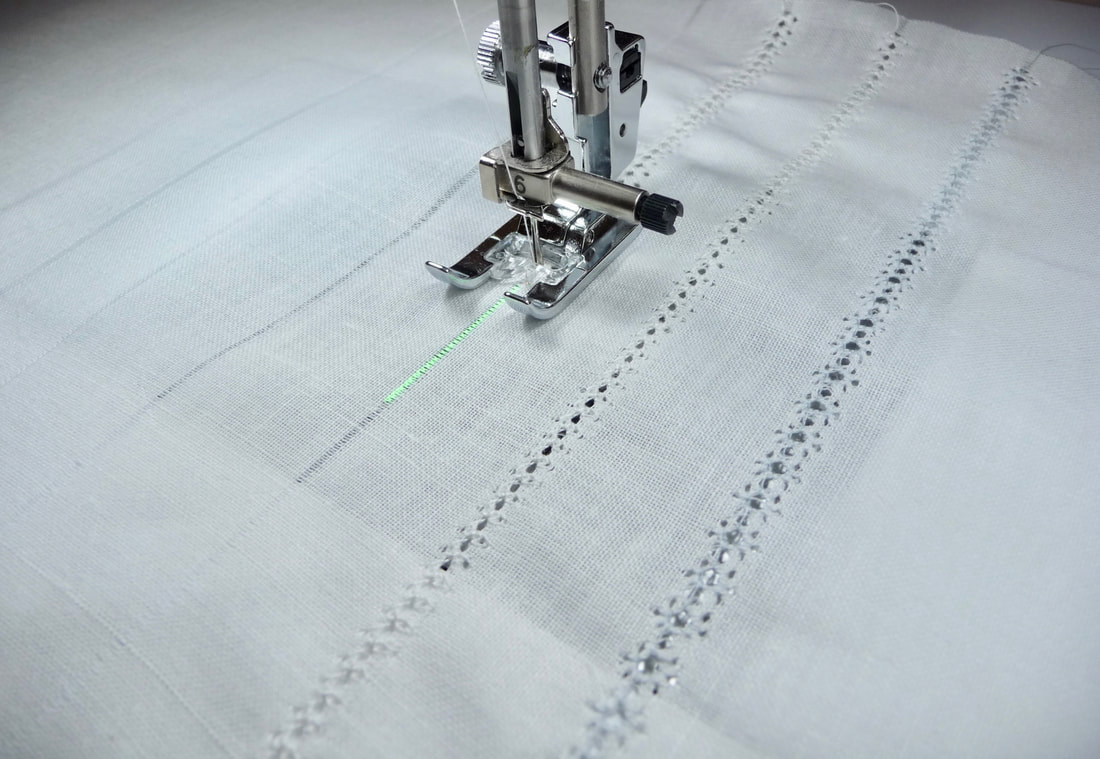
Once you are all set up for stitching, try various stitches and threads on your fabric. If you have the guideline marker capability on your Brother machine you can use it to help guide your stitching in a straight line.
Picture
I like to experiment with different threads but the 60-weight cotton is what I tend to use most often. Stitches shown below were created with the cotton 60-weight thread. 
Picture
I switched to the 100 weight silk thread for stitches No.3-21 through No.3-24, shown below.
Picture
When you’re finished with stitching wash out all markings and stabilizer, and then lightly starch your fabric for a smooth finished look. I hope this tutorial encourages you to try your hand at hemstitching!
 
More Options and Ideas:
 
  • Traditionally, hemstitches are done on white or off-white natural fiber fabrics, using matching thread for a tone on tone look. However, don’t overlook the possibility of experimenting with alternative colors and other fabric selections. Just know that the fibers need to separate easily for the featured holes to form.
 
  • Hemstitches are popular in the realm of heirloom sewing but once you see them stitched out it is likely you’ll find ways to use them in many other projects.
 
  • A common way to use hemstitched fabric is to create an oversized section of fabric, also known as a “fancy band.” Once the fabric has been embellished you can lay a pattern on top and cut yokes, cuffs, hem bands, and other sections of fabric as desired.
 
  • Hemstitched fabric makes great accents for home décor too! Pillows of any size and style, including neck roll pillows are beautiful when made with hemstitched fabric!
I'd love to entertain your questions and read your comments. Feel free to share your thoughts!
Download a printable PDF tutorial on Hemstitching below:
happy_hemstitching.pdf
File Size: 46170 kb
File Type: pdf
Download File

18 Comments
Carolyn McCray
8/20/2022 23:21:21

I'd love to see projects where hemstitching is used.

Reply
Joanne Banko
8/21/2022 15:50:53

Thanks for sharing your thoughts Carolyn! I'm not sue where my older samples are at but I'll put the task of making some new ones on my "to do" list.

Reply
Susie Jackson link
7/17/2023 14:10:20

I’m so excited to find this site. I’ve wanted to try hemstitching without buying an expensive attachment.

Laurie
8/21/2022 00:26:58

Hi, I love heirloom and hem stitching but I’ve wondered about if you can use a wing needle to embroider an item in the hoop since we can add so many decorative stitches into the embroidery side of the machine.

Reply
Joanne Banko
8/21/2022 15:55:02

Hi Laurie! There are definitely embroidery designs made for use with a wing needle. I have not made any for some time but I do remember Criswell making some. Here is a link to an example: https://www.criswell-emb.com/frontpage/pg00056.html I'm going to see if I can hunt down some more and will post and update when I find some.

Reply
Margee
8/21/2022 07:19:53

Very interesting enjoyed learning about hem stitching love the look

Reply
Joanne Banko
8/21/2022 15:57:30

So nice to hear from you Margee! Glad you enjoyed the post!

Reply
Angela Shoen link
8/21/2022 07:20:09

I have always liked the look of hemstitch towels. They seem hard to find. Now I will have to try this. Thank you for sharing this tutorial.

Reply
Joanne Banko
8/21/2022 15:58:35

Hi Angela! I hope you enjoy experimenting with this technique! Thanks for taking the time to leave a comment.

Reply
William Edward Densmore
8/21/2022 08:51:42

Joanne. Thank you for reminding me of these graceful stitches. I recently finished a baptismal set that would have really benefited from machine embellishment. Unfortunately, my 60"s "Dressmaker" machine hasn't the capability of the Luminaire and my husband will be quite put out when I explain my need for a new machine. LOL

Reply
Joanne Banko
8/21/2022 16:01:41

Thanks for leaving a comment! Of course, there are many other models that have decorative stitches like these. Indeed, there are many other heirloom techniques you can do with simple straight and zig zag stitches. I'm sure your finished set was beautiful and the love you put into it made it priceless!

Reply
Sarah Mckinney
8/21/2022 10:18:40

I like hemstitching but have not used it for a while. I do like the stabilizer suggestion . I did starch well before but can see how this would help and with 80wt thread I am ready to try again.

Reply
Joanne Banko
8/21/2022 16:04:50

Hi Sarah! I've ben using the Perfect Sew liquid stabilizer for many years. It's a little hard to find but I've always had great success with it and a little goes a long way. Here is a bit more info from the Palmer/Pletsch site:https://www.palmerpletsch.com/product/perfect-sew-fabric-stabilizer-combo/

Reply
Deborah Smith link
8/22/2022 02:58:28

Thanks for the article on Hemstitching. Please do more articles on the decorative stitches and how you like to use them.

Thanks again.
Deborah

Reply
Mavis Anderson
8/22/2022 14:38:08

Thank you for the hemstitching information. I want to crochet an edging around a baby bib. Do you think any of the decorative stitches, stitched on the edge of the bib, on the Luminaire would leave a hole big enough to crochet through?

Reply
VICKY ISLIEFSON link
8/26/2022 13:03:32

Thanks for this great tutorial, Joanne. I have been saving those bits of sticky wash-away stabilizer. Now I know why!

Reply
Paulette "Polly" Renfro
8/28/2022 14:31:59

Joanne, I love to see the hen stitch used especially on young girls' garments. Thank you for "refreshing my memories".

Reply
Blair
9/27/2022 05:19:15

I stumbled on your blog this morning looking for tips for my new serger. That post was so helpful. When I switched from my phone to my laptop to see more of who you are with your wonderfully written blog posts and this post came up. OH MY! That is what those settings are for! I am so thrilled to experiment. My mother and grandmother made our dresses with such tiny lace. I have a such a fondness for that and this feels delightfully adjacent. I am ordering a wing needle in my next Wawak order. Thank you!

Reply


Leave a Reply.

    Picture

    Author:

    Joanne Banko
    Freelance Sewing Educator

    I'd love to stay in touch with you!

    Click Here
    and Sign up for
    ​Sewing News, plus tips, tricks, and notifications about new blog posts.

    Archives

    June 2025
    May 2025
    March 2025
    February 2025
    December 2024
    October 2024
    September 2024
    March 2024
    February 2024
    September 2023
    July 2023
    June 2023
    May 2023
    March 2023
    February 2023
    January 2023
    December 2022
    November 2022
    October 2022
    September 2022
    August 2022
    July 2022
    June 2022
    May 2022
    April 2022
    March 2022
    January 2022
    December 2021
    October 2021
    August 2021
    July 2021
    June 2021
    May 2021
    April 2021
    March 2021
    February 2021
    November 2020
    October 2020
    June 2020
    May 2020
    April 2020
    March 2020
    February 2020
    January 2020
    November 2019
    August 2019
    July 2019
    June 2019
    May 2019
    March 2019
    February 2019
    January 2019
    December 2018
    September 2018
    August 2018
    July 2018
    June 2018
    March 2018
    February 2018
    December 2017
    September 2017
    August 2017
    June 2017
    April 2017
    February 2017
    January 2017
    December 2016
    September 2016
    July 2016
    June 2016
    May 2016
    March 2016
    February 2016
    January 2016
    December 2015
    October 2015
    September 2015
    July 2015
    June 2015
    May 2015
    March 2015
    January 2015
    October 2014
    July 2014
    May 2014
    March 2014
    January 2014

    *As a believer in full disclosure, I'd like you to know that Blog posts may contain affiliate links for products and services I know and trust. Purchasing items through a link marked * results in a small commission for me, with no extra charges for you.

    Categories

    All

    RSS Feed

© Copyright 2025 by Joanne Banko. All rights Reserved