letsgosew.com
  • Home
  • Contact
  • Privacy Policy
  • Sign Up for Sewing News, Freebies, & Updates
  • Order Just Jackets Embroidery Collection
  • Just Jackets FAQ
  • Order Wrapped in Embroidery Book by Joanne Banko
  • Joanne Banko's Blog
  • Machine Embroidery Survey
  • FREE Tutorials and Tip Sheets
    • NEW! Serger Sample Sheet
    • NEW! 2-Thread Serger Techniques-Pt.1
    • NEW! Basic Serger Stitches
    • New! Sew with Your Feet_Resources
    • New Project! Chic Triangle Scarf
    • New! Embroidered Sachet Envelope Project
    • Denim Re-design Hanging Organizer
    • Sewing a Cargo Pocket
    • NEW! Interfacings for Embroidery Tip Sheet
    • Making Kitchen Towels & FREE Cornucopia Applique Design
    • NEW! Embroidery Placement Positioning Tips
    • Tip sheet - 5 Reasons Quilters Need A Serger
    • Free In-the-Hoop Patch Pocket Design
    • Serging versus Sewing
    • FREE Project-Embroidered Gift Tag with Gift Bag
    • Tip Sheet - Pillow Pointers
    • Tip sheet_Sew Straight Laser for Seams
    • Embelishment Tips from dime V.111
    • Tip sheet - Shannon Embrace Double Gauze
    • Tip sheet - Fun with Fonts
    • Fabric Tip Sheet- Sewing Faux Suede
    • Tip sheet for Sewing & Embroidering with Metallic Thread
    • Fleece Ruana Pattern: As seen on PBS It's Sew Easy TV
    • Fabric Tip Sheet - Crepe Back Satin
    • Fabric Tip Sheet-Sewing Slinky Type Knit
    • Fabric Tip Sheet - Fleece
    • Fancy Footwork Tipsheet - About the Walking Foot
    • Fancy Footwork Tip Sheet_Basic Appliqué
    • Fancy Footwork Tip sheet - Ruffler Attachment
    • Fancy Footwork Tip Sheet - Narrow Hems with a Standard Foot
    • Fancy Footwork Tip Sheet - Non Stick Foot
    • Tip sheet - Machine Embroidery Pattern Connection Resources
    • Tutorial_Embroidered Greeting Card Project
    • Tip Sheet - Machine Set up for Shirring
    • Tip sheet - Snowman and Target Markers
    • Tip Sheet for Printing on Fabric
    • Tip sheet-Five Ways to Finish Fleece Blankets
    • T-Shirt Transformation Tutorial
    • Project- Serge a Little Girl's Sweet Summer Dress
    • Tip Sheet for Fleece Frame Shape Appliqué
    • Tip Sheet - Bobbin Work Sewing & Embroidery
    • Tip Sheet - Custom Covered Buttons
    • Tip Sheet - Liquid Stabilizers
    • Tip sheet - Appliqué with Brother XV8500D & ScanNCut
    • Project - Sheer Chiffon Wrap
    • Project - Pearl Trimmed Candle Ring
    • Tip Sheet -Mitered Satin Blanket Binding
    • Fabric Tip Sheet_Knit Know How
    • Tool School Tip Sheets
    • ITH Project Planner
  • As seen in DiME Magazine - Photo Gallery
  • Sewing and Embroidery Events
  • My Sewing Story
  • It's Sew Easy TV Online Blog
  • IT'S SEW EASY TV Videos & Bonus Files
    • NEW! It's Sew Easy TV Series 2100
    • It's Sew Easy TV_Series 2000
    • It's Sew Easy TV_Series 1500
    • It's Sew Easy TV - Series 1600
    • It's Sew Easy TV_Series 1700
    • It's Sew Easy TV Series 1800
    • It's Sew Easy TV Series 1900
    • NEW! Superstar Sewing Stitches
    • NEW! Classy Textured Cape
    • NEW! Baby Bath Wrap
    • NEW! Detachable Collar
    • Sew a Swimsuit
    • Machine Embroidered Garments
    • Kimono Blouses
    • Custom Covered Hangers
    • Sewing Beautiful Belts
    • Felted Flower Hat Trim
    • Sew a Waffle Weave Robe
    • Learn about Couching accessories!
    • Turn a Pashmina into a Trendy Topper
    • Machine Embroidered Reverse Applique
    • Machine Embroidered Knit Dress
    • Use Non-Stick Foot to sew a Custom Luggage Tag
    • Serge & Sew Broomstick Skirt
    • Machine Embroidered Western Jacket
    • Machine Embroidered Bobbin Work Pashmina
    • Embroidered Pajamas
    • Sewing Pearls and Sequins
    • Learn how to use the Fringe Foot
    • Quilted Pinwheel Patchwork Tote
    • Machine Embroidered Lace for Lingerie
    • Sewing Circles with a Circular Attachment
    • Sew with the Edge Joining Foot
    • Re-style Tops for Little Girls
    • Short Style Tip- Blouse Embellishment
    • Learn how to make pretty piping using the Piping Foot
    • Embellish with the Three Slot Cording Foot
    • Facebook Live Interview 12-4-2018
    • Machine Embroidery - Starter Tips

Superstar Sewing - Part One: Straight Stitches and Stitch Posistions

8/26/2018

9 Comments

 
In the 1500 series of It's Sew Easy TV I had the opportunity to showcase basic stitches that perform as superstars. Basic yes, but they deserve superstar status for the way they can make your projects look more professional. Watch the full video here to see learn more.

This new series of blog posts is designed to complement the video with additional information. This is the first in a series that celebrates basic utility stitches, beginning with the straight stitch and exploring ways to sew accurate seams.
Picture
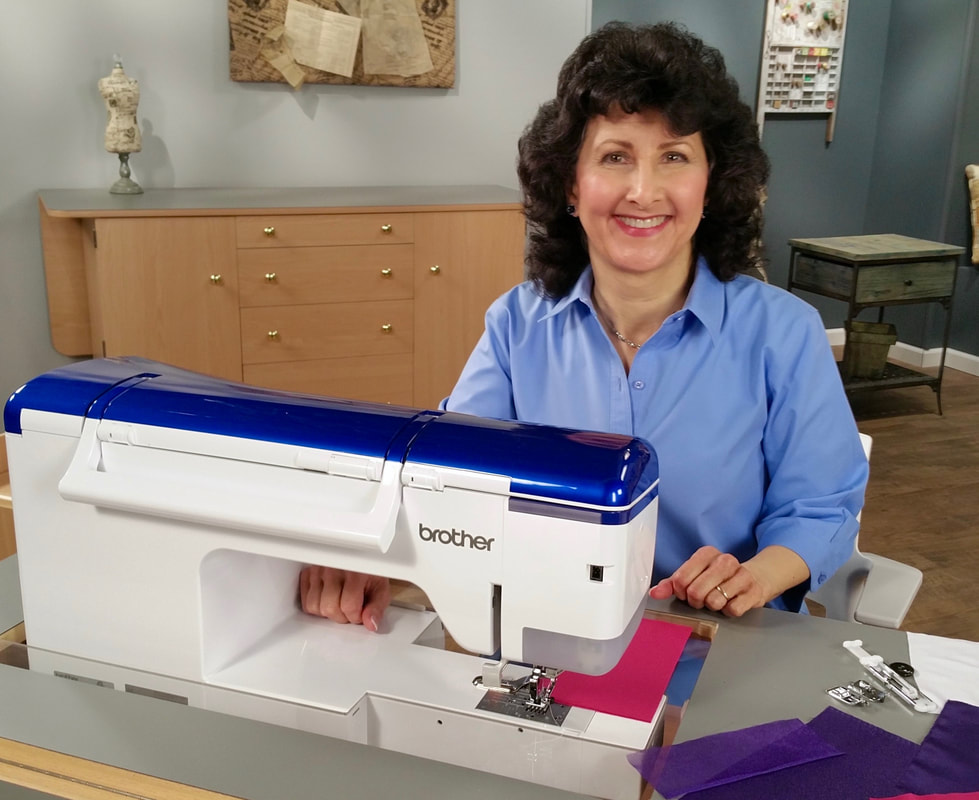
Brother Expert Consultant
Nothing in your sewing repertoire is more basic than a straight stitch!   Today we'll talk about seams and seam allowances.
Picture
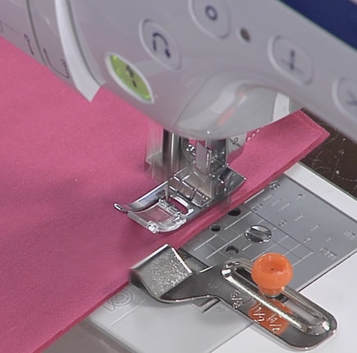
The little "old fashioned" seam guide you see above has been around for eons. It's still one of my go to tools for sewing accurate seams. The one you see here is the Brother version but it's likely you'll find a similar one for most any brand of machine. What makes it so useful? Well, if you are anything like me, you've struggled to follow the engraved markings on the throat plate. Even when sewing a standard 5/8-inch seam it can be difficult to stay on the straight and narrow when following the groovy guides on the plate.  Sure, there are some new-fangled, laser guided ways to achieve accuracy for sewing seams, and I promise to cover some of those in the next post, but this guide is a generic quick fix that works great and is a one size fits all solution.
 
Simply screw it into the plate, set it for the distance of your seam, and then guide the fabric along the easy to follow raised edge as you sew from beginning to end. The fact that it attaches to the machine in front of a multitude of accessory feet provides visibility along with accuracy.

Picture
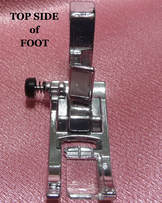
With or without the guide, coordinating the position of the needle in combination with the standard "J" foot is another way to sew accurate seams with the standard straight and zig zag foot. Again, you'll need to check your own machine, but many feet are identical to the "J" foot shown here.

Picture
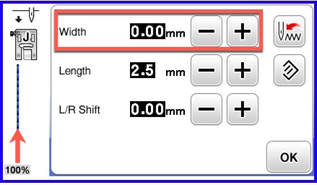
A setting of 0.00 puts the needle at the far left.

Picture
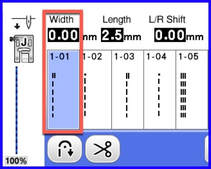
This left needle setting  is the default position for most modern computerized machines. 

Picture
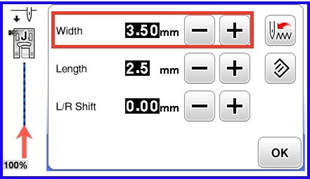
A setting of 3.50 puts the needle in the center.

Picture
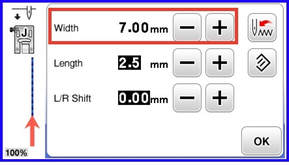
A setting of 7.00 puts the needle in the far right.

Picture
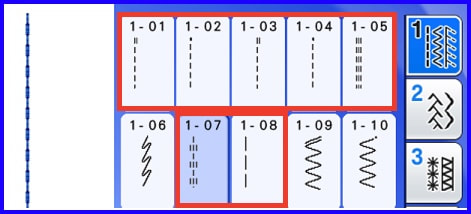
Changing the position of the needle for a straight stitch is a super easy way to sew an accurate seam. Simply adjust the needle using the width key and follow the edge of the foot as a guide. You can do this with any of the straight stitches shown boxed in red. Check your machine for your own personal options but in most cases this will include anything that sews straight, including a specialized basting stitch.
Picture
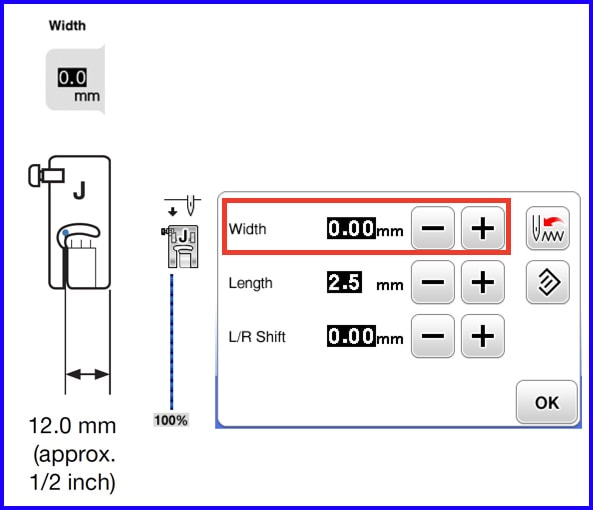
Here you see the setting for sewing a 1/2-inch seam by guiding the fabric along the edge of the foot.
Picture
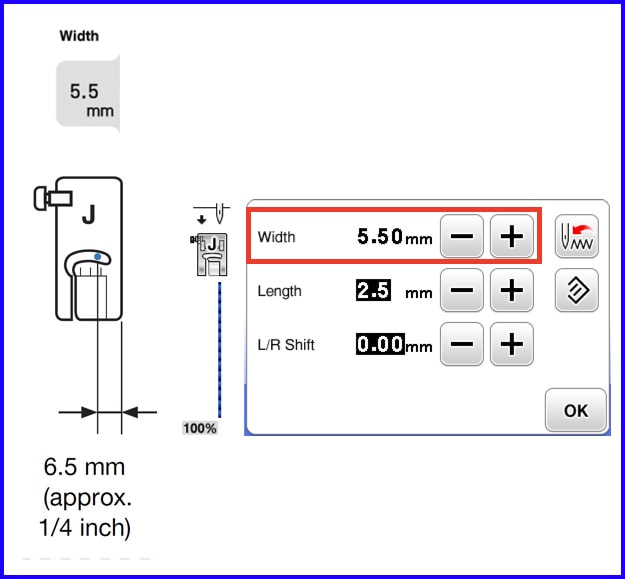
And here is the setting for sewing a 1/4-inch seam by guiding the fabric along the edge of the foot.
I hope this has helped you find better ways to sew seams and use the ordinary but necessary straight stitch! Next time we'll explore a bit more, discover some high-tech ways to achieve perfect stitches, and delve into more utility stitches that make your sewing projects shine. Often taken for granted, mastering the basics and making full use of features built-in to modern machines can make basic tasks easier and more accurate. Stay tuned for more tips, tricks, and techniques to help you make the most of your machine!

Feel free to leave comments and tell me if this post has answered some questions for you, or perhaps sparked new ones!
9 Comments
Carla Bazhenow
8/26/2018 16:05:13

Great post! I enjoy your spots on Its Sew Easy.

Reply
Joanne Banko link
8/26/2018 22:52:15

Hi Carla! Thanks so much for writing a note and telling me you like what you see on It's Sew Easy TV! I will think of you next time I have the opportunity to be in the studio taping new shows :-)

Reply
Maryann Williams link
8/26/2018 16:33:24

I have been sewing since I was 10 years old, making clothes for a family of 6 on a portable Singer that my father won in a contest. It went forward and backwards and did button holes. It had a basic foot, zipper foot and button hole attachment. I sewed until about 1991 when I had a heart attack. Since I had to work full time, I dropped sewing. Retired in 2006 to take care of my husband. Started doing quilting, then sewing again and embroidery. Loved your book (Christmas present). I enjoy your Lets go sew blog very much. I print off and keep in a binder articles to refer to. Today's article helped me so much, as much as changed in the last few years. I did what you said, went to each sewing machine (Have 6) and practiced using that foot and recording the settings I like on each machine. I have a Kenmore (1971), 3 Brothers (One is Quattro 3) and 2 Janome. Anything new I print off and put in my binder called: Joanne Banko's Tips. I have been watching letsgpsew.com for years. The show has also introduced me to new materials like cork. I just started on my cork purse. Keep up the good work. I would love to see you in person, but am my husbands caregiver and it is hard for me to get away. But I watch all the shows on TV and read or watch all the info on the computer. When I was young, everyone made fun of my home made clothes; but now everyone is envious of my skills and my wardrobe!! Maryann Williams

Reply
Joanne Banko link
8/26/2018 22:58:53

Hello Maryann! Wow! I loved hearing your own personal sewing story :) I'm so glad you were able to start sewing again and find enjoyment in creating things. I'm also thrilled that you were able to get some practical use out of the tips, tricks, and techniques presnted online and in the videos. It is truly a pleasure to share sewing with like minded enthusiasts like you. I wish you and your husband all the best. Take care and stay in touch!

Reply
Donna Horton
8/26/2018 19:05:16

I always learn something new from you. Keep it coming!

Reply
Joanne Banko link
8/26/2018 23:03:17

Hi Donna! So nice to hear from you :-)

I'll keep sending sewing info your way and you keep letting me know how it helps you, is that a deal?!?

Reply
Susan T
8/27/2018 18:00:24

Joanne, you are amazing! This is exactly what I was looking for. And you prepared it so quickly. Wow! I own a Brother Dream Creator and NEVER knew these techniques for needle placement. I so enjoyed the It’s Sew Easy show that you did about how to use those stitches that we just never know what to do with. Since I don’t own a serger, the overcast stitch will now be used quite often. Once again, thanks so much...you are one talented lady.

Reply
Susan T
8/27/2018 18:03:38

One more thing...Maryann’s comment about printing out your wonderful techniques is a great one. That’s what I plan to do from now on. Thanks, Maryann!

Reply
Joanne Banko link
8/27/2018 19:00:59

Hi Susan!

I'm so glad you read the post and found it helpful. With all the fancy, schmancy features we have in our modern machines it's still the basics that we fall back on time and time again. You definitely have a lot to explore with your Dream Creator machine and I'll be sure to cover some of the bells and whistles in future posts. Happy sewing my friend!

Reply


Leave a Reply.

    Picture

    Author:

    Joanne Banko
    Brother Ambassador


    I'd love to stay in touch with you!

    Click Here
    and Sign up for
    ​Sewing News, plus tips, tricks, and notifications about new blog posts.

    Archives

    May 2025
    March 2025
    February 2025
    December 2024
    October 2024
    September 2024
    March 2024
    February 2024
    September 2023
    July 2023
    June 2023
    May 2023
    March 2023
    February 2023
    January 2023
    December 2022
    November 2022
    October 2022
    September 2022
    August 2022
    July 2022
    June 2022
    May 2022
    April 2022
    March 2022
    January 2022
    December 2021
    October 2021
    August 2021
    July 2021
    June 2021
    May 2021
    April 2021
    March 2021
    February 2021
    November 2020
    October 2020
    June 2020
    May 2020
    April 2020
    March 2020
    February 2020
    January 2020
    November 2019
    August 2019
    July 2019
    June 2019
    May 2019
    March 2019
    February 2019
    January 2019
    December 2018
    September 2018
    August 2018
    July 2018
    June 2018
    March 2018
    February 2018
    December 2017
    September 2017
    August 2017
    June 2017
    April 2017
    February 2017
    January 2017
    December 2016
    September 2016
    July 2016
    June 2016
    May 2016
    March 2016
    February 2016
    January 2016
    December 2015
    October 2015
    September 2015
    July 2015
    June 2015
    May 2015
    March 2015
    January 2015
    October 2014
    July 2014
    May 2014
    March 2014
    January 2014

    *As a believer in full disclosure, I'd like you to know that Blog posts may contain affiliate links for products and services I know and trust. Purchasing items through a link marked * results in a small commission for me, with no extra charges for you.

    Categories

    All

    RSS Feed

© Copyright 2025 by Joanne Banko. All rights Reserved