letsgosew.com
  • Home
  • Contact
  • Privacy Policy
  • Sign Up for Sewing News, Freebies, & Updates
  • Order Just Jackets Embroidery Collection
  • Just Jackets FAQ
  • Order Wrapped in Embroidery Book by Joanne Banko
  • Joanne Banko's Blog
  • It's Sew Easy TV Online Blog
  • Machine Embroidery Survey
  • IT'S SEW EASY TV Videos & Bonus Files
    • NEW! It's Sew Easy TV Series 2100
    • It's Sew Easy TV_Series 2000
    • It's Sew Easy TV_Series 1500
    • It's Sew Easy TV - Series 1600
    • It's Sew Easy TV_Series 1700
    • It's Sew Easy TV Series 1800
    • It's Sew Easy TV Series 1900
    • NEW! Superstar Sewing Stitches
    • NEW! Classy Textured Cape
    • NEW! Baby Bath Wrap
    • NEW! Detachable Collar
    • Sew a Swimsuit
    • Machine Embroidered Garments
    • Kimono Blouses
    • Custom Covered Hangers
    • Sewing Beautiful Belts
    • Felted Flower Hat Trim
    • Sew a Waffle Weave Robe
    • Learn about Couching accessories!
    • Turn a Pashmina into a Trendy Topper
    • Machine Embroidered Reverse Applique
    • Machine Embroidered Knit Dress
    • Use Non-Stick Foot to sew a Custom Luggage Tag
    • Serge & Sew Broomstick Skirt
    • Machine Embroidered Western Jacket
    • Machine Embroidered Bobbin Work Pashmina
    • Embroidered Pajamas
    • Sewing Pearls and Sequins
    • Learn how to use the Fringe Foot
    • Quilted Pinwheel Patchwork Tote
    • Machine Embroidered Lace for Lingerie
    • Sewing Circles with a Circular Attachment
    • Sew with the Edge Joining Foot
    • Re-style Tops for Little Girls
    • Short Style Tip- Blouse Embellishment
    • Learn how to make pretty piping using the Piping Foot
    • Embellish with the Three Slot Cording Foot
    • Facebook Live Interview 12-4-2018
    • Machine Embroidery - Starter Tips
  • FREE Tutorials and Tip Sheets
    • NEW! Embroidery Placement Positioning Tips
    • Free Embroidered Snowflake Coasters
    • Tip sheet - 5 Reasons Quilters Need A Serger
    • Free In-the-Hoop Patch Pocket Design
    • Serging versus Sewing
    • FREE Project-Embroidered Gift Tag with Gift Bag
    • Tip Sheet - Pillow Pointers
    • Tip sheet_Sew Straight Laser for Seams
    • Embelishment Tips from dime V.111
    • Tip sheet - Shannon Embrace Double Gauze
    • Tip sheet - Fun with Fonts
    • Fabric Tip Sheet- Sewing Faux Suede
    • Tip sheet for Sewing & Embroidering with Metallic Thread
    • Fleece Ruana Pattern: As seen on PBS It's Sew Easy TV
    • Fabric Tip Sheet - Crepe Back Satin
    • Fabric Tip Sheet-Sewing Slinky Type Knit
    • Fabric Tip Sheet - Fleece
    • Fancy Footwork Tipsheet - About the Walking Foot
    • Fancy Footwork Tip Sheet_Basic Appliqué
    • Fancy Footwork Tip sheet - Ruffler Attachment
    • Fancy Footwork Tip Sheet - Narrow Hems with a Standard Foot
    • Fancy Footwork Tip Sheet - Non Stick Foot
    • Tip sheet - Machine Embroidery Pattern Connection Resources
    • Tip Sheet - Machine Set up for Shirring
    • Tip sheet - Snowman and Target Markers
    • Tip Sheet for Printing on Fabric
    • Tip sheet-Five Ways to Finish Fleece Blankets
    • T-Shirt Transformation Tutorial
    • Project- Serge a Little Girl's Sweet Summer Dress
    • Tip Sheet for Fleece Frame Shape Appliqué
    • Tip Sheet - Bobbin Work Sewing & Embroidery
    • Tip Sheet - Custom Covered Buttons
    • Tip Sheet - Liquid Stabilizers
    • Tip sheet - Appliqué with Brother XV8500D & ScanNCut
    • Project - Sheer Chiffon Wrap
    • Project - Pearl Trimmed Candle Ring
    • Tip Sheet -Mitered Satin Blanket Binding
    • Fabric Tip Sheet_Knit Know How
    • Tool School Tip Sheets
    • ITH Project Planner
  • As seen in DiME Magazine - Photo Gallery
  • Sewing and Embroidery Events
  • About Joanne Banko
  • What's New? Let's Get Creative Club Meetings
  • November Pinecone Project

Pressing Matters

8/17/2019

18 Comments

 
Picture
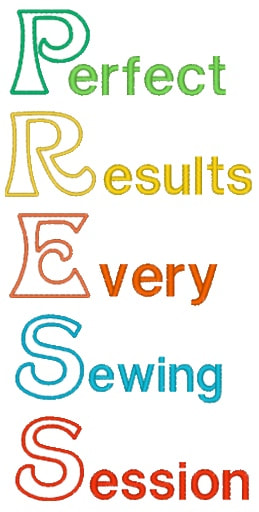
Proper pressing produces perfect results every sewing session.

Let me help you press properly with the tips in this post.

In my recent post about It's Sew Easy TV I asked viewers to share some of their favorite tips from watching the show. The topic of pressing popped up in several comments. I thought it would be a timely topic for another post and I'm eager to share some of my favorite tools for pressing.
Picture
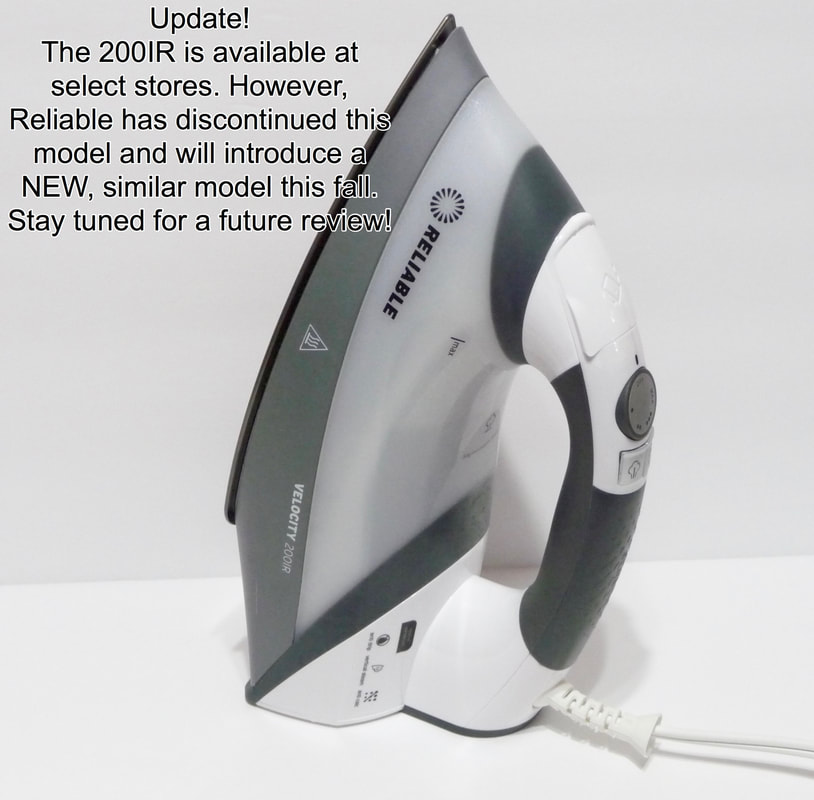
Update! I have now been using my 200IR for about 18 months. Still the best iron I have ever owned. The new Reliable iron comparable to this one is the 230IR. Learn more HERE on their site.
It all starts with a good, reliable steam iron. No pun intended but I am loving my ​Reliable Velocity 200IR steam iron. Several months ago I received the iron in exchange for a product review. I like it so much I would gladly purchase one just like it.
Picture
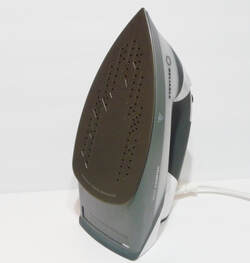
Aside from the solid weight and smooth ironing surface, my favorite feature is the ability to press with steam even when the iron is on a lower heat setting. If I understand the design correctly, the water is actually heated inside the iron and turns into steam regardless of the temperature of the sole plate. Two steam options (low and high), and standard horizontal as well as vertical steam give me all the features I need to steam my fabric into submission. It does have auto shut off but you can de-activate it if you choose.

Picture
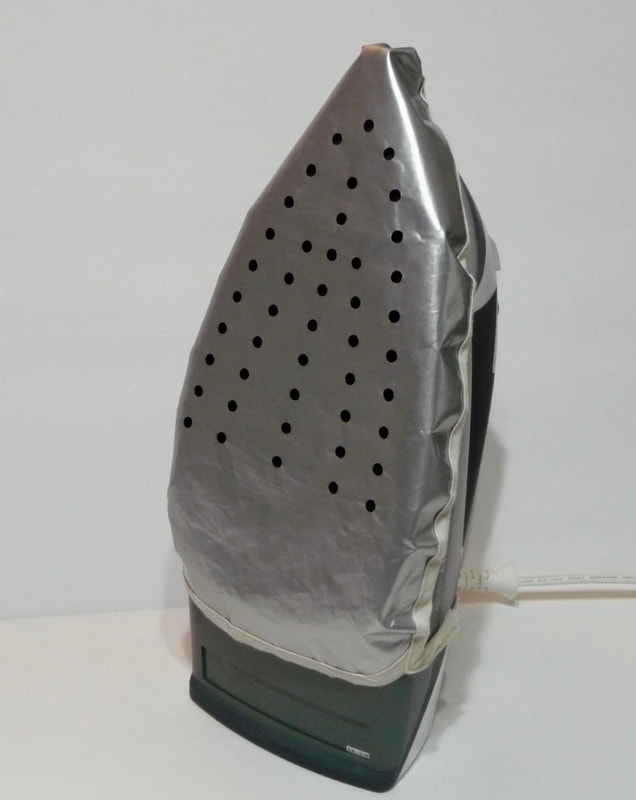
Since I can steam at a lower heat, I haven't had any issues with this iron scorching or causing a shine on delicate fabrics. However, if you have another kind of iron and you want to protect your fabric I highly recommend this drawstring style iron cover, aka iron shoe from Bonash. It fits virtually any iron, keeps fusible residue from sticking to your iron surface, protects the bottom of your iron,  and eliminates the need for a press cloth. This little item packs flat and goes with me on every road trip so I can use the hotel iron without fear of transferring anything ugly onto my garments.

The rest of the photos below show my favorite pressing accessories. I use each and every one of them on a regular basis. I've had some of these for so long they're practically antiques but I'll provide links for what you'll find currently available.
Picture
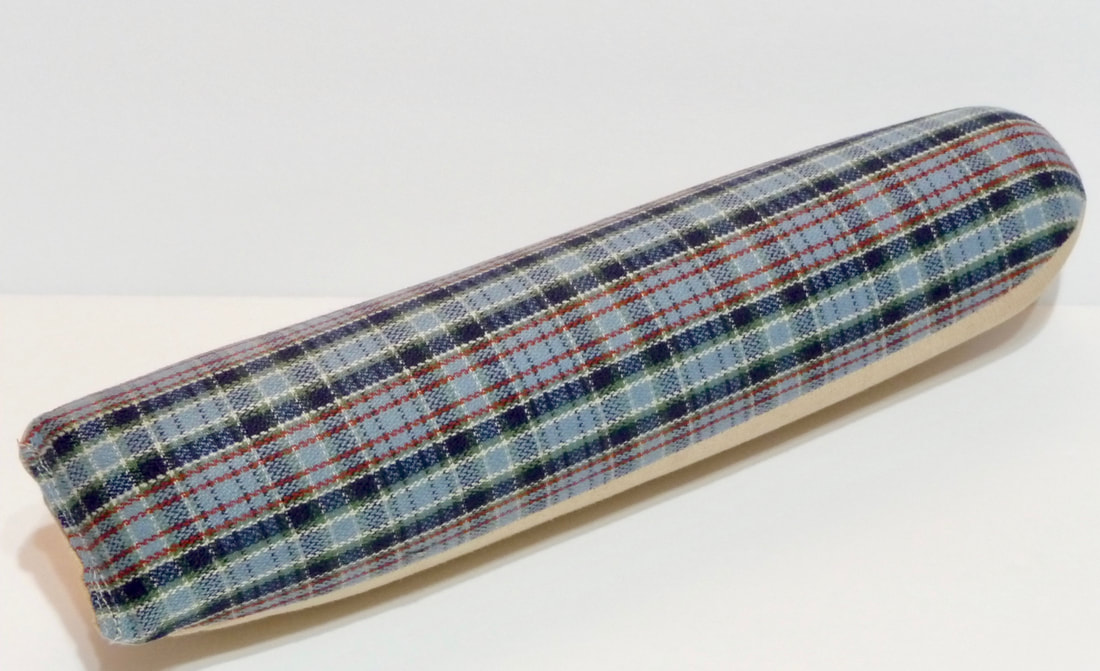
My Dritz sleeve roll or Seam Roll is essential for pressing seams on anything that's narrow.  With the rounded edge you are also less likely to see an indent form on the fabric from the edge of the seam. The two different fabric sides are designed to accommodate different pressing temperatures. I'm especially happy I have this tool when I need to press up hems on narrow sleeves, etc.
Picture
You'll want to use a pressing ham or Tailor's Ham for any garments with shape. Think darts, hip curves, etc. The last thing you want to do is press a dart flat. Pressing flat causes puckers and spoils the look of a custom crafted garment.
Picture
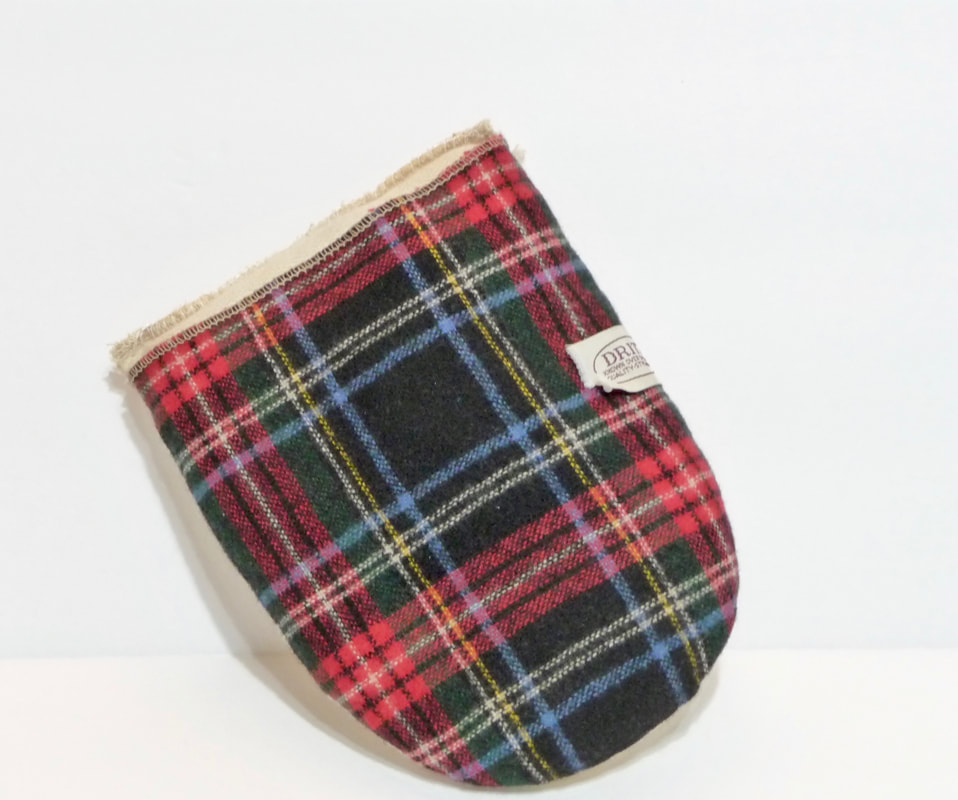
I use a pressing mitt for hard to reach areas and spots that won't lay flat on an ironing board. My Dritz model mitt really does seem to be an antique. I don't see one available any longer but there is a similar product on Amazon. You can click here if you want to research this item for yourself. Perhaps a little hunting will turn up more options.
Picture
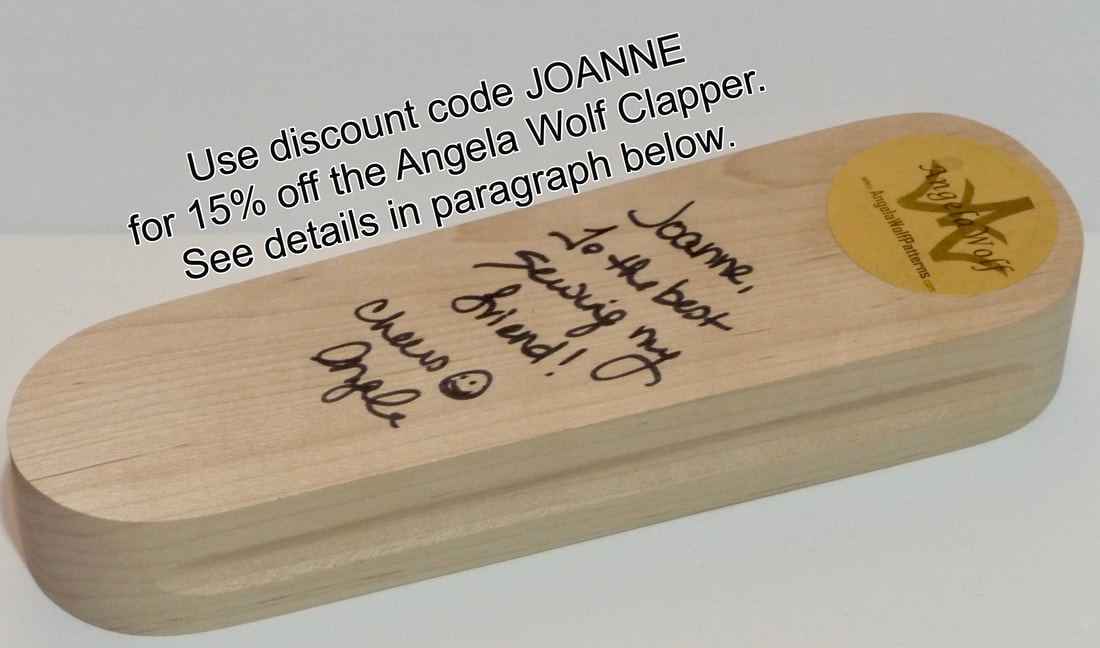
Another must have is my high quality, ever useful "clapper" from my friend Angela Wolf. I've actually been using one of these for decades, but this USA made treasure is custom-crafted according to Angela's specifications and it truly is the best of the best. Known as a Tailor's Clapper, the magic behind this tool lies in the way the wood absorbs steam, holding it in your fabric instead of having it dissipate into the air. Simply pressing and holding the wood block over your recently steamed fabric area for several seconds (enough time to let the wood cool), flattens, creases, and pounds your fabric into submission like nothing else can. It's amazing the difference this tool can make on everything you sew and press! You can check out Angela's clapper on her website HERE.  Be sure to use discount code JOANNE for a 15% discount!
Picture
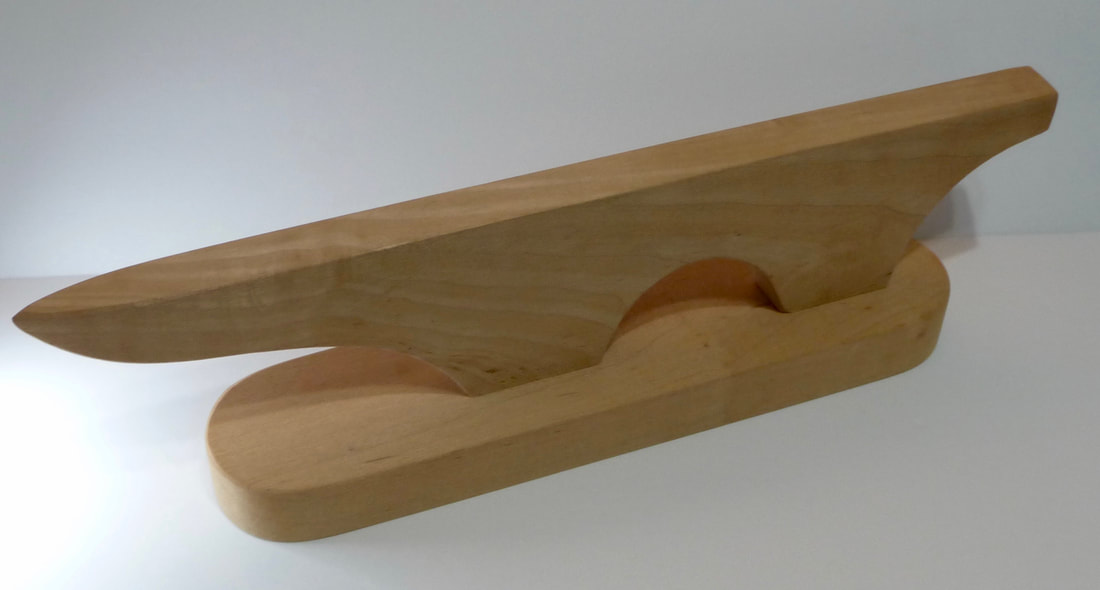
This combo point presser and clapper is handy, but I find that I only use the point part for pressing as I prefer the handling of a clapper separately. Points of collars and other narrow spots fit right over the narrow pointed tip. While I do have pads that fit over the wood I seldom find it necessary to use them. If I think I need a buffer between the wood and the fabric I simply place a fluffy washcloth over the wood and press away! A google search will lead you to a variety of vendors that offer this item. Check with your local sewing shop to see if they can order something similar for you.
Picture
Picture
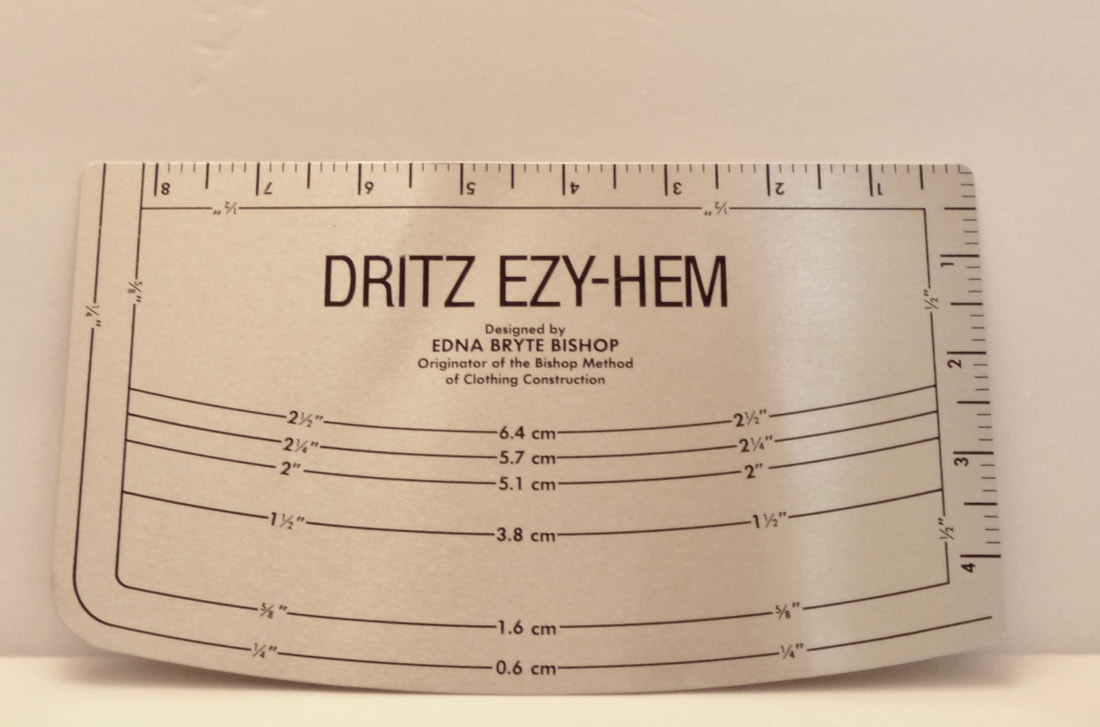
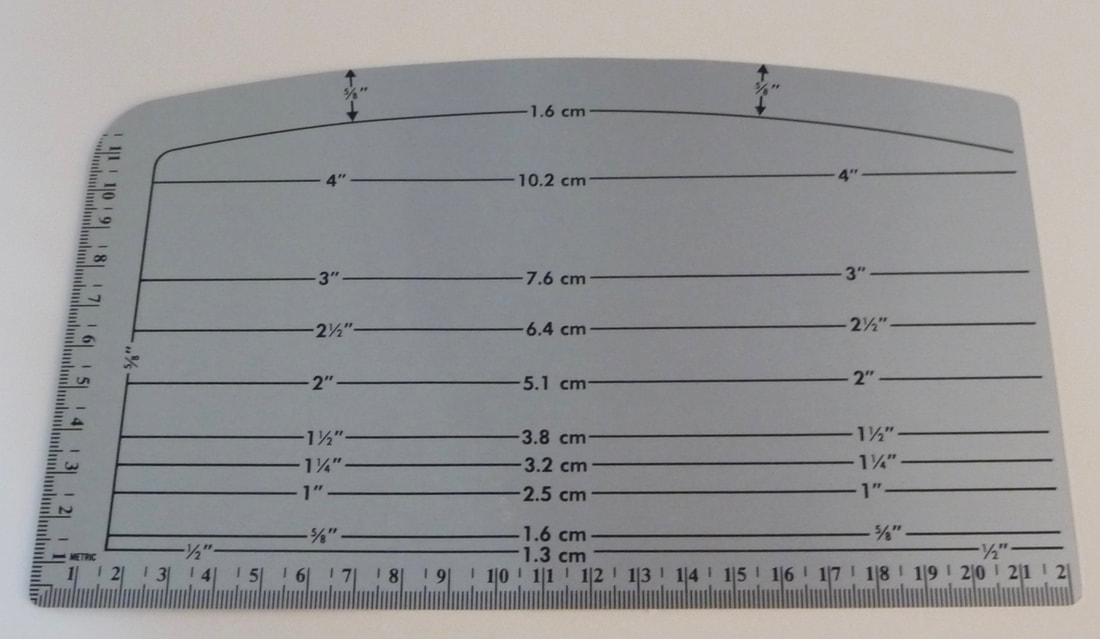
Another pressing tool I use regularly is this sheet of metal marked with accurate measurements. The Dritz Ezy-Hem Gauge has curved markings on one side and straight ones on the opposite side. Simply fold fabric up to the desired line and press the specific depth you need to turn and fold. In addition to taking the place of measuring, pinning and pressing, the metal helps seal in the heat and makes a nice crease.
Picture
Dritz makes a larger size of this same tool and it comes in handy for larger garments and many types of home decor sewing, especially curtains and drapes. This one is called the Dritz Drapery Hem Gauge.
If you're looking to improve your sewing projects with better pressing habits, I encourage you to explore the options shown here. I'd love to know if any of these are already in your pressing repertoire as you seek to have Perfect Results Every Sewing Session! Be sure to share your comments below!
18 Comments
Sis
8/18/2019 01:27:53

I make zip pouches from time to time and it annoyed me that I could not press the corners properly but one afternoon while using my wooden meat tenderiser for crushing nuts I suddenly realised that I was holding a perfect pressing tool for awkward corners where my combi clapper/point presser didn't work. Mine is very old but it is still possible to buy wooden ones:
https://www.amazon.com/Bamber-Wood-Meat-Tenderizer-Poultry/dp/B014GNU6BY
I looked around the utensils drawer after that and now I have a couple of wooden spoons in my sewing area too for pressing spaghetti straps and other tubes you do no want to press flat. I also have a piece of a wooden broomstick for pressing purpose (that was an idea from Nancy Zieman many moons ago). My ham and sleeve roll I made myself a while back from a pattern that sadly looks like it is out of print but it is easy to do and you can make them just the shape you want them.
I keep old fashioned brown paper in the sewing room too so I can avoid the seams making an imprint on the front of the garment when pressing. It is hard though to find brown paper that doesn't have some sort of sizing added these days. The sizing can make marks on some fabric.
I would love to find a metal hem gauge but I don't think it is available in Europe. I use strips of cardboard but of course they do not last very long.

Reply
Joanne Banko
8/18/2019 15:54:10

Hi Sis! You are right on target with all your tips. I learned about the brown paper trick way back in fashion school. As far as pressing over something to press hems or creases, some folks like to use no-melt mylar template plastic. It's used for quilting and appliqués. Perhaps you can locate some of that. Thanks so much for sharing all your ideas! It's always great to hear from you :-)

Reply
Sis
8/20/2019 14:31:06

Thanks for the idea of using the heat resistent template plastic. I have used it for applique in the past so will dig deep and see if I still have some otherwise do a search and see if that is available here.

LeAnn Morgan
8/18/2019 06:35:08

One of the best products I ever purchased is the wool pressing mat. It holds heat in as you iron and helps press even the toughest wrinkles. I use it for quilting, sewing and machine embroidery. They are available in a variety of sizes and work great!

Reply
Joanne Banko
8/18/2019 15:56:07

Hi LeAnn! I agree with you about the wool mat. That was a great invention for sure!!! I'm glad you thought to add it to the comments so everyone else would be aware of the option. Take care my friend!

Reply
Jane
8/18/2019 11:27:47

I love my hams and press roll. My husband the, woodworker, made my pointpresser and clapper. I think my most used item is from Nancy Zieman, her Single Fold and Press Guide set. I also use for double folds. Makes it much faster and easier.

Reply
Joanne Banko
8/18/2019 15:59:11

Hi Jane! You are fortunate lady to have a woodworking Hubby! thanks for sharing the idea bout the pressing set. Those were totally new to me! Anything that makes the task easier is a winner in my book. I appreciate your input :-)

Reply
Joann Telzrow
8/18/2019 20:51:05

Good post Joanne! I too liked my point presser and clapper combo but I really like June Tailor’s “Tailor Board”. It has some wonderful curved edges that will accommodate almost any curved pressing need. If you can still find the pads that go with it, I’d get those too. Don’t do much garment sewing any more but this tool still comes in handy for home decor and accessories sewing.

Reply
Joanne Banko
8/18/2019 20:59:20

Hi Joann! So good to hear your thoughts! Yep! I have the Tailor Board AND the pads too! I just didn't think about taking a photo of that set. I did a quick search and it looks like it's still available. You are quite right, the curved edges are wonderful for various shapes on more than just garments. Thanks for leaving such great comments!

Reply
Sheila O'Sulllivan
8/19/2019 16:36:50

Thank you, Joanne, for the info the Reliable irons. It can be very confusing when you look at the variety available for purchase. I too have the roll, ham and pointer from my garment sewing days - and I used them when pressing my clothes in years past - before fabrics became so much more washer/dryer friendly! I need to remember to incorporate them into my pressing of quilt piecing when appropriate.
I have been meaning to buy a hem guage for ages since all slacks seem to be designed for 6' women now and must be shortened by those of us in the non-6' category. 😊 I Very Much enjoy your segments and presentation style on TV and look forward to many, many more!

Reply
Susan Carlisle
8/20/2019 16:34:04

I have used a tailor's ham & sleeve roll for many years & recently bought a clapper. Another of my favorite pressing tools is a two-level mini ironing board that is perfect for sleeves & seams. I've had it for years & have no idea where I got it. It's about 16 inches long by 5 inches wide & shaped like an ironing board with one pointed end. It's the perfect size & shape to handle so many pressing situations.

Reply
Joanne Banko
8/29/2019 12:16:01

Hi Susan! I'm so glad you mentioned the two-level sleeve board. I also have one that is ancient! I believe the newer sleeve boards are just one level, but they come in really handy for lots of sewing situations and intricate garment pressing too. Dritz makes one that is collapsible for storage. So nice to hear from you, thanks for taking the time to comment :-)

Reply
lori
8/21/2019 07:39:41

I attached a small rack at the bottom of my ironing board. I use it to keep my pressing cloths and ham & sleeve rolls. I installed a shelf on the wall over my ironing board. I keep my spray starches and wood pressers there.

Reply
Joanne Banko
8/29/2019 12:07:04

Great ideas Lori! Having everything just where you need it streamlines the pressing process and leads to happy sewing times! Thanks for sharing your thoughts!

Reply
bremda
8/26/2019 01:44:30

so glad to have found your website. we have recently added shelves and exchanged some other furniture for a chest of drawers and a git larger sewing table and added new shelving for all the sewing etc. to convert a closet into my sewing room. i am still trying to figure out the ironing station in there. it is just a bit much to have to go into another room for pressing. YIKES suggestions ?????

Reply
Joanne Banko
8/29/2019 12:02:24

Hi Brenda! Congratulations on getting your sewing space in order! How wonderful it is to have a dedicated space set up for sewing. I understand your "where do I press?" dilemma. In fact, even though I have a spare room dedicated to sewing I don't have an ironing board nearby. My ironing board is a wall unit in my laundry room in the basement and my sewing space is upstairs. I actually prefer it that way as it forces me to get up and move. I feel that the exercise of going up and down stairs is healthy since I tend to sit a lot in front of the machine or computer. However, there are times when I am pressing frequently, and it would be a waste of time and energy to traipse downstairs each and every time. In that case I use a 12" X18" June Tailor Cut and Press board along with a small portable iron I keep upstairs. This setup works for me and could work for you. Another option would be for you to mount an ironing station on the wall or use one of the back of the door type ironing boards. Last but not least, I've seen some small collapsible ironing boards that are attached to a basket of drawers. You may want to do an online or amazon search for one of those. Hope this helps!

Reply
Professional Embroidery Designs link
9/30/2019 01:51:08

such a nice blog , I am really impress your writing skills , we are also work in StitchMax software , it can use to embroidery design and punching use, The Stitchmax Provide best embroidery digitizing service, Stitchmax is a great way to start creating and editing professional embroidery designs on a VERY low budget. Its can Every device support of Windows OS with all versions that is work fast speed and smooth work, website: stitchmax [dot] in

Reply
Wireking link
5/27/2022 02:31:28

Thanks for your sharing. Did you use an ironing board. I think use it wil make the clothes more tidy. https://www.wirekingtrolley.com/product/detail/professional-custom-home-ironing-board.html

Reply


Leave a Reply.

    Picture

    Author:

    Joanne Banko
    Brother Ambassador


    I'd love to stay in touch with you!

    Click Here
    and Sign up for
    ​Sewing News, plus tips, tricks, and notifications about new blog posts.

    Archives

    January 2023
    December 2022
    November 2022
    October 2022
    September 2022
    August 2022
    July 2022
    June 2022
    May 2022
    April 2022
    March 2022
    January 2022
    December 2021
    October 2021
    August 2021
    July 2021
    June 2021
    May 2021
    April 2021
    March 2021
    February 2021
    November 2020
    October 2020
    June 2020
    May 2020
    April 2020
    March 2020
    February 2020
    January 2020
    November 2019
    August 2019
    July 2019
    June 2019
    May 2019
    March 2019
    February 2019
    January 2019
    December 2018
    September 2018
    August 2018
    July 2018
    June 2018
    March 2018
    February 2018
    December 2017
    September 2017
    August 2017
    June 2017
    April 2017
    February 2017
    January 2017
    December 2016
    September 2016
    July 2016
    June 2016
    May 2016
    March 2016
    February 2016
    January 2016
    December 2015
    October 2015
    September 2015
    July 2015
    June 2015
    May 2015
    March 2015
    January 2015
    October 2014
    July 2014
    May 2014
    March 2014
    January 2014

    *As a believer in full disclosure, I'd like you to know that Blog posts may contain affiliate links for products and services I know and trust. Purchasing items through a link marked * results in a small commission for me, with no extra charges for you.

    Categories

    All

    RSS Feed

© Copyright 2022 by Joanne Banko. All rights Reserved